Panasonic PT43LC14 Multi Media Display - Page 41
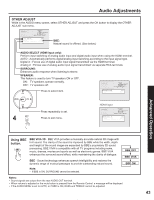
Advanced Operation, Notes, Adjustment, Button, Adjustment Details, H Position, H WIDTH, V SIZE, PHASE - how to remove back of tv
 |
View all Panasonic PT43LC14 manuals
Add to My Manuals
Save this manual to your list of manuals |
Page 41 highlights
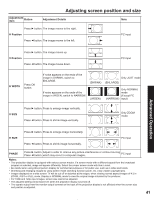
Adjustment item Button Adjusting screen position and size Adjustment Details Note Press ► button. The image moves to the right. H Position Press ◄ button. The image moves to the left. PC input Press ► button. The image moves up. V Position Press ◄ button. The image moves down. PC input H WIDTH Press OK button. If noise appears on the ends of the image in SHRINK, switch to ENLARGE. Only JUST mode (SHRINK) (ENLARGE) If noise appears on the ends of the image in WIDEN, switch to NARROW. (WIDEN) Only NORMAL mode (Except PC (NARROW) input) V SIZE Press ► button. Press to enlarge image vertically. Press ◄ button. Press to shrink image vertically. Only ZOOM mode Advanced Operation H SIZE Press ► button. Press to enlarge image horizontally. Press ◄ button. Press to shrink image horizontally. PC input PHASE Press ► button. Adjust in order to remove any picture interference or Press ◄ button. which may occur in computer images. contour blurring PC input Notes: • This projection display is equipped with various screen modes. If a screen mode with a different aspect from the broadcast program is selected, image will appear differently. Select the proper screen mode with this in mind. • Be careful when using this projection display for commercial purposes or for public use, such as in cafes and hotels. • Shrinking and enlarging images by using screen mode switching function (zoom, etc.) may violate copyright laws. • Images displayed on a wide screen TV will be cut off or distorted at the edges, when viewing normal aspect images of 4:3 in ZOOM, JUST or FULL mode. Display in NORMAL mode to view the original image intended by the producer. • For 1080i and 720p input images, screen size cannot be adjusted. • The adjusted setting will be kept even when the projection display is turned off. • The signals output from the monitor output terminal on the back of the projection display is not affected when the screen size and position is adjusted. 41
-
 1
1 -
2
-
3
-
4
-
5
-
6
-
7
-
8
-
9
-
10
-
11
-
12
-
13
-
14
-
15
-
16
-
17
-
18
-
19
-
20
-
21
-
22
-
23
-
24
-
25
-
26
-
27
-
28
-
29
-
30
-
31
-
32
-
33
-
34
-
35
-
 36
36 -
 37
37 -
 38
38 -
 39
39 -
 40
40 -
 41
41 -
 42
42 -
 43
43 -
 44
44 -
 45
45 -
 46
46 -
47
-
48
-
49
-
50
-
51
-
52
-
53
-
54
-
55
-
56
-
57
-
58
-
59
-
60
-
61
-
62
-
63
-
64
-
65
-
66
-
67
-
68
-
69
-
70
-
71
-
72
-
73
-
74
-
75
-
76
-
77
-
78
-
79
-
80
-
81
-
82
-
83
-
84
-
85
-
86
-
87
-
88
 |
 |
