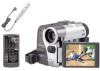
Panasonic PVGS55 PVGS55 User Guide - Page 50
Connecting Computer and, Palmcorder, For Using Built-in SD Drive - software
 |
View all Panasonic PVGS55 manuals
Add to My Manuals
Save this manual to your list of manuals |
Page 50 highlights
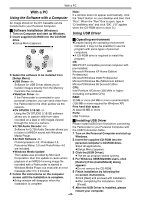
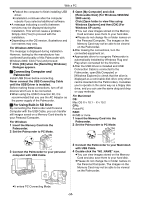
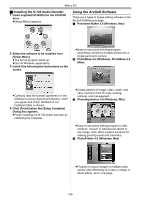
With a PC ≥Reboot the computer to finish installing USB driver. ≥Installation continues after the computer reboots if you selected additional software. ≥A message indicating a conflict between versions may be displayed during the installation. This will not cause a problem. Simply click [Yes] to proceed with the installation. ≥Depending on the OS version, illustrations and icon names may vary. For Windows 2000 Users The message is displayed during installation. However, testing by the manufacturer has confirmed functionality of this Palmcorder with Windows 2000. Click [Yes] and proceed. 7 Click [OK] when the [Restarting Windows] Dialogue appears. ª Connecting Computer and Palmcorder Install USB Driver before connecting. Never connect the USB Connecting Cable until the USB Driver is installed. Before making these connections, turn off all devices which are to be connected. ≥When using the USB Connection Kit, it is recommended that you use the AC Adaptor as the power supply of the Palmcorder. ª For Using Built-in SD Drive By connecting the Palmcorder and Personal Computer with the USB Cable, you can transfer still images saved on a Memory Card directly to your Personal Computer. For Windows 1 Insert the Memory Card into the Palmcorder. 2 Set the Palmcorder to PC Mode. 4 Open [My Computer] and click [Removable Disk] (For Windows 98SE/Me/ 2000 users). Click [Open folder to view files using Windows Explorer] and then [OK] (For Windows XP users). ≥You can view images stored on the Memory Card and also save them to your hard disk. ≥Please do not change file or folder names on the Personal Computer. The images on the Memory Card may not be able to be viewed on the Palmcorder. ≥After making the connections, turn the connected equipment on. ≥Appropriate driver to recognize Palmcorder is automatically installed by Windows Plug and Play when connected for the first time. ≥After the USB Driver is installed and USB Connection Cable is connected to the Palmcorder, open [My Computer] or [Windows Explorer] to check that the drive is displayed as a removable disk drive (only when card is inserted into the Palmcorder). It enables you to operate in the same way as a floppy disk drive, and you can use the same drag and drop or copy methods. For Macintosh OS: Mac OS X v 10.1 - X v 10.2 CPU: PowerPC RAM: 64 MB or more 1 Insert the Memory Card into the Palmcorder. 2 Set the Palmcorder to PC Mode. PC SD SD PC 3 Connect the Palmcorder to your personal computer with USB Cable. 3 Connect the Palmcorder to your Macintosh with USB Cable. 4 Double click the "NO_NAME" icon. ≥You can view images stored on the Memory Card and also save them to your hard disk. ≥Please do not change file or folder names on the Personal Computer. The images on the Memory Card may not be able to be viewed on the Palmcorder. ≥It enters PC Connecting Mode. -50-
-
 1
1 -
2
-
3
-
4
-
5
-
6
-
7
-
8
-
9
-
10
-
11
-
12
-
13
-
14
-
15
-
16
-
17
-
18
-
19
-
20
-
21
-
22
-
23
-
24
-
25
-
26
-
27
-
28
-
29
-
30
-
31
-
32
-
33
-
34
-
35
-
36
-
37
-
38
-
39
-
40
-
41
-
42
-
43
-
44
-
 45
45 -
 46
46 -
 47
47 -
 48
48 -
 49
49 -
 50
50 -
 51
51 -
 52
52 -
 53
53 -
 54
54 -
 55
55 -
56
-
57
-
58
-
59
-
60
-
61
-
62
-
63
-
64
-
65
-
66
-
67
-
68
-
69
-
70
-
71
-
72
-
73
-
74
-
75
-
76
-
77
-
78
-
79
-
80
-
81
-
82
-
83
-
84
-
85
-
86
-
87
-
88
 |
 |
