Panasonic SAPM313 SAPM31 User Guide - Page 12
Timer
 |
View all Panasonic SAPM313 manuals
Add to My Manuals
Save this manual to your list of manuals |
Page 12 highlights
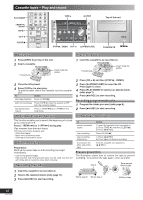
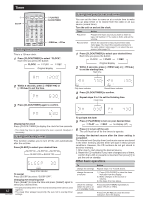
Timer Setting the clock This is a 12-hour clock. 1 Press [CLOCK/TIMER] to select "CLOCK". Each time you press the button: CLOCK ˚ PLAY ˚ REC Original display Using the play or record timer You can set the timer to come on at a certain time to wake you up (play timer) or to record from the radio or an aux source (record timer). Turn the unit on and set the clock. Timer Play timer Record timer Action Prepare the music source you want to listen to; tape, CD number (1~5), radio or AUX, and set the volume. Check the cassette's erasure prevention tabs (refer page 10), insert the cassette and tune to the radio station (refer page 11) or select the aux source (refer page 13). 1 Press [CLOCK/TIMER] to select your desired timer. Each time you press the button: CLOCK ˚ PLAY ˚ REC Original display 2 Within 5 seconds, press [4/REW/ 4] or [3/FF/¢] to set the starting time. Start time 2 Within 5 seconds, press [4/REW/ 4] or [3/FF/¢] to set the time. 3 Press [CLOCK/TIMER] again to confirm. Play timer indicator Record timer indicator 3 Press [CLOCK/TIMER] to confirm. 4 Repeat steps 2 to 3 to set the finishing time. Finish time Displaying the clock Press [CLOCK/TIMER] to display the clock for few seconds. • The clock may lose or gain some time over a period. Readjust if necessary. Using the sleep timer This function enables you to turn off the unit automatically after the set time. Press [SLEEP] to select your desired time. SLEEP 30 SLEEP 60 SLEEP 90 SLEEP OFF SLEEP 120 Sleep timer indicator To cancel Press [SLEEP] to select "SLEEP OFF". Changing the remaining time Press [SLEEP] to show the time and press [SLEEP] again to select your desired time. • The play and sleep timer or the record and sleep timer can be used 12 together. • The sleep timer always has priority. Be sure not to overlap timer RQT7923 settings. To activate the timer 5 Press [˚PLAY/REC] to turn on your desired timer. ˚ PLAY ˚ REC no display (off) 6 Press [y] to turn off the unit. The unit must be off for the timers to operate. To enjoy the desired source after the timer setting is completed. The volume level (for play timer) and music source are stored in the timer memory and the timer will start in these preset conditions. However, the CD numbers do not get stored in the timer memory. 1. After step 5, start playing the desired source. 2. Reset the CD numbers if you have changed any of them, confirm that a CD or cassette is inserted, then press [y] to put the unit on standby. Other basic operations To change the settings change the source or volume check the settings (when the unit is on or in standby mode) cancel Action Repeat steps 1 to 4 and 6 above. 1) Press [˚PLAY/REC] to clear the timer indicator from the display. 2) Make changes to the source or volume. 3) Do steps 5 to 6 as above. Press [CLOCK/TIMER] repeatedly to select ˚PLAY or ˚REC. Press [˚PLAY/REC] to clear the timer indicators from the display.
-
 1
1 -
2
-
3
-
4
-
5
-
6
-
 7
7 -
 8
8 -
 9
9 -
 10
10 -
 11
11 -
 12
12 -
 13
13 -
 14
14 -
 15
15 -
 16
16
 |
 |
