Panasonic SAPT480 SAPT480 User Guide - Page 16
Changing the player settings - remote codes
 |
View all Panasonic SAPT480 manuals
Add to My Manuals
Save this manual to your list of manuals |
Page 16 highlights
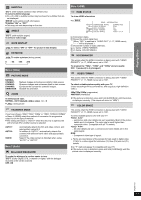
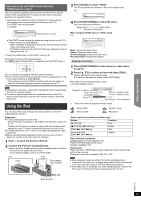
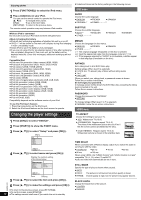
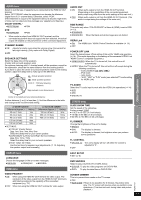
Reference Other Operations Playing Discs Getting Started Enjoying photos 1 Press [FUNCTIONS]D to select the iPod menu. 2 Play a slideshow on your iPod. You can use the remote control to operate the iPod menu. [3, 4]9: To navigate menu items. [OK]9: To go to the next menu. [RETURN]E: To return to the previous menu. The remote control operation may vary between iPod models. While an iPod is connected Do not push or pull your iPod back and forth with great force. About recharging the battery ≥ iPod will start recharging regardless of whether this unit is on or off. ≥ "IPOD ¢" will be shown on the main unit's display during iPod charging in main unit standby mode. ≥ Check iPod to see if the battery is fully recharged. ≥ If you are not using iPod for an extended period of time after recharging has completed, disconnect it from main unit, as the battery will be depleted naturally. (Once fully recharged, additional recharging will not occur.) Compatible iPod ≥ iPod nano 5th generation (video camera) (8GB, 16GB) ≥ iPod touch 2nd generation (8GB, 16GB, 32GB, 64GB) ≥ iPod classic [120GB, 160GB (2009)] ≥ iPod nano 4th generation (video) (8GB, 16GB) ≥ iPod classic [160GB (2007)] ≥ iPod touch 1st generation (8GB, 16GB, 32GB) ≥ iPod nano 3rd generation (video) (4GB, 8GB) ≥ iPod classic (80GB) ≥ iPod nano 2nd generation (aluminum) (2GB, 4GB, 8GB) ≥ iPod 5th generation (video) (60GB, 80GB) ≥ iPod 5th generation (video) (30GB) ≥ iPod nano 1st generation (1GB, 2GB, 4GB) ≥ iPod 4th generation (color display) (40GB, 60GB) ≥ iPod 4th generation (color display) (20GB, 30GB) ≥ iPod 4th generation (40GB) ≥ iPod 4th generation (20GB) ≥ iPod mini (4GB, 6GB) Compatibility depends on the software version of your iPod. To use the iPod touch features 1 Press the Home button on the iPod touch. 2 Select the iPod touch features on the touch screen to operate. Changing the player settings 1 Press [DVD]5 to select "DVD/CD". 2 Press [START]C to show the START menu. 3 Press [3, 4]9 to select "Setup" and press [OK]9. Menu MAIN DISC VIDEO AUDIO DISPLAY HDMI OTHERS SET RETURN 4 Press [3, 4]9 to select menu and press [OK]9. Display the current setting of the items below DISC CURRENT SETTINGS AUDIO SUBTITLE MENUS RATINGS PASSWORD ENGLISH AUTO ENGLISH 8 NO LIMIT SET RETURN Item Setting 5 Press [3, 4]9 to select the item and press [OK]9. RQTX1101 6 Press [3, 4]9 to make the settings and press [OK]9. ≥ To return to the previous screen, press [RETURN]E. 16 ≥ To exit the screen, press [START]C. ≥ The settings remain intact even if you switch the unit to standby. ≥ Underlined items are the factory settings in the following menus. DISC menu AUDIO Choose the audio language. ≥ ENGLISH ≥ FRENCH ≥ SPANISH ≥ ORIGINAL§1 ≥ OTHER - - - -§2 SUBTITLE Choose the subtitle language. ≥ AUTO§3 ≥ ENGLISH ≥ OTHER - - - -§2 ≥ FRENCH ≥ SPANISH MENUS Choose the language for disc menus. ≥ ENGLISH ≥ FRENCH ≥ SPANISH ≥ OTHER - - - -§2 §1 The original language designated on the disc is selected. §2 Input the appropriate code from the language code list (B 19). §3 If the language selected for "AUDIO" is not available, subtitles appear in that language (if available on the disc). RATINGS Set a rating level to limit DVD-Video play. Setting ratings (When level 8 is selected) ≥ 0 LOCK ALL: To prevent play of discs without rating levels. ≥ 1 to 7 ≥ 8 NO LIMIT When you select your ratings level, a password screen is shown. Follow the on-screen instructions. Do not forget your password. A message screen will be shown if a DVD-Video disc exceeding the rating level is inserted in the unit. Follow the on-screen instructions. PASSWORD Change the password for "RATINGS". ≥ SETTING To change ratings (When level 0 to 7 is selected) ≥ CHANGE: Follow the on-screen instructions. VIDEO menu TV ASPECT Choose the setting to suit your TV. ≥ 16:9: Widescreen TV (16:9) ≥ 4:3PAN&SCAN: Regular aspect TV (4:3) The sides of the widescreen picture are cut off so it fills the screen (unless prohibited by the disc). ≥ 4:3LETTERBOX: Regular aspect TV (4:3) Widescreen picture is shown in the letterbox style. TIME DELAY When connected with a Plasma display, adjust if you notice the audio is out of sync with the video. ≥ 0 ms/AUTO ≥ 20 ms ≥ 40 ms ≥ 60 ms ≥ 80 ms ≥ 100 ms When using VIERA Link "HDAVI Control" with "HDAVI Control 3 or later" compatible TV (B 14), select "0 ms/AUTO". Audio and video will automatically be set in sync. STILL MODE Specify the type of picture shown when paused. ≥ AUTO ≥ FIELD: The picture is not blurred, but picture quality is lower. ≥ FRAME: Overall quality is high, but the picture may appear blurred. BLACK LEVEL Change the black level of the picture. ≥ LIGHTER ≥ DARKER
-
 1
1 -
2
-
3
-
4
-
5
-
6
-
7
-
8
-
9
-
10
-
 11
11 -
 12
12 -
 13
13 -
 14
14 -
 15
15 -
 16
16 -
 17
17 -
 18
18 -
 19
19 -
 20
20 -
 21
21 -
22
-
23
-
24
-
25
-
26
 |
 |