Panasonic SC-CMAX5 SC-CMAX5 Operating Manual - Page 12
External equipment
 |
View all Panasonic SC-CMAX5 manuals
Add to My Manuals
Save this manual to your list of manuals |
Page 12 highlights
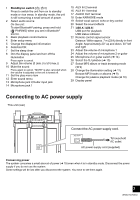
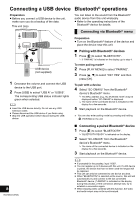
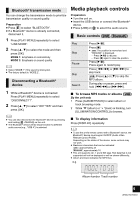
Play timer You can set the timer to come on at a certain time to wake you up. Preparation Set the clock. 1 Press [SETUP] repeatedly to select "TIMER ADJ". 2 Press [3, 4] to select "FPLAY" and then press [OK]. 3 Press [3, 4] to set the starting time and then press [OK]. 4 Press [3, 4] to set the finishing time and then press [OK]. 5 Press [3, 4] to select the music source§ you want to play and then press [OK]. Turning the timer on 1 Prepare the music source you want to listen to (USB or external equipment) and set the volume. 2 Press [SETUP] repeatedly to select "TIMER SET". 3 Press [3, 4] to select "PLAY ON" and then press [OK]. ≥ "FPLAY" is displayed. ≥ To turn the timer off, press [3, 4] to clear "FPLAY", and then press [OK]. 4 Press [Í] to turn the unit to standby mode. (For the timer to operate, the unit must be turned off before the timer start time.) To check the setting 1 Press [SETUP] repeatedly to select "TIMER ADJ". 2 Press [3, 4] to select "FPLAY" and then press [OK]. (During standby, press [DISPLAY] twice.) ≥ The play timer starts at a low volume and increases gradually to the preset level. ≥ The timer comes on at the set time every day if the timer is on. ≥ If you switch off the system and switch on again while a timer is in operation, the timer will not stop at the end time. § The following can be set as the music source. "AUX 1", "AUX 2", "USB A", "USB B" External equipment Preparation ≥ Disconnect the AC power supply cord. ≥ Switch off all equipment and read the appropriate operating instructions. Using a VCR and DVD player etc. You can connect a VCR and DVD player etc. and listen to the audio through this system. e.g. This unit (rear) DVD player (not supplied) Audio cable (not supplied) 1 Connect an external equipment using an audio cable (not supplied). 2 Press [AUX] to select "AUX 1" and start playback on the connected device. ≥ If you want to connect equipment other than those described, refer to the audio dealer. ≥ Sound distortion can occur when you use an adaptor. 12 RQT0A53 (ENG)
-
 1
1 -
2
-
3
-
4
-
5
-
6
-
 7
7 -
 8
8 -
 9
9 -
 10
10 -
 11
11 -
 12
12 -
 13
13 -
 14
14 -
 15
15 -
 16
16 -
 17
17 -
18
-
19
-
20
-
21
-
22
 |
 |
