Panasonic SC-CMAX5 SC-CMAX5 Operating Manual - Page 7
Connecting to AC power supply - bluetooth
 |
View all Panasonic SC-CMAX5 manuals
Add to My Manuals
Save this manual to your list of manuals |
Page 7 highlights
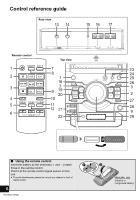
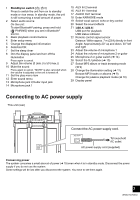
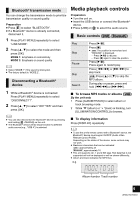
1 Standby/on switch [Í], [Í/I] Press to switch the unit from on to standby mode or vice versa. In standby mode, the unit is still consuming a small amount of power. 2 Select audio source On the unit: To start Bluetooth® pairing, press and hold [ -PAIRING] when you are in Bluetooth® source. 3 Basic playback control buttons 4 Enter setup menu 5 Change the displayed information 6 Selection/OK 7 Set the sleep timer 8 Dim the display panel and turn off the illumination Press again to cancel. 9 Adjust the volume (0 (min.) to 50 (max.)) 10 Mute the sound Press again to cancel. "MUTE" is also canceled when the volume is adjusted or the unit is turned off. 11 Set the play menu item 12 Enter sound menu 13 Microphone jack 2/Guitar input jack 14 Microphone jack 1 15 AUX IN 2 terminal 16 AUX IN 1 terminal 17 AUDIO OUT terminal 18 Enter KARAOKE mode 19 Select vocal cancel, echo or key control 20 Select the sound effects 21 [USB\A] [USB\B] USB port for playback USB status indicator 22 Remote control signal sensor Distance: Within approx. 7 m (23 ft) directly in front Angle: Approximately 20° up and down, 30° left and right 23 Adjust the volume of microphone 1 24 Adjust the volume of microphone 2 or guitar 25 Microphone 2 or guitar switch (l 14) 26 Select the DJ jukebox (l 10) 27 Select MP3 album or track browsing mode (l 9) 28 Change the illumination setting (l 11) Browse MP3 tracks or albums (l 9) Change DJ jukebox playback mode (l 10) 29 Display panel Connecting to AC power supply This unit (rear) Connect the AC power supply cord. To household AC outlet AC power supply cord (supplied) Conserving power The system consumes a small amount of power (l 19) even when it is in standby mode. Disconnect the power supply if you do not use the system. Some settings will be lost after you disconnect the system. You have to set them again. 7 (ENG) RQT0A53
-
 1
1 -
 2
2 -
 3
3 -
 4
4 -
 5
5 -
 6
6 -
 7
7 -
 8
8 -
 9
9 -
 10
10 -
 11
11 -
 12
12 -
13
-
14
-
15
-
16
-
17
-
18
-
19
-
20
-
21
-
22
 |
 |
