Panasonic SC-HTB880 SC-HTB880 Owner's Manual (English) - Page 24
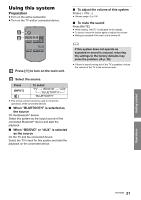
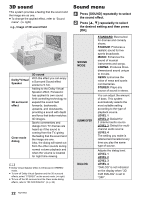
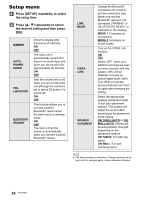
Setup menu, Press [SETUP] repeatedly to select, the setup item., Press, repeatedly to select
 |
View all Panasonic SC-HTB880 manuals
Add to My Manuals
Save this manual to your list of manuals |
Page 24 highlights
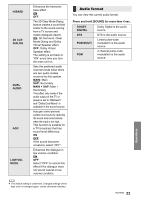
Setup menu Press [SETUP] repeatedly to select the setup item. Press [3, 4] repeatedly to select the desired setting and then press [OK]. DIMMER AUTO POWER DOWN VOL LIMITATION BLUETOOTH STANDBY Dims the display after 5 seconds of inactivity. ON OFF The main unit is automatically turned off if there is no audio input and when you do not use it for approximately 20 minutes. ON OFF Sets the volume limit to 50 when you turn on the main unit although the volume is set to above 50 before it is turned off. ON OFF This function allows you to connect a paired Bluetooth® device when the main unit is in standby mode. ON OFF The main unit will be turned on automatically when you connect a paired Bluetooth® device. LINK MODE VIERA LINK SPEAKER PLACEMENT Change the Bluetooth® connection link mode to suit the connection type. Make sure that the Bluetooth® device is not connected ("PAIRING" or "BLUETOOTH READY" is indicated on the display). MODE 1: Emphasis on connectivity. MODE 2: Emphasis on sound quality. Turn on the VIERA Link function. ON OFF Select "OFF" when your HDAVI Control device does not work correctly with this system. ARC will be disabled. Connect an optical digital audio cable. Turn off all connected devices and then turn them on again after changing the setting. Select the appropriate speaker placement mode to suit your placement method. This system will adjust the sound effect according to the placement mode setting. ON TABLE-AUTO or ON WALL-AUTO: Setting will be automatically changed depending on the placement method. ON TABLE: For table top layout ON WALL: For wall mounting layout ≥ The default setting is underlined. Changed settings will be kept until it is changed again, unless otherwise indicated. 24 RQT9903
-
 1
1 -
2
-
3
-
4
-
5
-
6
-
7
-
8
-
9
-
10
-
11
-
12
-
13
-
14
-
15
-
16
-
17
-
18
-
 19
19 -
 20
20 -
 21
21 -
 22
22 -
 23
23 -
 24
24 -
 25
25 -
 26
26 -
 27
27 -
 28
28 -
 29
29 -
30
-
31
-
32
-
33
-
34
 |
 |
