Panasonic SDR-H80-S Sd/hdd Camcorder - Page 13
Preparation, Before using - manual
 |
UPC - 037988982165
View all Panasonic SDR-H80-S manuals
Add to My Manuals
Save this manual to your list of manuals |
Page 13 highlights
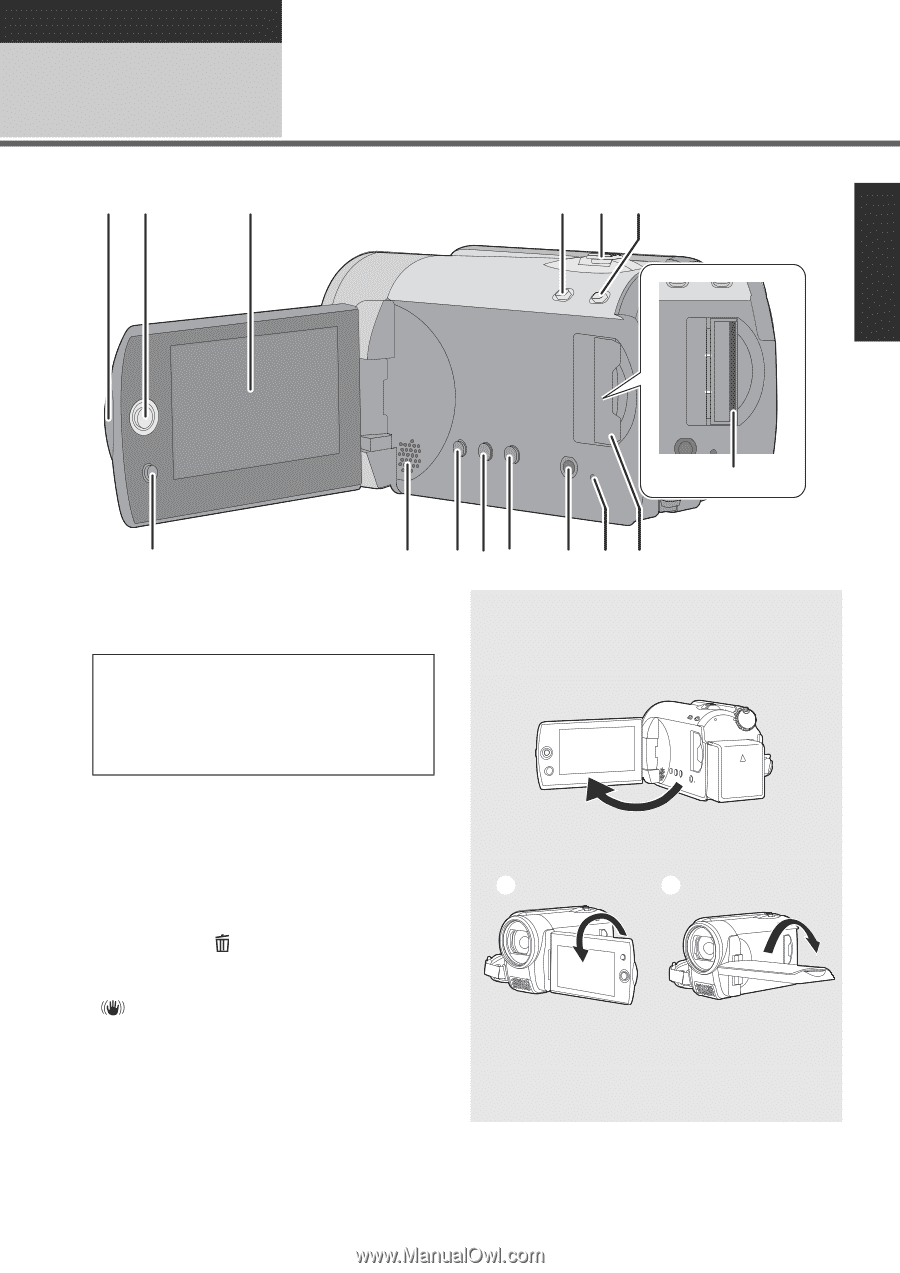
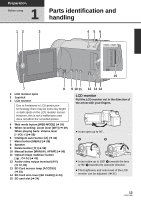
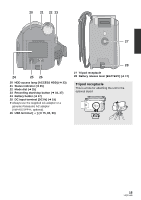
Preparation Before using 1 Parts identification and handling 12 3 4 56 15 7 8 1 LCD monitor open 2 Joystick 3 LCD monitor Due to limitations in LCD production technology, there may be some tiny bright or dark spots on the LCD monitor screen. However, this is not a malfunction and does not affect the recorded picture. 4 Web mode button [WEB MODE] (l 35) 5 When recording: Zoom lever [W/T] (l 39) When playing back: Volume lever [sVOLr] (l 55) 6 Intelligent auto button [iA] (l 32) 7 Menu button [MENU] (l 26) 8 Speaker 9 Delete button [ ] (l 59) 10 Manual button [MANUAL AF/MF] (l 50) 11 Optical image stabilizer button [ , O.I.S.] (l 41) 12 Audio-video output terminal [A/V] (l 72, 81) 13 SD Card access lamp [ACCESS] (l 23) 14 SD Card slot cover [SD CARD] (l 24) 15 SD card slot (l 24) 9 10 11 12 13 14 LCD monitor Pull the LCD monitor out in the direction of the arrow with your fingers. ≥ It can open up to 90o. ≥ It can rotate up to 180o A towards the lens or 90o B towards the opposite direction. ≥ The brightness and color level of the LCD monitor can be adjusted. (l 31) 13 LSQT1449
-
 1
1 -
2
-
3
-
4
-
5
-
6
-
7
-
 8
8 -
 9
9 -
 10
10 -
 11
11 -
 12
12 -
 13
13 -
 14
14 -
 15
15 -
 16
16 -
 17
17 -
 18
18 -
19
-
20
-
21
-
22
-
23
-
24
-
25
-
26
-
27
-
28
-
29
-
30
-
31
-
32
-
33
-
34
-
35
-
36
-
37
-
38
-
39
-
40
-
41
-
42
-
43
-
44
-
45
-
46
-
47
-
48
-
49
-
50
-
51
-
52
-
53
-
54
-
55
-
56
-
57
-
58
-
59
-
60
-
61
-
62
-
63
-
64
-
65
-
66
-
67
-
68
-
69
-
70
-
71
-
72
-
73
-
74
-
75
-
76
-
77
-
78
-
79
-
80
-
81
-
82
-
83
-
84
-
85
-
86
-
87
-
88
-
89
-
90
-
91
-
92
-
93
-
94
-
95
-
96
-
97
-
98
-
99
-
100
-
101
-
102
-
103
-
104
-
105
-
106
-
107
-
108
-
109
-
110
-
111
-
112
-
113
-
114
-
115
-
116
-
117
-
118
-
119
-
120
-
121
-
122
-
123
-
124
 |
 |