Panasonic SDR-SW21 Sd Movie Camera - Multi Language - Page 25
Inserting/Removing SD cards (sold separately
 |
UPC - 037988982912
View all Panasonic SDR-SW21 manuals
Add to My Manuals
Save this manual to your list of manuals |
Page 25 highlights
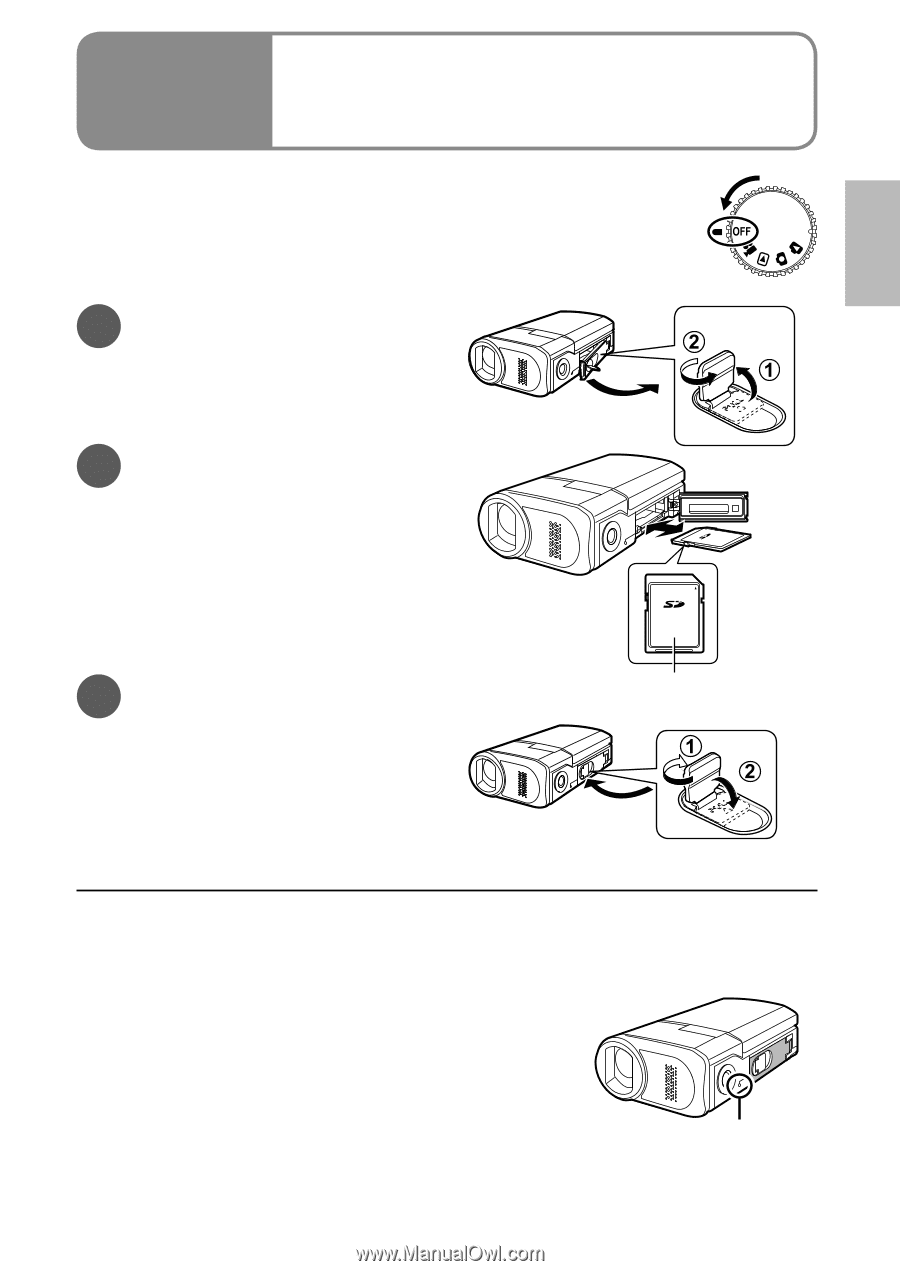
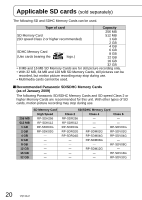
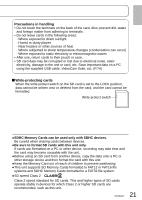
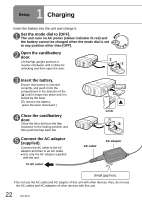
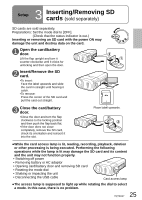
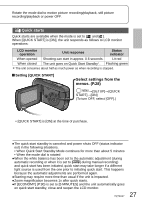
3 Setup Inserting/Removing SD cards (sold separately) SD cards are sold separately. Preparations: Set the mode dial to [OFF]. (Check that the status indicator is out.) Inserting or removing an SD card with the power ON may damage the unit and destroy data on the card. 1 Open the card/battery door. Lift the flap upright and turn it counter-clockwise until it clicks for unlocking and then open the door. 2 Insert/Remove the SD card. •To insert: Face the label upwards and slide the card in straight until hearing it catch. •To remove: Press the center of the SD card and pull the card out straight. 3 Close the card/battery door. •Close the door and turn the flap clockwise to the locking position and then push the flap back flat. •If the door does not close completely, remove the SD card, check its orientation and reinsert it into the slot. Place label upwards. ●While the card access lamp is lit, reading, recording, playback, deletion or other processing is being executed. Performing the following operations while the lamp is lit may damage the SD card and its content and the unit may not function properly. • Switching off power • Removing battery or AC adaptor • Opening card/battery door and removing SD card • Rotating the mode dial • Shaking or impacting the unit • Disconnecting the USB cable Card access lamp ●The access lamp is supposed to light up while rotating the dial to select a mode. In this case, there is no problem. 25 VQT2A17
-
 1
1 -
2
-
3
-
4
-
5
-
6
-
7
-
8
-
9
-
10
-
11
-
12
-
13
-
14
-
15
-
16
-
17
-
18
-
19
-
 20
20 -
 21
21 -
 22
22 -
 23
23 -
 24
24 -
 25
25 -
 26
26 -
 27
27 -
 28
28 -
 29
29 -
 30
30 -
31
-
32
-
33
-
34
-
35
-
36
-
37
-
38
-
39
-
40
-
41
-
42
-
43
-
44
-
45
-
46
-
47
-
48
-
49
-
50
-
51
-
52
-
53
-
54
-
55
-
56
-
57
-
58
-
59
-
60
-
61
-
62
-
63
-
64
-
65
-
66
-
67
-
68
-
69
-
70
-
71
-
72
-
73
-
74
-
75
-
76
-
77
-
78
-
79
-
80
-
81
-
82
-
83
-
84
-
85
-
86
-
87
-
88
-
89
-
90
-
91
-
92
-
93
-
94
-
95
-
96
-
97
-
98
-
99
-
100
-
101
-
102
-
103
-
104
-
105
-
106
-
107
-
108
-
109
-
110
-
111
-
112
-
113
-
114
-
115
-
116
-
117
-
118
-
119
-
120
 |
 |