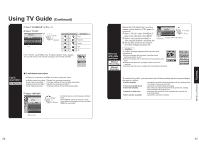
Panasonic TH-42PX600U 42" Plasma Tv - Page 16
Displaying Pc Screen On Tv - picture settings
 |
UPC - 037988241033
View all Panasonic TH-42PX600U manuals
Add to My Manuals
Save this manual to your list of manuals |
Page 16 highlights
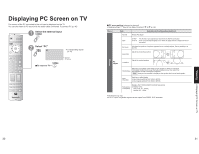
Displaying PC Screen on TV The screen of the PC connected to the unit can be displayed on the TV. You can also listen to PC sound with the audio cable connected. To connect PC (p. 46) 1 Select the external input 2 Select "PC" PC ŶTo return to TV •Corresponding signals (p. 29) Displays PC screen ŶPC menu setting (changed as desired) •Making settings "How to Use Menu Functions" Menu Item to (p. 32) Adjustments/Configurations(options) Normal Sync Resets PC adjust H&V : The H and V sync signals are input from the HD/VD connector. ••On G : Uses a synchronized signal on the Video G signal, which is input from the G connector. Dot clock Alleviates the problem if a picture appears to be vertically-striped, flickers partially or is blurred. H-position Adjust the horizontal position. Picture PC adjust V-position Adjust the vertical position. Clock phase Alleviates the problem if the whole picture appears to flicker or is blurred. First adjust the Dot Clock to get the best possible picture, then adjust the Clock Phase so that a clear picture appears. Note It may not be possible to display a clear picture due to poor input signals. Input resolution Switches to wide display. Input signal switched from VGA to WVGA ••Input signal switched from XGA to WXGA H-frequency V-frequency •Displays the H (Horizontal)/V (Vertical) frequencies. Display range Horizontal: 15 - 110kHz Vertical: 48 - 120Hz ••Audio menu (p. 32) For PC input, only audio signals can be output from PROG. OUT terminals. Viewing Displaying PC Screen on TV 30 31
-
 1
1 -
2
-
3
-
4
-
5
-
6
-
7
-
8
-
9
-
10
-
 11
11 -
 12
12 -
 13
13 -
 14
14 -
 15
15 -
 16
16 -
 17
17 -
 18
18 -
 19
19 -
 20
20 -
 21
21 -
22
-
23
-
24
-
25
-
26
-
27
-
28
-
29
-
30
-
31
-
32
-
33
-
34
-
35
 |
 |
