Panasonic TH-L32C10 User Manual - Page 16
Watching Videos and DVDs
 |
View all Panasonic TH-L32C10 manuals
Add to My Manuals
Save this manual to your list of manuals |
Page 16 highlights
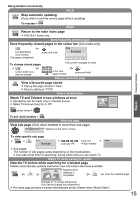
Watching Videos and DVDs Connect the external equipment (VCRs, DVD equipment, etc.) and you can watch the input. To connect the equipment p. 9 You can operate some functions of selected Panasonic external equipment with this remote control. 1 Display the Input Selection menu 2 Select the input mode of the connected equipment Input Selection 2 change AV1 AV2 PC HDMI1 *2 HDMI2 1 select TV *2) For TH-L32C12K only: "HDMI1" will be displayed as "HDMI" and "HDMI2" is not displayed. You can also select the input using the AV button on the side panel of the TV. Press the button repeatedly until the desired input is selected. You can label or skip each input mode "Input Labels" (p. 22) 3 View Displays the selected mode To return to TV Note If the external equipment has an aspect adjustment function, set to "16:9". For details, see the manual of the equipment or ask your local dealer. 16
-
 1
1 -
2
-
3
-
4
-
5
-
6
-
7
-
8
-
9
-
10
-
 11
11 -
 12
12 -
 13
13 -
 14
14 -
 15
15 -
 16
16 -
 17
17 -
 18
18 -
 19
19 -
 20
20 -
 21
21 -
22
-
23
-
24
-
25
-
26
-
27
-
28
-
29
-
30
-
31
-
32
-
33
-
34
-
35
-
36
-
37
-
38
-
39
-
40
-
41
-
42
-
43
-
44
-
45
-
46
-
47
-
48
-
49
-
50
-
51
-
52
 |
 |
