Panasonic VDR D100 Dvd Camcorder-english/spanish - Page 38
Setting Date And Time, Clock Set]
 |
UPC - 037988980192
View all Panasonic VDR D100 manuals
Add to My Manuals
Save this manual to your list of manuals |
Page 38 highlights
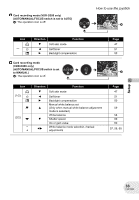
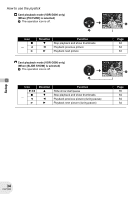
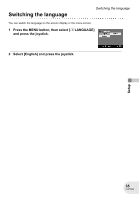
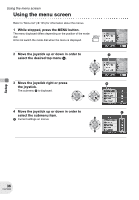
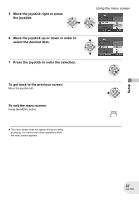
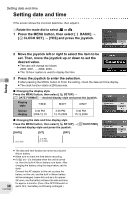
Setting date and time Setting date and time If the screen shows the incorrect date/time, then adjust it. ¬ Rotate the mode dial to select or . 1 Press the MENU button, then select [ BASIC] # [ CLOCK SET] # [YES] and press the joystick. Setup 2 Move the joystick left or right to select the item to be set. Then, move the joystick up or down to set the desired value. ≥ The year will change as follows: 2000, 2001, ..., 2099, 2000, ... ≥ The 12-hour system is used to display the time. 3 Press the joystick to enter the selection. ≥ After pressing the MENU button to finish the setting, check the date and time display. ≥ The clock function starts at [00] seconds. ∫ Changing the display style Press the MENU button, then select [ SETUP] # [ DATE FORMAT] # desired display style and press the joystick. Display style Y/M/D M/D/Y D/M/Y Screen display 3:30 PM 2006.12.15 3:30 PM 12.15.2006 3:30 PM 15.12.2006 ∫ Changing the date and time display style Press the MENU button, then select [ SETUP] # [ # desired display style and press the joystick. [DATE] [D/T] [OFF] DATE/TIME] 12.15.2006 3:30 PM 12.15.2006 38 LSQT0969 ≥ The date and time function are driven by a built-in lithium battery. ≥ Make sure to check the time before recording. ≥ If [0] or [- -] is indicated when this unit is turned on, then the built-in lithium battery runs down. After charging the battery using the steps below, set the clock. Connect the AC adaptor to this unit or place the battery on this unit, and the built-in lithium battery will be recharged. Leave this unit as is for approx. 24 hours, and the battery will save the date and time for approx. 6 months. (Even if the OFF/ON switch is set to OFF, the battery is still being recharged.)
-
 1
1 -
2
-
3
-
4
-
5
-
6
-
7
-
8
-
9
-
10
-
11
-
12
-
13
-
14
-
15
-
16
-
17
-
18
-
19
-
20
-
21
-
22
-
23
-
24
-
25
-
26
-
27
-
28
-
29
-
30
-
31
-
32
-
 33
33 -
 34
34 -
 35
35 -
 36
36 -
 37
37 -
 38
38 -
 39
39 -
 40
40 -
 41
41 -
 42
42 -
 43
43 -
44
-
45
-
46
-
47
-
48
-
49
-
50
-
51
-
52
-
53
-
54
-
55
-
56
-
57
-
58
-
59
-
60
-
61
-
62
-
63
-
64
-
65
-
66
-
67
-
68
-
69
-
70
-
71
-
72
-
73
-
74
-
75
-
76
-
77
-
78
-
79
-
80
-
81
-
82
-
83
-
84
-
85
-
86
-
87
-
88
-
89
-
90
-
91
-
92
-
93
-
94
-
95
-
96
-
97
-
98
-
99
-
100
-
101
-
102
-
103
-
104
-
105
-
106
-
107
-
108
-
109
-
110
-
111
-
112
-
113
-
114
-
115
-
116
-
117
-
118
-
119
-
120
-
121
-
122
-
123
-
124
-
125
-
126
-
127
-
128
-
129
-
130
-
131
-
132
-
133
-
134
-
135
-
136
-
137
-
138
-
139
-
140
-
141
-
142
-
143
-
144
-
145
-
146
-
147
-
148
-
149
-
150
-
151
-
152
-
153
-
154
-
155
-
156
-
157
-
158
-
159
-
160
 |
 |
