Panasonic VDR D100 Dvd Camcorder-english/spanish - Page 41
Recording Motion Pictures - a v cables
 |
UPC - 037988980192
View all Panasonic VDR D100 manuals
Add to My Manuals
Save this manual to your list of manuals |
Page 41 highlights
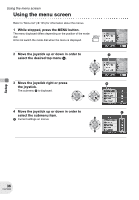
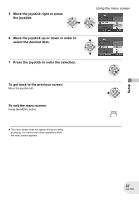
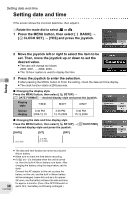
Recording motion pictures Recording motion pictures Record motion pictures onto a disc. (RAM) (-RW‹VR›) (-RW‹V›) (-R) 1 Remove the lens cap, then turn the unit on. If the unit is turned on with the lens cap fitted, the automatic white balance adjustment may not function properly. 2 Rotate the mode dial to select . 3 Press the recording start/stop button to start recording. Recording To end the recording Press the recording start/stop button again to pause recording. ≥ [¥] and [;] are red during recording. Do not move this unit until [;] is green. ≥ The images recorded between pressing the recording start/stop button to start recording and pressing it again to pause recording become one scene. ≥ When about 5 minutes has passed without any operation, this unit automatically turns off to prevent the battery from running down. When you use this unit, turn it on again. This setting can also be set to [OFF]. (l 127, POWER SAVE) ≥ The maximum number of scenes on a disc (per side): 999 (Even if there is remaining capacity for recording on a disc, you may not be able to record 999 scenes.) ≥ While "WRITING THE INFORMATION ON THE DISC." is displayed, do not disconnect the AC cable or remove the battery as doing so may make the disc unusable. ≥ Sound is recorded in Dolby Digital from the internal stereo microphone on the front of the unit. Take care not to block this microphone. ≥ Each time the unit enters the recording pause mode, the counter display will be reset to "0h00m00s". 41 LSQT0969
-
 1
1 -
2
-
3
-
4
-
5
-
6
-
7
-
8
-
9
-
10
-
11
-
12
-
13
-
14
-
15
-
16
-
17
-
18
-
19
-
20
-
21
-
22
-
23
-
24
-
25
-
26
-
27
-
28
-
29
-
30
-
31
-
32
-
33
-
34
-
35
-
 36
36 -
 37
37 -
 38
38 -
 39
39 -
 40
40 -
 41
41 -
 42
42 -
 43
43 -
 44
44 -
 45
45 -
 46
46 -
47
-
48
-
49
-
50
-
51
-
52
-
53
-
54
-
55
-
56
-
57
-
58
-
59
-
60
-
61
-
62
-
63
-
64
-
65
-
66
-
67
-
68
-
69
-
70
-
71
-
72
-
73
-
74
-
75
-
76
-
77
-
78
-
79
-
80
-
81
-
82
-
83
-
84
-
85
-
86
-
87
-
88
-
89
-
90
-
91
-
92
-
93
-
94
-
95
-
96
-
97
-
98
-
99
-
100
-
101
-
102
-
103
-
104
-
105
-
106
-
107
-
108
-
109
-
110
-
111
-
112
-
113
-
114
-
115
-
116
-
117
-
118
-
119
-
120
-
121
-
122
-
123
-
124
-
125
-
126
-
127
-
128
-
129
-
130
-
131
-
132
-
133
-
134
-
135
-
136
-
137
-
138
-
139
-
140
-
141
-
142
-
143
-
144
-
145
-
146
-
147
-
148
-
149
-
150
-
151
-
152
-
153
-
154
-
155
-
156
-
157
-
158
-
159
-
160
 |
 |
