Panasonic WJ-ND400K Setup Information - Page 24
[CAM] tab, Zoom] box, Focus] box, Auto mode] box, Control pad/buttons, Brightness] box, Preset] box
 |
View all Panasonic WJ-ND400K manuals
Add to My Manuals
Save this manual to your list of manuals |
Page 24 highlights
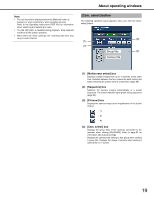
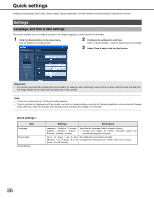
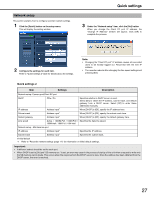
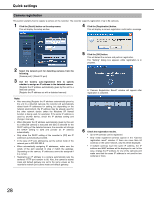
About operating windows [CAM] tab The camera can be controlled (pan/tilt, zoom, focus, brightness, preset, auto mode) when the live image is from a camera that can pan and tilt. Some camera operations cannot be done depending on the type of camera connected. (1) (3) (4) (5) (2) (6) (1) [Zoom] box Click [-] or [+] to adjust the zoom. Click [x1] to return the zoom to normal. (2) [Focus] box Click [Near] or [Far] to adjust the image focus. Click [Auto] to adjust the focus automatically (auto focus). (3) [Auto mode] box Select the camera's auto mode function. Click [V] and select an auto mode function (auto track, auto pan, preset sequence, sort, patrol), and then click [Start]. Click [Stop] to turn off the auto mode function. (4) Control pad/buttons Click the buttons on the control pad to move the camera to the direction of the button (pan/tilt). Also, click in the control pad to adjust the horizontal/vertical position (pan/tilt) of the image. The pan/tilt movement increases if a clicked point gets farther from the center point of the control pad. (5) [Brightness] box Click [-] (Dark) or [+] (Bright) to adjust the lens iris (brightness). Click [Reset] to reset the brightness. (6) [Preset] box [Go] button The camera moves to the pre-registered preset position. Click [V], select a preset number ([Home], 1 to 256), and then click [Go]. To perform the preset operation, register the camera's preset positions in advance. [Set] button Register preset positions that specify the direction of the camera. Move the camera to the direction to register, click [V], select a preset number (1 to 256), and then click [Set] ([Home] cannot be registered.). 24
-
 1
1 -
2
-
3
-
4
-
5
-
6
-
7
-
8
-
9
-
10
-
11
-
12
-
13
-
14
-
15
-
16
-
17
-
18
-
 19
19 -
 20
20 -
 21
21 -
 22
22 -
 23
23 -
 24
24 -
 25
25 -
 26
26 -
 27
27 -
 28
28 -
 29
29 -
30
-
31
-
32
-
33
-
34
-
35
-
36
-
37
-
38
-
39
-
40
-
41
-
42
-
43
-
44
-
45
-
46
-
47
-
48
-
49
-
50
-
51
-
52
-
53
-
54
-
55
-
56
-
57
-
58
-
59
-
60
-
61
-
62
-
63
-
64
-
65
-
66
-
67
-
68
-
69
-
70
-
71
-
72
-
73
-
74
-
75
-
76
-
77
-
78
-
79
-
80
-
81
-
82
-
83
-
84
-
85
-
86
-
87
-
88
-
89
-
90
-
91
-
92
-
93
-
94
-
95
-
96
-
97
-
98
-
99
-
100
-
101
-
102
 |
 |
