Panasonic WJ-ND400K Setup Information - Page 72
Hosts, Host settings
 |
View all Panasonic WJ-ND400K manuals
Add to My Manuals
Save this manual to your list of manuals |
Page 72 highlights
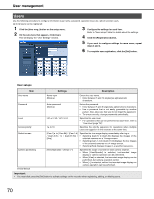
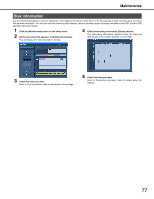
User management Hosts The following procedure is to register information for PCs (hosts) that can access the camera over a network. Up to 32 hosts can be registered. 1 Click the [User mng.] button on the setup menu. 2 On the sub-menu that appears, click [Host]. This will display the "Host setting" window. 3 Configure the settings for each item. Refer to "Host settings" table for details about the settings. 4 Click the [Set] button. Host settings Item Settings Description Host IP address Level Access priority Default screen Camera partitioning ♦Initial default Address input (Blank♦) Enter the IP address. • Enter single-byte numerals in the range of 0 to 255. • You can use the "*" special character to represent any number. • "0.0.0.0" or "*.*.*.*" cannot be registered. LV1♦ / LV2 / LV3 / LV4 Specifies the user level. • For operations that can be performed at each level, refer to "User level (page 74)". 1♦ to 16 Specifies the priority sequence for operations when multiple users are logged in on the recorder at the same time. [Cam.1]♦ to [Cam.64] / [Cam.1-4] / [Cam.5-8] / to / [Cam.61-64] / [Seq] Specifies the live image display immediately after log in. • Selecting [Cam.1] to [Cam.64] displays the images of the selected cameras on a 1-image screen. • Selecting [Cam.1-4] to [Cam.61-64] displays the live images of the selected cameras on a 4-image screen. • Selecting [Seq] displays images in a specified sequence. [View/Operate]♦ / [View] / [--] Specifies the scope of control for each camera channel. • When [View/Operate] is selected, live/recorded image display or camera operation can be performed. • When [View] is selected, live/recorded image display can be performed, but camera operation cannot. • When [--] is selected, neither live/recorded image display nor camera operation can be performed. Important: • You must click press the [Set] button to activate settings on the recorder when registering, editing, or deleting hosts. Note: • Clicking the [Registration] button does not log out other users. 72
-
 1
1 -
2
-
3
-
4
-
5
-
6
-
7
-
8
-
9
-
10
-
11
-
12
-
13
-
14
-
15
-
16
-
17
-
18
-
19
-
20
-
21
-
22
-
23
-
24
-
25
-
26
-
27
-
28
-
29
-
30
-
31
-
32
-
33
-
34
-
35
-
36
-
37
-
38
-
39
-
40
-
41
-
42
-
43
-
44
-
45
-
46
-
47
-
48
-
49
-
50
-
51
-
52
-
53
-
54
-
55
-
56
-
57
-
58
-
59
-
60
-
61
-
62
-
63
-
64
-
65
-
66
-
 67
67 -
 68
68 -
 69
69 -
 70
70 -
 71
71 -
 72
72 -
 73
73 -
 74
74 -
 75
75 -
 76
76 -
 77
77 -
78
-
79
-
80
-
81
-
82
-
83
-
84
-
85
-
86
-
87
-
88
-
89
-
90
-
91
-
92
-
93
-
94
-
95
-
96
-
97
-
98
-
99
-
100
-
101
-
102
 |
 |
