Panasonic WJ-NV300 Quick Start Guide - Page 2
Select a camera and switch images, Play recorded images
 |
View all Panasonic WJ-NV300 manuals
Add to My Manuals
Save this manual to your list of manuals |
Page 2 highlights
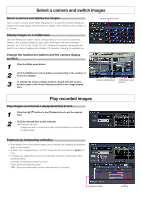
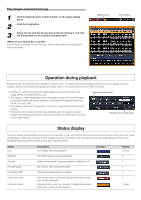
Select a camera and switch images Select a camera and display live images Click a camera number panel. While displaying on a multiscreen, double-clicking the image in the image display area will switch to display of the clicked camera images on a 1-screen. Display images on a multiscreen Click the "Multiscreen select" button corresponding to the number of screens to display. If the 4-screen is selected, each click of the button will switch between camera 1 to 4, 5 to 8, 9 to 12 and 13 to 16. Clicking the camera number panel will switch to a 4-screen displaying the images of 4 cameras, including the selected one. Change the multiscreen pattern and the camera display position 1 Click the [Wide view] button. 2 Click the Multiscreen select button corresponding to the number of screens to display. 3 To change the camera display position, drag & drop the camera number panel to the desired display position in the image display area. Camera number panel Camera number panel Multiscreen select buttons Play recorded images Play images recorded at a designated date & time 1 Click the [D]/[C] button in the [Playback] box to set the desired time. 2 Click the desired date on the calendar. ➜ Playback will start. * Unless you wish to change the date, set the playback time and click the [Play] button. Playback by designating a timeline • The playback time of recorded images can be changed by dragging the playback slider on the timeline. • To skip to the designated point, set the "Jump interval" and click the [A]/[B] buttons. • To display the desired time zones on the timeline, mark the checkboxes of the respective items. Schedule: Schedule recorded time zone Event: Event recorded time zone VMD: Time zone within which motion was detected in an image Playback slider Timeline
-
 1
1 -
 2
2 -
 3
3 -
 4
4
 |
 |
