Panasonic WVNS954 WVNS954 User Guide - Page 6
AUTO MODE *2, List] button *1
 |
View all Panasonic WVNS954 manuals
Add to My Manuals
Save this manual to your list of manuals |
Page 6 highlights
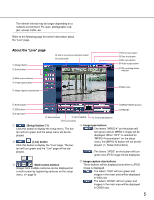
y AUX buttons (*2) These buttons will be displayed only when "Terminal alarm 3" is selected for "AUX output" on the setup menu. ( Setup Instructions) : The letters "OPEN" on the button will turn green and the status of AUX connector will be open. : The letters "CLOSE" on the button will turn green and the status of the AUX connector will be closed. u [SD] button (manual SD recording button) (*2) This button will be displayed only when "Manual" is selected for "Save trigger" on the setup menu. ( Setup Instructions) Click this button to manually record images on the SD memory card. Refer to page 10 for descriptions of how to manually record images on the SD memo- ry card. i [List] button (*1) This button will become available only when "ON" is selected for "Save logs" on the setup menu ( Setup Instructions). When this button is clicked, the log list will be dis- played and images saved on the SD memory card can be played. Refer to page 17 for further information about the log list and of how to play images on the SD memory card. o ZOOM buttons (*2) : Click this button to adjust the zoom ratio to the WIDE side. : Click this button to set the zoom ratio to x1. : Click this button to adjust the zoom ratio to the TELE side. !0 Focus buttons (*2) : Click this button to adjust the focus automatically. : Click this button to adjust the focus to the NEAR side. : Click this button to adjust the focus to the FAR side. !1 AUTO MODE (*2) Select an operation from the pull-down menu and click the [START] button. The selected operation will start. 6 Click the [STOP] button to stop the operation. The selected operation will stop when the camera (panning/tilting/zooming/focusing) is operated or when an action that is to be taken according to the settings for "Self return" ( Setup Instructions) or for "Camera motion on alarm" ( Setup Instructions) starts. Auto track: Automatically tracks an object in the shooting area. Notes: • The auto track function works only when the size of the object is larger than 1/48 of the main area and also the contrast ratio between the object and the background is more than 5 %. • The auto track function of this camera is the simplified function that tracks a moving object in the shooting area. It may be impossible to track a moving object in the following cases: • When there are multiple moving objects in the shooting area • When the contrast ratio between a moving object and the background is almost none • When an object moves quickly • When a moving object is too small or too big • When the shooting area is dark • When there is a flicker in the shooting area • When the zoom ratio is set to the TELE side, it may be difficult to obtain accuracy with the auto tracking function. It is recommended to use the auto tracking function with setting the zoom ratio to the WIDE side. Auto pan: Automatically pans between the left position and the right position set in advance ( Setup Instructions). Even when the camera is operated for zooming or focusing, the camera continues panning. (However, panning will stop when the zoom button (x1) is clicked.) Preset sequence: Automatically moves to the preset positions ( Setup Instructions) orderly (start from the lowest preset position number). 360 map-shot: Moves 45° horizontally at a time and repeats 7 times to shoot images of each 45° position (45° x 8 = 360°), and then displays 8 thumbnail images of each 45° position (45° x 8 = 360°) on a newly opened window. When a thumbnail image is clicked, the camera moves to the respective position and live images will be displayed on the "Live" page.
-
 1
1 -
 2
2 -
 3
3 -
 4
4 -
 5
5 -
 6
6 -
 7
7 -
 8
8 -
 9
9 -
 10
10 -
 11
11 -
 12
12 -
13
-
14
-
15
-
16
-
17
-
18
-
19
-
20
-
21
 |
 |
