Panasonic WVNS954 WVNS954 User Guide - Page 8
Full screen button, One shot button, Mic input button *3, Audio output button *3, Notes
 |
View all Panasonic WVNS954 manuals
Add to My Manuals
Save this manual to your list of manuals |
Page 8 highlights
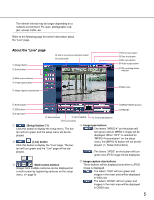
!7 Full screen button Images will be displayed on a full screen. To return to the "Live" page, press the [Esc] key. When displaying images on a full screen, the audio transmission button will become unavailable. !8 One shot button Click this button to take a picture (a still picture). The picture will be displayed on a newly opened window. When right-clicking on the displayed image, the popup menu will be displayed. The displayed image can be saved on the PC by selecting "Save" from the pop-up menu. When "Print" is selected, printer output is enabled. !9 Mic input button (*3) Turns on/off the audio reception (hear audio from the camera on a PC). This button will be displayed only when "Mic input", "Interactive (full duplex)" or "Interactive (half duplex)" is selected for "Audio mode" on the setup menu. ( Setup Instructions) When this button is clicked, the button will turn into the button and audio from the camera will not be heard. Audio volume can be adjusted (Low/Middle/High) by moving the volume cursor . @0 Audio output button (*3) Turns on/off the audio transmission (play audio from the PC on the camera speaker). This button will be displayed only when "Audio output", "Interactive (full duplex)" or "Interactive (half duplex)" is selected for "Audio mode" on the setup menu. ( Setup Instructions) The button blinks while the audio transmission is being carried out except the case of setting to "Interactive (full duplex)". When this button is clicked, the button will turn into the button and audio from the PC will not be heard. Audio volume can be adjusted (Low/Middle/High) by moving the volume cursor . Notes: • When a user is using the audio transmission func- tion with "Interactive (full duplex)" selected, the receiver button and the transmission button will be inoperable for the other users. When "Interactive (full duplex)" is selected, the transmission button is inoperable for other users. 8 • Possible duration of audio transmission is up to 5 minutes per transmission. When 5 minutes have passed, the audio transmission function will be canceled and the audio reception function will automatically be turned on. To turn the audio transmission function on, click the transmission button again. • When the camera is restarted, the adjusted volume level (for both the audio transmission and reception) will return to the level that had been set on the [Audio] tab on the setup menu. ( Setup Instructions) • Actual volume level will change in three steps even though the volume cursor can be adjusted minutely. @1 SD recording status indicator The status of the SD recording can be checked with this indicator. When the SD recording starts, this indicator will light red. When the SD recording stops, this indicator will go off. This indicator will be displayed only when "Manual" is selected for "Save trigger" on the setup menu. ( Setup Instructions) @2 Main area (*2) Images from the camera will be displayed in this area. The current time and date will be displayed at the selected position in the time and date format set on the setup menu. ( Setup Instructions). Click a desired point in the main area on the "Live" page that is to be the center of the angle of view. The camera moves to adjust the position in order to set the clicked point as the center. When selecting an area in the main area by dragging the mouse, the selected area will be located at the center of the main area. In this case, the zoom ratio will be adjusted automatically. Zoom can be adjusted using the mouse wheel. Notes: • When the displayed image is being zoomed in more than 30x, the clicked point may not always be located at the center of the main area. • When the mouse is dragged to move the camera beyond its operable range, the camera will move to the requested direction and will stop at the end of the operable range. Then, the zoom ratio of the displayed image will automatically be adjusted.
-
 1
1 -
2
-
 3
3 -
 4
4 -
 5
5 -
 6
6 -
 7
7 -
 8
8 -
 9
9 -
 10
10 -
 11
11 -
 12
12 -
 13
13 -
14
-
15
-
16
-
17
-
18
-
19
-
20
-
21
 |
 |
