Panasonic WVNS954 WVNS954 User Guide - Page 9
Monitor images from multiple cameras, Important, Step 1
 |
View all Panasonic WVNS954 manuals
Add to My Manuals
Save this manual to your list of manuals |
Page 9 highlights
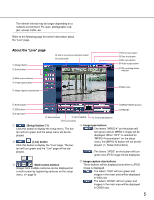
• When MPEG-4 image is being displayed, it may take time to display the frame border indicating an area selected by dragging the mouse. *3 Operable by users who belong to the access level selected for "Authentication" on the [Audio] tab of the "Camera setup" page ( Setup Instructions). Important: When the camera position is moved inadvertently while the power of the camera is on, restart the camera (restart) or refresh the camera position (position refresh) on the [Initialization] tab of the "Maintenance" page ( Setup Instructions). *1 Only operable by users whose access level is "1. Administrator" *2 Only operable by users whose access level is "1. Administrator" or "2. Camera control" when "ON" is selected for "User authentication" ( Setup Instructions). Refer to Setup Instructions for further information about the access level. Note: When operated by a lower access level user, images displayed on the screen may be changed temporarily. This does not affect operation of the camera. Monitor images from multiple cameras Images from multiple cameras can be displayed on a multi-screen. Images from 4 cameras (up to 16 cameras) can be displayed simultaneously. To display images on a multi-screen, it is necessary to register cameras in advance. 4 cameras can be registered as a group and up to 4 groups (16 cameras) can be registered. ( Setup Instructions) Important: • When simultaneously displaying images from 16 cameras on a multi-screen, panning, tilting and zooming are unavailable. • Only JPEG images can be displayed on a multi-screen. Audio will not be heard. • When the power is turned off or the LAN cable is disconnected while displaying images, displaying images on a multi-screen from the "Live" page will become unavailable. • When displaying images on a multi-screen, panning/tilting/zooming by dragging the mouse are unavailable. Step 1 Click the desired [Multi-screen] button. → Images from the registered cameras will be displayed on a selected multi-screen (screen can be split up to 16 areas). The following are instructions when displaying on a 4-split screen. q To display images on a single screen, click the [Live] button. w Click a camera title. Live images from the camera corresponding to the clicked camera title will be displayed on the "Live" page of the newly opened window. 9
-
 1
1 -
2
-
3
-
 4
4 -
 5
5 -
 6
6 -
 7
7 -
 8
8 -
 9
9 -
 10
10 -
 11
11 -
 12
12 -
 13
13 -
 14
14 -
15
-
16
-
17
-
18
-
19
-
20
-
21
 |
 |
