Pentax Espio 140V Espio 140V Manual - Page 2
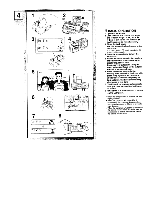
OAF/Self-timer
 |
View all Pentax Espio 140V manuals
Add to My Manuals
Save this manual to your list of manuals |
Page 2 highlights
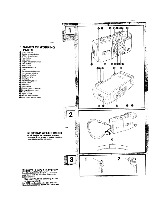
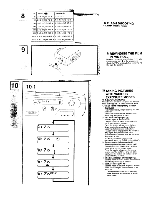
le )111 tie 1 W NAMES OF WORKING e PARTS Lens protector e Shutter release button OAF/Self-timer button 0 Flash button 0 LCD panel e Diopter adjustment lever Date button 0 Built-in flash Viewfinder window Lens 0 Remote control receiver Light sensor window Autofocus window Self-timer lamp 0 Strap lug 0 Viewfinder eyepiece Green lamp fp Red lamp Zoom button Film information window 0 Battery chamber cover Back cover Tripod socket 0 Mid-roll rewind button 0 Back cover release lever 2 STRAP ATTACHMENT Fit the strap on the camera as illustrated. ' Protrusion • can be used for pushing the mid-roll rewind button and the date button. INSTALLING A BATTERY Insert the battery with the plus (+) side up in accordance with the indication label in the battery chamber. Use one 3V Lithium Battery (CR123A or the equivalent) For DATE model, setting the date and time. Refer to the section IMPRINTING DATE/TIME. 3 1 d'• ENV DI tG 401 •40tt Act;4:4• Toill- "") 2
-
 1
1 -
 2
2 -
 3
3 -
 4
4 -
 5
5 -
 6
6
 |
 |
