Pentax Optio E50 Operation Manual - Page 34
Press the shutter release button fully., halfway., Confirm the focus frame on - review
 |
UPC - 898887001315
View all Pentax Optio E50 manuals
Add to My Manuals
Save this manual to your list of manuals |
Page 34 highlights
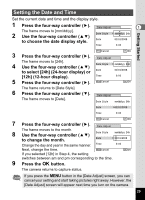
Quick Start 4 2 Press the shutter release button fully. The picture is taken. The image appears on the LCD monitor for 2 seconds (Instant Review) and is saved to the SD Memory Card or the built-in memory. (p.22) • When you turn on the camera, you can take pictures in b mode, the default shooting mode. (p.50) • Press the Green button to switch to (Green Mode) and let the camera set all the shooting functions automatically. (p.48) Pressing the Shutter Release Button Press the shutter release button smoothly in two steps. This allows for exact focusing as well as preventing camera shake. Basic method for shutter release 1 Press the shutter release button halfway. Lightly press the shutter release button until you feel the click on your finger. 2 Confirm the focus frame on the LCD monitor turns green. Hold the shutter release button and wait until the focus frame turns green. The subject is in focus. 3 Press the shutter release button fully. Press it down smoothly until the shutter is released. The subject is in focus. The picture is taken. You can also press the shutter release button all the way down (single step) to take pictures. This allows you to release the shutter at the right moment. The pictures are taken as deep-focus (pan focus) shots. 32
-
 1
1 -
2
-
3
-
4
-
5
-
6
-
7
-
8
-
9
-
10
-
11
-
12
-
13
-
14
-
15
-
16
-
17
-
18
-
19
-
20
-
21
-
22
-
23
-
24
-
25
-
26
-
27
-
28
-
 29
29 -
 30
30 -
 31
31 -
 32
32 -
 33
33 -
 34
34 -
 35
35 -
 36
36 -
 37
37 -
 38
38 -
 39
39 -
40
-
41
-
42
-
43
-
44
-
45
-
46
-
47
-
48
-
49
-
50
-
51
-
52
-
53
-
54
-
55
-
56
-
57
-
58
-
59
-
60
-
61
-
62
-
63
-
64
-
65
-
66
-
67
-
68
-
69
-
70
-
71
-
72
-
73
-
74
-
75
-
76
-
77
-
78
-
79
-
80
-
81
-
82
-
83
-
84
-
85
-
86
-
87
-
88
-
89
-
90
-
91
-
92
-
93
-
94
-
95
-
96
-
97
-
98
-
99
-
100
-
101
-
102
-
103
-
104
-
105
-
106
-
107
-
108
-
109
-
110
-
111
-
112
-
113
-
114
-
115
-
116
-
117
-
118
-
119
-
120
-
121
-
122
-
123
-
124
-
125
-
126
-
127
-
128
-
129
-
130
-
131
-
132
-
133
-
134
-
135
-
136
-
137
-
138
-
139
-
140
-
141
-
142
-
143
-
144
-
145
-
146
-
147
-
148
-
149
-
150
-
151
-
152
-
153
-
154
-
155
-
156
-
157
-
158
-
159
 |
 |
