Pentax PC-300 PC-300 Manual - Page 4
Pentax PC-300 Manual
 |
View all Pentax PC-300 manuals
Add to My Manuals
Save this manual to your list of manuals |
Page 4 highlights
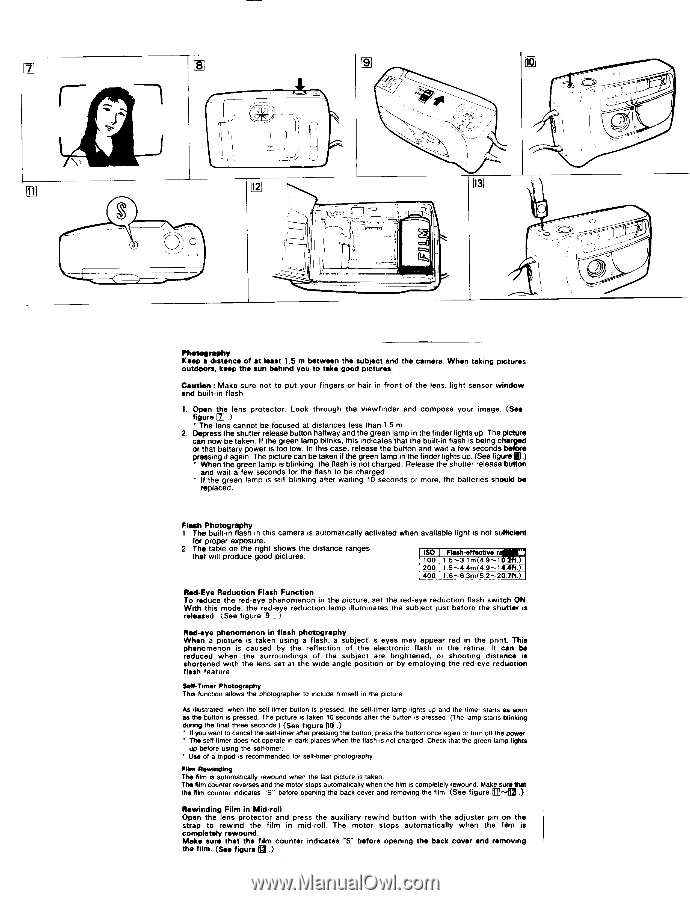
II 11 2 13 O 046 I` • Photography Keep a distance of at least 1.5 m between the subject and the camera. When taking pictures outdoors. keep the sun behind you to take good pictures. Caution : Make sure not to put your fingers or hair in front of the lens, light sensor window and built-in flash. 1. Open the lens protector. Look through the viewfinder and compose your image. (See figure M .) • The lens cannot be focused at distances less than 1.5 m 2. Depress the shutter release button halfway and the green lamp in the finder lights up. The picture can now be taken. If the green lamp blinks, this indicates that the built-in flash is being char or that battery power is too low. In this case, release the button and wait a few seconds b e pressing it again. The picture can be taken if the green lamp in the finder lights up. (See figure®.) • When the green lamp is blinking, the flash is not charged. Release the shutter release button and wait a few seconds for the flash to be charged. • If the green lamp is still blinking after waiting 10 seconds or more, the batteries should be replaced. Flash Photography 1. The built-in flash in this camera is automatically activated when available light is not sufficient for proper exposure. 2. The table on the right shows the distance ranges that will produce good pictures. ISO Flesh-effective r f 100 1.5-3.1m(4.9-10. 200 1.5-4.4m(4.9-14.4ft.) 400_ 1.6-6.3m(5.2-20.7ft.) Red-Eye Reduction Flash Function To reduce the red-eye phenomenon in the picture, set the red-eye reduction flash switch ON. With this mode, the re`0d.-eye reduction lamp illuminates the subject just before the shutter is released. (See figure . ) Red-eye phenomenon in flash photography When a picture is taken using a flash, a subject' s eyes may appear red in the print. This phenomenon is caused by the reflection of the electronic flash in the retina. It can be reduced when the surroundings of the subject are brightened, or shooting distance is shortened with the lens set at the wide-angle position or by employing the red-eye reduction flash feature. Self-Timer Photography Thus function allows the photographer to include himself in the picture. As illustrated, when the self-timer button is pressed, the self-timer lamp lights up and the timer starts as soon as the button is pressed. The picture is taken 10 seconds after the button is pressed. (The lamp starts blinking dunng the final • It you want to three seconds.) (See figure 0 .) cancel the self-timer after pressing the button, press the button once again or turn off the power. • The self-timer does not operate in dark places when the flash is not charged. Check that the green lamp lights up before using the self-timer. • Use of a tripod is recommended for self-timer photography. Film Rewinding The film is automatically rewound when the last picture is taken. The film counter reverses and the motor stops automatically when the film is completely rewound. Make sure that the film counter indicates "S" before opening the back cover and removing the film. (See figure El -'- Rewinding Film in Mid-roll Open the lens protector and press the auxiliary rewind button with the adjuster pin on the strap to rewind the film in mid-roll. The motor stops automatically when the film is completely rewound. Make sure that the film counter indicates "S" before opening the back cover and removing the film. (See figure In .)
-
 1
1 -
 2
2 -
 3
3 -
 4
4 -
 5
5 -
 6
6
 |
 |