Pfaff 145 Owner's Manual - Page 10
Drawing, Bobbin, Thread, Regulating, Tensions - needle bar adjustment
 |
View all Pfaff 145 manuals
Add to My Manuals
Save this manual to your list of manuals |
Page 10 highlights
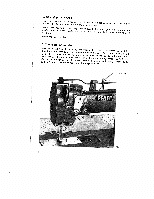
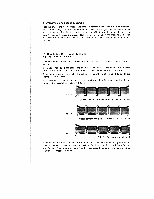
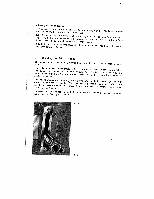
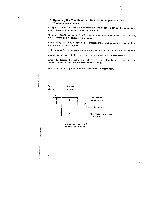
9. Drawing Up the Bobbin Thread Hold the end of the needle thread and turn the balance wheel toward you, as indicated by an arrow in Fig. 1, until the needle moves down and up again. As the needle moves up, it catches the bobbin thread which comes up with it through the needle hole. Lay both threads back under the presser foot, place the material in the machine and lower the presser foot. Hold the ends of both threads until the machine has made a few stitches. 10. Regulating the Thread Tensions Adjusting the Upper Tension Turn tension nut M (Fig. 8) clockwise for more tension, or counter-clockwise for less tension. If the upper tension is too loose, the bobbin thread will draw the needle thread down so that it forms small kinks on the underside of the material, as shown in Fig. 9. If the upper tension is too tight, the bobbin thread will be pulled up (Fig. 10) or the needle thread will break. Both tensions are correctly balanced, if the needle and bobbin threads interlock in the center of the material, as shown in Fig. 11. Fig. 9 Upper tension too loose or lower tension too tight Fig. 10 Upper tension too tight or lower tension too loose Fig. 11 Both tensions properly balanced When you raise the presser bar, the upper tension is released automatically so that the work can be easily removed from the machine. To do this, pull the work back (in for ward feeding direction), never forward as this may cause bending of the needle, skipping of stitches or thread breaking. 9
-
 1
1 -
2
-
3
-
4
-
 5
5 -
 6
6 -
 7
7 -
 8
8 -
 9
9 -
 10
10 -
 11
11 -
 12
12 -
 13
13 -
 14
14 -
 15
15 -
16
-
17
-
18
-
19
 |
 |
