Pfaff 145 Owner's Manual - Page 9
Changing, Needle, Threading - needle set screw
 |
View all Pfaff 145 manuals
Add to My Manuals
Save this manual to your list of manuals |
Page 9 highlights
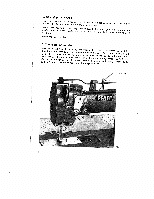
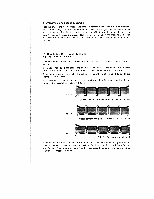
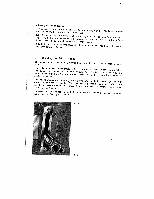
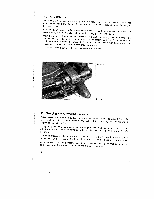
7. Changing the Needle aRnadiseputlhl ethneeeddalme abgaerdtoneietsdlheigohuetstofpothinet, loosen needle needle clamp. set screw A (Fig. 8) half a turn, Insert a new sewing hook. securely. needle into the clamp, making Push the needle up as far as sure that it will go its short groove faces toward the and tighten needle set screw A Never use rusty needles 8. Threading the Needle 7rcatP,ihorgaorn9hseu,ttsarnadotdnotlhlduetelnrhe1wrf0tdethiiansrtadhedcnaredodrr5,ue,ftgrtaftohhrhiomenrmneothruleedgtf3ohht,whetocontlhlseoprraceiongikanodhwdlttitasthcuhekhrproeeoaucuurakgopgnhuhdsnlptedthtrvhhieenerarognheu8doyg6,le,hebtshoeuteftpihwnneneasedentheunoddowdlleetnteh1nr1iaosn(1nFiu.odigtgnhh. et8hd)trihtosharcuenrsgeadahd4dt,htghruguernuieaddiaddeederg7gu,tohiufdfriredetoahem2dse, R9932 '' 8 Fig.8
-
 1
1 -
2
-
3
-
 4
4 -
 5
5 -
 6
6 -
 7
7 -
 8
8 -
 9
9 -
 10
10 -
 11
11 -
 12
12 -
 13
13 -
 14
14 -
15
-
16
-
17
-
18
-
19
 |
 |
