Pfaff 261 - 362 Owner's Manual
Pfaff 261 - 362 Manual
 |
View all Pfaff 261 - 362 manuals
Add to My Manuals
Save this manual to your list of manuals |
Pfaff 261 - 362 manual content summary:
- Pfaff 261 - 362 | Owner's Manual - Page 1
- Pfaff 261 - 362 | Owner's Manual - Page 2
guide to easy sewing -- Fallow sewing these simple instructions and familiarize yourself exciting on your easy-to-operate Pfaff-Autamatic. with the exclusive automatic features of your more fun for you. Pfaff-Automatic Sewing. machine. You will find If you have any sewing problems - Pfaff 261 - 362 | Owner's Manual - Page 3
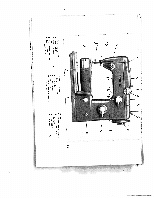
9 Reverse teed control 10 Light switch 11 Drop seed control 12 13 Needle plate Free arm cover (enclosing transverse rotary sewing hook) 2 14 Needle 15 Automatic needle threader 16 Needle thread tension 17 Sewlight 18 Stitch width dial (A) 19 Needle position lever (B) R 8153A - Pfaff 261 - 362 | Owner's Manual - Page 4
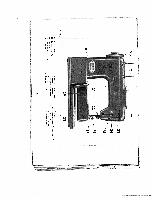
F:::: 3O 26 27 R 8138 A 20 Balance wheel 21 Collapsible spool pins 22 Top cover 23 Needle threader control 24 Face cover 25 Presser bar lifter (also used to operate the Stopmatic) 26 Sewing loot thumb screw 27 Sewing foot 28 Snap-out workplate 3 29 Free arm 30 Double receptacle for speed - Pfaff 261 - 362 | Owner's Manual - Page 5
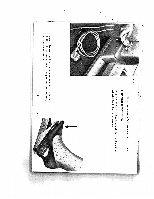
Make sure the electric circuit is A. C. before you plug in the machine. Electrical Information fr Push plug 1 into receptacle 2, and plug 3 at other end of cord into the wall outlet. Cord 4 leads to the speed control. Place the foot control under the cabinet within easy reach of your foot. Rest - Pfaff 261 - 362 | Owner's Manual - Page 6
run a threaded machine unless you have fabric under the presser foot. The machine will feed the material under the sewing foot automatically. All you have to do is guide the work. Never try to hasten feeding by pushing or 1, pulling the fabric while stitching because the needle - may bend or - Pfaff 261 - 362 | Owner's Manual - Page 7
R 8007 Straight Stitching Set: Dial C=O Dial AO Lever B= 4 .4 Lever E engages and disengages the Automatic mechanism. If you don't need this mechanism for a longer period, set lever E at "0". I This setting is indicated on pages 32 to 51 as follows: A=0 . C=0 E==O I \i1i1 r - Pfaff 261 - 362 | Owner's Manual - Page 8
is set for straight stitching (A on 0), merely press down the finger-tip control. When the lever is released, the machine resumes straight stitching automatically. To sew longer zigzag seams, turn dial A to desired stitch width (indicated by numbers I to 4). When dial A is set between 1 and 2, you - Pfaff 261 - 362 | Owner's Manual - Page 9
dial C clockwise until 5 is at top. 0 clockwise until 3 is opposite red mark (see arrow). And watch To ensure gether, set your that dial Automatic conjure upthe design you want. the zigzag stitches are packed closely to G (page 6) between 0.2 and 0.4, depend ing on the type of fabric and - Pfaff 261 - 362 | Owner's Manual - Page 10
right, without changing settings A, C and D. This is an advantage of the Pfaff-Auiomatic. Mast designs are made with dial A set on "0" (see box A this setting need hardly be changed. 264 A Big Advantage of the Pfaff-Automatic Each of the primary designs pictured on the embroidery design dial can - Pfaff 261 - 362 | Owner's Manual - Page 11
Winding the Bobbin Hold balance wheel a and turn stop motion knob b all the way to the left (counter-clockwise). Place spool always be of thread the same on right-hand spool pin. The bobbin thread should size as that used on the spool, or a little finer. Pull thread from spool and lead it - Pfaff 261 - 362 | Owner's Manual - Page 12
1 R7100 4 6 Pull it through thread guide. Pass end of thread through slot in bobbin, from inside. break off end of thread and continue winding at a faster pace. Bobbin winder will stop automatically when bobbin is full. If you don't want a full bobbin, press out lever i when sufficient amount of - Pfaff 261 - 362 | Owner's Manual - Page 13
4.. Inserting a Full Bobbin into Bobbin Case -cD As shown in illustration 1, hold bobbin in left hand so that the thread end tolls from the lop down toward you, and insert bobbin into bobbin case. Hold the bobbin firmly in the bobbin case and pull the thread into the case slot. Pull the thread - Pfaff 261 - 362 | Owner's Manual - Page 14
Inserting the Bobbin Case Make sure the needle is still in its highest position. siIWtnlowittriheallpttlhneauonctmdingbgoeftatlnjhaadtecmhfbmoopreboedbifniinbtnsgeteucwrapeso(eefs,neleeibtftaoirsbhrbaobniwends)t,.ctaloTisfhtehelonaaltndcpdhtlhahkceoealooniktod.osenRtueecrnlenednatsboeeofr - Pfaff 261 - 362 | Owner's Manual - Page 15
Types of Fabrics Mercerized Cotton Fine Fabrics such as georgette, chiffon, batiste, voile, lawn, silk. 80 to 100 Silk 0 to 000 twist Needle Size 60 or 70 Lightweight Fabrics such as dress silks and cottons, sheer woolens, shirting, dra- 70 A&B to twist 80 80 peries. Medium Fabrics 50 - Pfaff 261 - 362 | Owner's Manual - Page 16
Important Facts about Needles On Pfaff 362 sewing machines, System 130R, flat-shank needles are used for all ordinary sewing and embroidery work. The needle system is stamped on the needle plate. Genuine Pfaff needles, System 130R. are available from every Pfaff dealer. Bent or blunt needles should - Pfaff 261 - 362 | Owner's Manual - Page 17
from right 1 to left through one of the holes at its end. Pull thread into slots at left of thread guides 7 and 8 and then into the slot at left of needle clamp 9. Then thread needle, front to back. The automatic needle threader will do this for you easily and quickly. 16 - -ew -• - r - Pfaff 261 - 362 | Owner's Manual - Page 18
[1 VceI.9d 1. 1 - Pfaff 261 - 362 | Owner's Manual - Page 19
Operating the Needle Threader Operate the Stopmatic lever to lift the needle to its raised position (which has been reached when the ascending take-up lever is about /sz below the top of its stroke, as illustrated on page 5). Now lower the sewing foot and -- With your left hand push needle threader - Pfaff 261 - 362 | Owner's Manual - Page 20
When you have had sufficient needle threading practice, you may shorten the procedure as follows: Push needle threader control down. Place thread behind hook of prong w so that its end is about '/2 inch to the right of the prong. Slowly re lease control. Prong w now pulls end of the thread - instead - Pfaff 261 - 362 | Owner's Manual - Page 21
: R8150 Correct Tension Regulation Balanced tensions are essential for sewing. If your tension is correct, you will hove perfect seams os sketched below (Ill). Sketch I - The threads interlock on the underside of the fabric. Cause: Upper tension too loose or lower tension too tight. Sketch Il - The - Pfaff 261 - 362 | Owner's Manual - Page 22
0R079 Regulating the Thread Tension The bobbin thread tension rarely needs adjusting, except for embroidery when it should be a little tighter thon for ordinary sewing. Adjustment is mode by a small knurled screw on the bobbin case which con be turned with the thumb tip. Turn it left -((( for - Pfaff 261 - 362 | Owner's Manual - Page 23
.4 To backtack the beginning or end of a seam, simply press the finger-tip control down. When the control is released, the machine resumes forward sewing automatically. This feature is ideal for darning rips with the ordinary sewing foot. To do this, operate the control in rhythm and move the fabric - Pfaff 261 - 362 | Owner's Manual - Page 24
control clockwise. I Fabric will cease feeding. F- I When the control is turned to the right as far as it will go, feeding of the fabric resumes automatically when you start sewing. - '- 4fflM* 23 R8160 - Pfaff 261 - 362 | Owner's Manual - Page 25
and pull it down. Slip on new foot and tighten the screw securely. .4 'I R 7085 Darning Foot and Vibrator Attach darning foot No. 53670, as instructed above. Drop machine feed and lower presser bar lifter. As the machine sews, the vibrator moves presser bor and darning foot up and down. The - Pfaff 261 - 362 | Owner's Manual - Page 26
R 8143 Care and Maintenance Longevity and smooth machine performance are dependent on regular and proper cleaning and oiling. Use Pfaff sewing machine oil only. Never lubricate machine with animal or vegetable oils. Remove all lint before oiling. All moving and rotating parts require regular - Pfaff 261 - 362 | Owner's Manual - Page 27
The oiling points in the machine arm can be reached easily by removing the top cover. Oil should be applied E sparingly. Excessive quantities of oil may soil the work and cause machine sluggishness. One or two drops of oil usually will suffice. Before you remove the top cover, set lever E between 5 - Pfaff 261 - 362 | Owner's Manual - Page 28
.rfeetmheedovnceeadeudswleeitphnlooaiustety - R 8237 abOcopcbuebnminut.hlaeWtefdritehein aatrhmesovfctiocivbneriutrysohonfdrthetmeakoseevweoiuntthgebholobinobtki.nwhcaicshe A and has Once in checkup a while your Pfaff should by your Pfaff dealer. be given a thorough I 27 Th "4 4 4A - Pfaff 261 - 362 | Owner's Manual - Page 29
be swung out by pulling down the grill. To change the tight bulb: Push bulb into socket, turn left, and pull out. When inserting new Pfaff tight bulb, be sure to slide bulb pins into bayonet socket slots. Press bulb in and turn right. Close grill. Note voltage of electric circuit - Pfaff 261 - 362 | Owner's Manual - Page 30
DR 696 The Snap-Out Workplate Your Pfaff-Automatic has a snap-out workplate which can be raised to give you a full-size work area for flat sewing and embroidery. To raise workplate, pull it - Pfaff 261 - 362 | Owner's Manual - Page 31
Trouble Shoofing I. Machine Skips Stitches Cause: Needle incorrectly inserted. Wrong needle. (For ordinary sewing, use System 130R needles.) Insert new needle. Check and correct threading as instructed on pages 16 and 17. Use correct needle and thread. 2. Needle Thread Breaks Cause: Remedy: - Pfaff 261 - 362 | Owner's Manual - Page 32
Use correct needle and thread sizes. Don't force the feeding motion. Guide the material lightly. Push bobbin case until you hear it snap unevenly wound. Pieces of thread between tension discs. Remedy: Adjust tensions as instructed. Use only first-rate thread --- the correct size for the needle and - Pfaff 261 - 362 | Owner's Manual - Page 33
level. Accumulations of lint packed between feed teeth. Remedy: Have your Pfaff dealer make the necessary adjustment. Take off needle plate and remove lint and causes excessive pressure on bearings. Machine works heavily when automatic embroi dery mechanism is engaged. Hook raceway lacks oil or - Pfaff 261 - 362 | Owner's Manual - Page 34
electric circuit has been closed automatically. Hove your Pfoff dealer adjust the Stopmatic. Note the "Fundamentals of Machine Operation" on page 5. Thread Jamming The new Pfaff rotary hook will not normally Thread jamming can be avoided, however, if you follow the instructions on page 5. 33 1 - Pfaff 261 - 362 | Owner's Manual - Page 35
seam close to left edge of zipper, stitch across end and up the other side in one continuous operation. Use right edge of foot as a guide. For other types of zipper insertion, follow directions in your zipper package. V Edge Stitching 13SO fjIij Machine Setting: DialA=Oto4 . LeverB=+ Dial C=O Lever - Pfaff 261 - 362 | Owner's Manual - Page 36
R 7171 41 2'2 Flat Felled Seams Machine Setting: Dial A=O or 2 (optional) Dial C=O Lever E=O Lever B= -1 Flat felled seams are used to durably join two pieces of fabric. They are made in two operations. Flat felled seams usually are straight stitched. Narrow zigzag stitches are used for - Pfaff 261 - 362 | Owner's Manual - Page 37
edges, hem first edge to within about /" of corner, cut away remaining portion of hem, as shown in sketch 2. Then hem the second edge, as instructed above. Before you hem the last edge, cut away about /." of the hem sewn first, as illustrated in sketch 3. R 7375 36 R 5915 - Pfaff 261 - 362 | Owner's Manual - Page 38
- 44058 4, Overcasting Edges Machine Setting: Dial A=2 to 4 Lever B= 1 Dial C=O Lever E=O Overcasting prevents frayed edges. Use a long, wide zigzag stitch and sew edge with the needle taking one stitch into the fabric and the other aver its edge. You may over cast edges after fabric is cut and - Pfaff 261 - 362 | Owner's Manual - Page 39
Attaching Lace Machine Setting: Dial A=1 to 3 Lever 6=4 Dial C=O Lever E=O You can attach lace edging in one simple operation. Overlap lace on raw edge. Sew to fabric with narrow zigzag stitches, taking one stitch into lace and fabric and the other into lace only. V 44085 4 Inserting Lace R - Pfaff 261 - 362 | Owner's Manual - Page 40
44088 ii / / l1 _ , 1.l s , Inserting Patches with the Elastic Seam (especially on elastic materials) Machine Setting: Dial A=0 . Lever 8= Dial C==3 Dial D=8 . Stitch length control between 0.2 and 0.6 (see also page 53) Inserting Patches with Zigzag Stitches (especially on nan-elastic - Pfaff 261 - 362 | Owner's Manual - Page 41
pearl thread) Follow above directions for cording, but place filler thread under rather than on top of the fabric. Fabric and filler thread r both are guided in the groove of the foot. Width of zigzag depends on thickness of filler thread used. •1 When you have finished the zigzag seam, slide - Pfaff 261 - 362 | Owner's Manual - Page 42
make the design more visible, run a filler thread (pearl thread) under the satin stitching. Or accentuate the applique with a line of Automatic embroidery. The embroidery outlines were sewn with the following settings: DialA=O . LeverB=J' Dial C==4 Dial D=3 - And the stems: Lever E=1 DialA - Pfaff 261 - 362 | Owner's Manual - Page 43
I R7166 46121 H Openwork Embrodery Machine Setting: Dial A=O and 2 /s . Lever I . Dial C==O . Lever E=O There are hundreds of patterns excellent for openwork embroidery. Although similar in appearance to applique, openwork embroidery is much simpler. Let's embroider the 25-square box illustrated. - Pfaff 261 - 362 | Owner's Manual - Page 44
E=1 to 7 Scalloping can be done in a jiffy on your Pfaff 362 Automatic. Scalloped edges can be used effectively as trimming on numerous articles. above, place fabric under sewing foot and guide needle along traced line. The scallops are produced automatically. 4 You may vary the length of the - Pfaff 261 - 362 | Owner's Manual - Page 45
44088 4 Imitation Hemstitching Machine Setting: Dial A=2'/s - Lever 8= 5432IHifnfwnBaaeeasbIniSbmeLefSStenereaihrdteysrfdioewiutwttoclcdpiietsuPtsorsilcseefiffm,enhgwiuaarhaci.hfshslanrioarftuntoecg'TnehsgchlsraedehohimitsnsmanfwSeoertaaooyvuooskfsteshoswwrttSir,ltninenpyiertth, - Pfaff 261 - 362 | Owner's Manual - Page 46
blindstitch guide No. 46669 which you can buy at your Pfaff store. Attach the guide so guide. Set dial A so that needle takes left stitch exactly in the folded edge and right stitch up to or over the hem edge. When hem is finished, stitches will not be visible on top side. - 44088 Automatic - Pfaff 261 - 362 | Owner's Manual - Page 47
(for bartacking). - 51S91 You may use also the all-purpose sewing foot No. 51991. If you prefer more prominent buttonholes, pull a filler cord in the guide groove. To get the correct stitch length, sew on a piece of scrap material. In making buttonholes in soft or loosely woven fabrics, it is - Pfaff 261 - 362 | Owner's Manual - Page 48
end of first stitch row. Sew second row and stop about 4 to 6 stitches from end of first row. S Press lever F down. Make second tack, as instructed above. 6 Push lever F up and make 3 to 4 tying stitches. 7 Trim both the sewing and filler threads. Open the buttonhole with your seam ripper. Be - Pfaff 261 - 362 | Owner's Manual - Page 49
rings with your Ptaff. Attach all-purpose sewing foot No. 51991 or button sewing foot No. 46120, which con be obtained from your Pfaff dealer, and drop machine feed. Machine Setting: Dial A=0 . Lever 8= 4. Dial C=0 . Lever E=0 Place button under button sewing foot one or two tying stitches. Raise - Pfaff 261 - 362 | Owner's Manual - Page 50
dial A=O Needle position lever B=4 Attach darning foot, as instructed Since your machine is fitted with a on page 24, drop machine vibrator, there is no need to feed, place and lower presser bar lifter. the fabric into darning hoops. Simply guide it under the needle free-hand. Use a thin No - Pfaff 261 - 362 | Owner's Manual - Page 51
width dial A=2 Needle position lever B= 4 Attach darning foot, as instructed on page 24, drop machine feed, and lower presser bor lifter. vibrator, there is no need to place the fabric into darning hoops. Simply guide it under the needle free-hand. For darning woolen socks, pullovers and other - Pfaff 261 - 362 | Owner's Manual - Page 52
to sew both block and script letters with the machine feed dropped and the darning foot attached, guiding the material free-hand. Ask your Pfaff dealer to show you Pfaff's Ornamentograph, the ingeniously designed monogram and ornamental stitch attachment. You will marvel at this versatility and - Pfaff 261 - 362 | Owner's Manual - Page 53
I Cording To cord on your Pfaff-Automatic, use Cording Kit No. 50117 which is avail able ot extra cost, The Cording Kit comprises: 4 double- 130R flat-shank needles in /32 and 7 /oo-inch needle holders. To attach cording plate, refer to instructions on page5o for mountingfeed cover plate. 52 - Pfaff 261 - 362 | Owner's Manual - Page 54
the bobbin thread tension slightly for cording. Pfaff recommends you fill your cording so it keeps Thread tensions also influence cording size. For uniform spacing of parallel tucks, attach an adjustable guide to the cording foot. When space between tucks is very narrow, place the preceding seam - Pfaff 261 - 362 | Owner's Manual - Page 55
and - well, you probably can think of many articles which would take on new I life with a touch of embroidery. Your Pfaff-Automatic will help you solve decorative problems and will stimulate your creative fancy. Combination toot Na. 51 366 (avail able at extra cost) is ideal for decorative - Pfaff 261 - 362 | Owner's Manual - Page 56
which slips over the regular spool pins (see \ illustration) and have your Pfaff dealer convert your machine to sew a stitch width of about i/i, inch. dial with three needles. Automatic Embroidery A Interesting design effects are easy to make by combining Automatic patterns. Now you can make - Pfaff 261 - 362 | Owner's Manual - Page 57
the transverse spool holder. You can buy the transverse spool holder from your Pfaff dealer. To attach the spool holder, slip position spring I aver the View Shoe) All-purpose sewing foot No. 51 991 is attached as instructed on page 24. The transparency of its shoe facilitates all sewing operations - Pfaff 261 - 362 | Owner's Manual - Page 58
Operation Straight Stitching Zigzag Sewing Setting for Automatic Embroidery Winding Inserting the Bobbin a Full Bobbin and Maintenance Regular Machine Care Sewlight Facts The Snap-Out Workplate Trouble Shooting Zipper Insertion Edge Stitching Contents Page Quilting Page 2 Flat - Pfaff 261 - 362 | Owner's Manual - Page 59
H CPFAFFJ No. 20142 engl. Schn. 969 Printed in Germany
-
 1
1 -
 2
2 -
 3
3 -
 4
4 -
 5
5 -
 6
6 -
 7
7 -
8
-
9
-
10
-
11
-
12
-
13
-
14
-
15
-
16
-
17
-
18
-
19
-
20
-
21
-
22
-
23
-
24
-
25
-
26
-
27
-
28
-
29
-
30
-
31
-
32
-
33
-
34
-
35
-
36
-
37
-
38
-
39
-
40
-
41
-
42
-
43
-
44
-
45
-
46
-
47
-
48
-
49
-
50
-
51
-
52
-
53
-
54
-
55
-
56
-
57
-
58
-
59
 |
 |
