Pfaff 563 Owner's Manual - Page 18
Funktionen, Tretplatten, Schalter, Functions, pedals, switch
 |
View all Pfaff 563 manuals
Add to My Manuals
Save this manual to your list of manuals |
Page 18 highlights
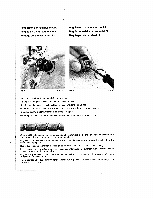
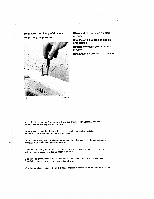
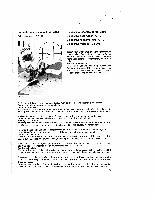
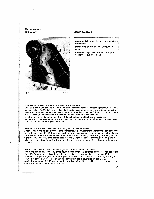
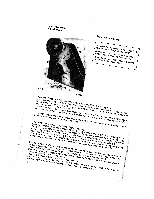
Funktionen der Tretplatte(n) und Schalter Functions of pedal(s) and switch 1 Fig. 14 ZldAl(uRsNNuRN-ewnpu9nüräägurä1itgchheTsohh1k1fccfmee1r/uäwh0ehsnu8dta1et(eäpne-etn)nbar9dlil.nvastlidn1sDsutceeDht1nanherrzr/ebrärUgeu0OibhSns:ser3ccceaetgk;ZekVhcmnn/eele0uhnlnelnau5r(bnerx-ünv)zdrid9,.gcowidie1eenkrSer.ngr0dnntnV/eHieHee.ici.nshren)(ahah:-mrnSnKz9raaRdaidte0imieehbttupn0gfaalcpl/.esdsu.dNkst.lten)ceBenwea:grhrehaaaa(RNtT1rmtm-alta9utrtasbe1enicbhgMMzrt1fkpestwe1awtlana.(n.aaa.s-s)atmgt9cn:dcitrhge1atheBbsieS1crinvzbennh/twoeTet3eeanntd5u.rhntakeie;eitNkSgt/onirrp3ogetptkaelT7enepafahln;r.ntlfs1tetubeteu9tinedenpn5nngiebldd)daSri:eest1bttTBreBeeS(lbriT-eleetzbu9jettrtwieäan1pelsltdt.gt1luiipaSgeg/2ntl13rettaegee.5notnNlt;lde1/buddä1n.einehse7rgrunr;S3/Tna3r2tctere5ienehlcoVrlthdupb0v3tnol.roea7egrrtncnt3ueh3,Tn.iunnardnueaSglct/3pt9hee(l5lSravld)utto:eetnemlmBgluben1ibitnsgaeutSlSin0get)dtee.ennl4lt kIpAsRsLCnRSnwopuiteueusefoeitsitwcttsonrticetkitnmimhdiornlgnpveinegangooetdthgs1nistswiuc,ehiaetppmoieitbwptooercaatrssnihobbccenie:thakasgwiomocicsDtnnaoiknekaneecrwrtxmpgokab.fharfcioaaeternsktchodcsaphgihstrksdneeie(atentgt-aahattode9ocdwneb1:gkpsdhe0igpiPoteg/nh(leps.raei-.giiednr)d9nt:seiasn.0(osswslP-i0n9esnrfti/1aerthg.3lco.1msei).hmag/s:.nh.pt()Pothdp-:enr9eodPpee1saetrspnih1ledstedie/satdo3toslohan5cfbtleop/o1o3snbo,pet7tasphrea2i/coot9dmpkilsooa5eiwrlntb)d(i:aoo-3ba19rxPn,la.ds1rtcsa1oe1tktots/wo(01se-p.95aappocr1/oesd1h1sdis7ti/ait0/soitl3oeo3nf5wno/s0p/ri231o5wn7sa)goai./nrtr9iidd3on5;s4nt)eit:to(r3iP-rs.9upra1poel1tsssii/soot0inpo1lien)f(.tdpe1Pado, lrsaaeifnttsoidtsorhwnakecan0crtuud)oc.sakrttrleoee 18
-
 1
1 -
2
-
3
-
4
-
5
-
6
-
7
-
8
-
9
-
10
-
11
-
12
-
 13
13 -
 14
14 -
 15
15 -
 16
16 -
 17
17 -
 18
18 -
 19
19 -
 20
20 -
 21
21 -
 22
22 -
 23
23 -
24
 |
 |
