Pfaff coverlock 4872 Owner's Manual - Page 40
disengaged
 |
View all Pfaff coverlock 4872 manuals
Add to My Manuals
Save this manual to your list of manuals |
Page 40 highlights
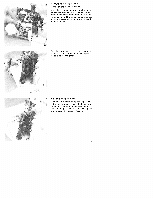
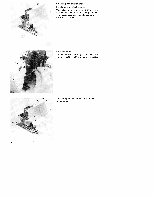
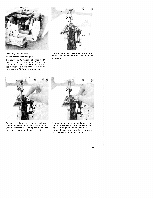
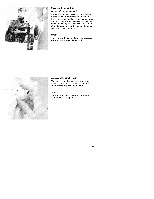
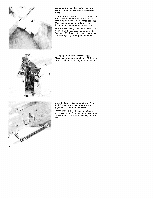
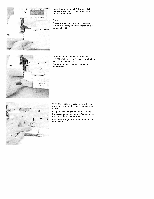
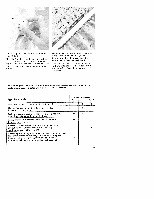
// S Adjusting the machine to the cover stitch (Prog. 1, 2, 3) and two thread chainstitch (Prog. 4) This is only necessary if you do not want to trim the fabric edge. Insert the needle(s) according to the LCD display (see page 13). Open the looper cover and remove the blade guard 15 by pulling it towards you. Lower the swiveling stitch width latch Isee page 32) and disengage the upper blade (see page 31). Ensure that the upper blade is disengaged by turning the handwheel. Disengage the upper overedge looper. Move the upper overedge looper 25 into its lowest position by turning the hdndwheel. Move the looper disengaging lever 16 to the left. Ensure that the looper is disen gaged by turning the handwheel. f Thread the two thread chainstitch looper and the cover stitch looper (see pages 18 to 21) and then the needle(s) (see page 22 and 23). 36
-
 1
1 -
2
-
3
-
4
-
5
-
6
-
7
-
8
-
9
-
10
-
11
-
12
-
13
-
14
-
15
-
16
-
17
-
18
-
19
-
20
-
21
-
22
-
23
-
24
-
25
-
26
-
27
-
28
-
29
-
30
-
31
-
32
-
33
-
34
-
 35
35 -
 36
36 -
 37
37 -
 38
38 -
 39
39 -
 40
40 -
 41
41 -
 42
42 -
 43
43 -
 44
44 -
 45
45 -
46
-
47
-
48
-
49
-
50
-
51
-
52
-
53
-
54
-
55
-
56
-
57
-
58
-
59
-
60
-
61
-
62
-
63
-
64
-
65
-
66
-
67
-
68
-
69
-
70
-
71
-
72
-
73
-
74
-
75
-
76
-
77
-
78
-
79
-
80
 |
 |
