Pfaff expression 2048 Owner's Manual - Page 44
Stitch 5, Stitch 6
 |
View all Pfaff expression 2048 manuals
Add to My Manuals
Save this manual to your list of manuals |
Page 44 highlights
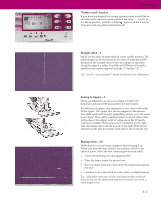
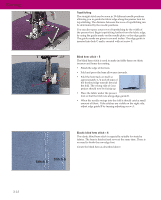
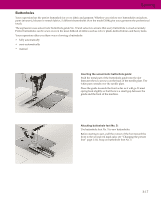
Sewing B Topstitching F The straight stitch can be sewn in 19 different needle positions allowing you to guide the fabric edge along the presser foot for top stitching. The distance between the rows of topstitching can be determined by the needle positions. You can also space your rows of topstitching by the width of C the presser foot. Begin topstitching further from the fabric edge, by using the guide marks on the needle plate, or the edge guide. The guide marks are given in cm and inches. The edge guide is inserted into hole C and is secured with set screw F. Blind hem stitch - 5 The blind hem stitch is used to make invisible hems on skirts, trousers and home decorating. • Finish the edge of the hem. A • Fold and press the hem allowance inwards. • Fold the hem back on itself so approximately 1/4 inch (6 mm) of the finished edge extends beyond the fold. The wrong side of your project should now be facing up. • Place the fabric under the presser foot so that the fold runs along edge guide B. • When the needle swings into the fold it should catch a small amount of fabric. If the stitches are visible on the right side, adjust edge guide B by turning adjusting screw A. Stitch 6 Stitch 5 Elastic blind hem stitch - 6 The elastic blind hem stitch is especially suitable for stretchy fabrics. The hem is finished and sewn at the same time. There is no need to finish the raw edge first. Create the blind hem as described above. 3:12
-
 1
1 -
2
-
3
-
4
-
5
-
6
-
7
-
8
-
9
-
10
-
11
-
12
-
13
-
14
-
15
-
16
-
17
-
18
-
19
-
20
-
21
-
22
-
23
-
24
-
25
-
26
-
27
-
28
-
29
-
30
-
31
-
32
-
33
-
34
-
35
-
36
-
37
-
38
-
 39
39 -
 40
40 -
 41
41 -
 42
42 -
 43
43 -
 44
44 -
 45
45 -
 46
46 -
 47
47 -
 48
48 -
 49
49 -
50
-
51
-
52
-
53
-
54
-
55
-
56
-
57
-
58
-
59
-
60
-
61
-
62
-
63
-
64
-
65
-
66
-
67
-
68
 |
 |
