Pfaff expression 2048 Owner's Manual - Page 46
Automatic darning - 28, Model 2048
 |
View all Pfaff expression 2048 manuals
Add to My Manuals
Save this manual to your list of manuals |
Page 46 highlights
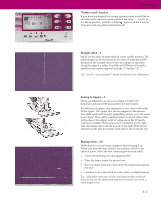
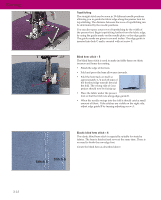
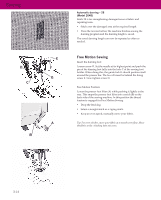
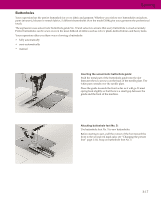
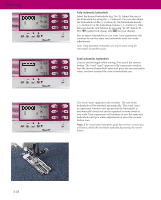
Sewing D C B E F G A Automatic darning - 28 (Model 2048) Stitch 28 is for strengthening damaged areas of fabric and repairing tears. • Stitch over the damaged area at the required length. • Press the reverse button; the machine finishes sewing the darning program and the darning length is saved. The saved darning length can now be repeated as often as needed. Free Motion Sewing Insert the darning foot: Loosen screw D. Set the needle at its highest point and push the pin of the darning foot fully into the hole C of the sewing foot holder. When doing this, the guide fork G should position itself around the presser bar. The lever E must be behind the fixing screw F. Now tighten screw D. Free Motion Position: Lower the presser foot lifter (A) while pushing it lightly to the rear. This snaps the presser foot lifter into a notch (B) on the back side of the sewing machine. In this position the thread tension is engaged for Free Motion Sewing. • Drop the feed dog. • Select a straight stitch or a zigzag stitch. • Keep an even speed, manually move your fabric. Tip: For even stitches, move your fabric at a smooth even flow. Move the fabric so the stitching does not cross. 3:14
-
 1
1 -
2
-
3
-
4
-
5
-
6
-
7
-
8
-
9
-
10
-
11
-
12
-
13
-
14
-
15
-
16
-
17
-
18
-
19
-
20
-
21
-
22
-
23
-
24
-
25
-
26
-
27
-
28
-
29
-
30
-
31
-
32
-
33
-
34
-
35
-
36
-
37
-
38
-
39
-
40
-
 41
41 -
 42
42 -
 43
43 -
 44
44 -
 45
45 -
 46
46 -
 47
47 -
 48
48 -
 49
49 -
 50
50 -
 51
51 -
52
-
53
-
54
-
55
-
56
-
57
-
58
-
59
-
60
-
61
-
62
-
63
-
64
-
65
-
66
-
67
-
68
 |
 |
