Pfaff quilt expression 4.0 Owner's Manual - Page 32
Stitch adjustments - making buttonholes
 |
View all Pfaff quilt expression 4.0 manuals
Add to My Manuals
Save this manual to your list of manuals |
Page 32 highlights
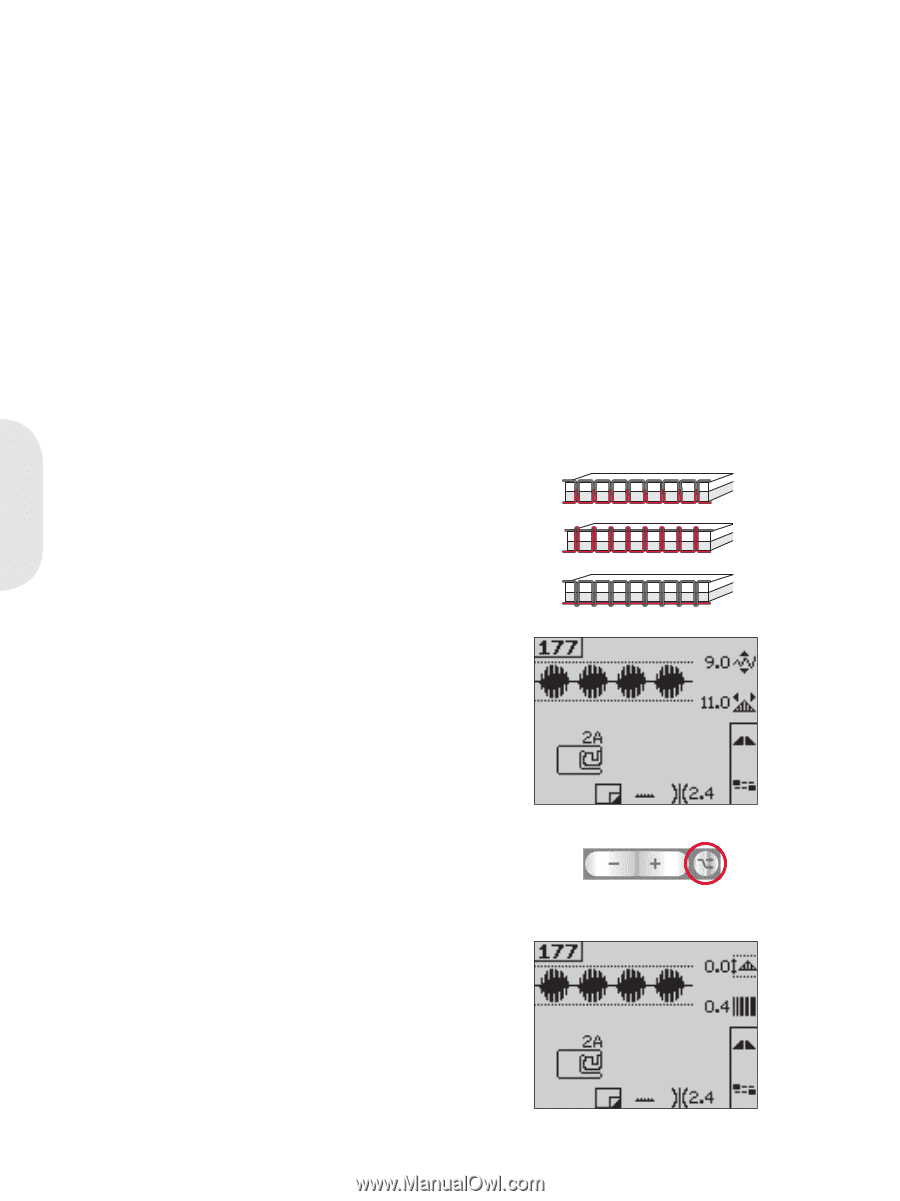
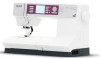
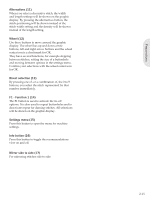
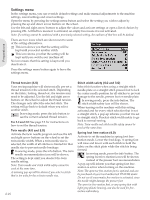
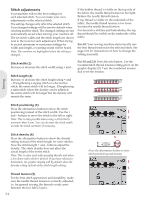
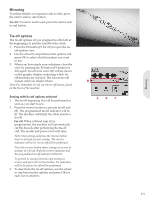
Stitch adjustments Your machine will set the best settings for each selected stitch. You can make your own adjustments on the selected stitch. The setting changes only affect the selected stitch. Your changed settings will be reset to default when selecting another stitch. The changed settings are not automatically saved when turning your machine off. The set stitch width and the stitch length are shown next to the icons for each adjustment. When trying to exceed minimum or maximum settings for width and length, a warning sound will be heard. Note: The numbers are highlighted when the setting is changed. If the bobbin thread is visible on the top side of the fabric, the needle thread tension is too tight. Reduce the needle thread tension. If top thread is visible on the underside of the fabric, the needle thread tension is too loose. Increase the needle thread tension. For decorative stitches and buttonholes, the top thread should be visible on the underside of the fabric. For 4.0: Your sewing machine electronically sets the best thread tension for the selected stitch. See page 2:16 for instructions on how to change the setting manually. Stitch width (1) Increase or decrease the stitch width using + and -. Stitch length (2) Increase or decrease the stitch length using + and -. If lengthening a zigzag stitch or a decorative stitch, the entire stitch will be longer. If lengthening a satin stitch where the density can be adjusted, the entire stitch will be longer but the density will remain the same. For 3.0 and 2.0: Press the info button. Use the recommended thread tension setting given on the graphic display (5). Turn the numbered tension dial to set the tension. Sewing Stitch positioning (3) Press the alternatives button to show the stitch positioning instead of the stitch width. Use the + 1 and - buttons to move the stitch to the left or right. Note: This is only possible when using a stitch that is 2 narrower than 9 mm. You can decrease the stitch width to make the stitch narrower if necessary. Stitch density (4) Press the alternatives button to show the density setting instead of the stitch length for satin stitches. Now the stitch length + and - buttons adjust the density. The stitch density does not affect the actual length of the entire stitch. Note: This is often used with specialty threads and when a less dense satin stitch is desired. If you have selected a buttonhole, the graphic display will by default show the density setting instead of the stitch length setting. Thread tension (5) For the best stitch appearance and durability, make sure the needle thread tension is correctly adjusted, i.e. for general sewing, the threads evenly meet between the two fabric layers. 3:2 5 Press the alternatives button to view stitch positioning and density 3 4
-
 1
1 -
2
-
3
-
4
-
5
-
6
-
7
-
8
-
9
-
10
-
11
-
12
-
13
-
14
-
15
-
16
-
17
-
18
-
19
-
20
-
21
-
22
-
23
-
24
-
25
-
26
-
 27
27 -
 28
28 -
 29
29 -
 30
30 -
 31
31 -
 32
32 -
 33
33 -
 34
34 -
 35
35 -
 36
36 -
 37
37 -
38
-
39
-
40
-
41
-
42
-
43
-
44
-
45
-
46
-
47
-
48
-
49
-
50
-
51
-
52
 |
 |