Philips 10001205 User manual (English) - Page 24
Installation
 |
View all Philips 10001205 manuals
Add to My Manuals
Save this manual to your list of manuals |
Page 24 highlights
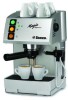
ENGLISH out in a professional manner is declined. Fire safety In the event of fire use carbon dioxide extinguishers (CO2). Do not use water or dry-powder extinguishers. Key to machine components (Pag.3) 1 Water tank 2 Main switch 3 Machine-on LED 4 Coffee button 5 Machine ready LED 6 Steam button 7 Hot water / steam dispenser knob 8 Coffee brew unit 9 Steam nozzle (Pannarello) 10 Power cord 11 Drip tray + grille 12 Cup warming plate 13 "Crema" filter holder 14 Filter for "Crema" filter holder (one only for brewing 1 or 2 coffees) 15 Coffee measuring scoop 16 Pods filter 17 Pods adapter 18 Cappuccinatore 4 INSTALLATION For your own safety and that of other people please strictly follow the "Safety regulations" at chap. 3. 4.1 Packaging The original packaging has been designed to protect the machine during transport. It is recommended to keep the packaging for future transport. 4.2 Installation instructions Before installing the machine, observe the following safety precautions: • place the machine in a safe place; • make sure children cannot play with the machine; • avoid placing the machine on very hot surfaces or near naked flames. The coffee machine is now ready to be connected to the power supply. 4.3 Connecting to the electricity supply Electric current can be dangerous! It is therefore essential to follow the safety regulations carefully. Never use faulty cables! Faulty cables and plugs must be replaced immediately by Authorized Customer Service Centres. The voltage of the appliance has been set by the manufacturer. Check that the voltage supplied matches the indications on the label on the bottom of the appliance. • Check that the main switch (2) is not pressed before connecting the machine to the power supply. • Connect the plug to a socket with suitable voltage. 4.4 Filling the water tank • (Fig.1) - Remove the water tank (1), an automatic • 24 •
-
 1
1 -
2
-
3
-
4
-
5
-
6
-
7
-
8
-
9
-
10
-
11
-
12
-
13
-
14
-
15
-
16
-
17
-
18
-
 19
19 -
 20
20 -
 21
21 -
 22
22 -
 23
23 -
 24
24 -
 25
25 -
 26
26 -
 27
27 -
 28
28 -
 29
29 -
30
-
31
-
32
-
33
-
34
-
35
-
36
-
37
-
38
-
39
-
40
-
41
-
42
-
43
-
44
-
45
-
46
-
47
-
48
-
49
-
50
-
51
-
52
-
53
-
54
-
55
-
56
-
57
-
58
-
59
-
60
-
61
-
62
-
63
-
64
-
65
-
66
-
67
-
68
-
69
-
70
-
71
-
72
-
73
-
74
-
75
-
76
-
77
-
78
-
79
-
80
-
81
-
82
-
83
-
84
-
85
-
86
-
87
-
88
-
89
-
90
-
91
-
92
-
93
-
94
-
95
-
96
 |
 |
