Philips 42PFL5432D User manual - Page 33
Auto adjust, Phase, Clock, Horizontal, Vertical - manual
 |
View all Philips 42PFL5432D manuals
Add to My Manuals
Save this manual to your list of manuals |
Page 33 highlights
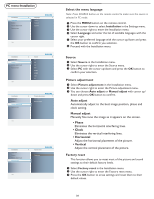
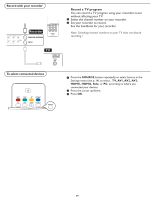
PC menu-Installation Installation 4 Language 3 Language English Source Français Picture adjustment Español Factory reset Info Installation 4 Source 8 Language TV Source AV1 Picture adjustment AV2 Factory reset AV3 HDMI1 HDMI2 Side PC Info Installation 4 Picture adjustment 2 Language Auto adjust Source Manual adjust Picture adjustment Factory reset Info Installation Language Source Picture adjustment Factory reset 4 Factory reset Start now Info Select the menu language Note: Press SOURCE button on the remote control to make sure the source is selected in PC mode. 1 Press the MENU button on the remote control. 2 Use the cursor down to select Installation in the Settings menu. 3 Use the cursor right to enter the Installation menu. 4 Select Language and enter the list of available languages with the cursor right. 5 Select your preferred language with the cursor up/down and press the OK button to confirm you selection. 6 Proceed with the Installation menu. Source 1 Select Source in the Installation menu. 2 Use the cursor right to enter the Source menu. 3 Select PC with the cursor up/down and press the OK button to confirm your selection. Picture adjustment 1 Select Picture adjustment in the Installation menu. 2 Use the cursor right to enter the Picture adjustment menu. 3 You can choose Auto adjust or Manual adjust with cursor up/ down and press OK button to confirm. Auto adjust Automatically adjust to the best image position, phase and clock setting. Manual adjust Manually fine tune the image as it appears on the screen. • Phase Eliminates the horizontal interfering lines. • Clock Eliminates the vertical interfering lines. • Horizontal Adjust the horizontal placement of the picture. • Vertical Adjust the vertical placement of the picture. Factory reset This function allows you to reset most of the picture and sound settings to their default factory levels. 1 Select Factory reset in the Installation menu. 2 Use the cursor right to enter the Factory reset menu. 3 Press the OK button to erase settings and reset them to their default values. 26
-
 1
1 -
2
-
3
-
4
-
5
-
6
-
7
-
8
-
9
-
10
-
11
-
12
-
13
-
14
-
15
-
16
-
17
-
18
-
19
-
20
-
21
-
22
-
23
-
24
-
25
-
26
-
27
-
 28
28 -
 29
29 -
 30
30 -
 31
31 -
 32
32 -
 33
33 -
 34
34 -
 35
35 -
 36
36 -
 37
37 -
 38
38 -
39
-
40
-
41
-
42
-
43
 |
 |