Philips 52PFL7422D37 User Guide - Page 20
Set your preferences
 |
UPC - 609585131507
View all Philips 52PFL7422D37 manuals
Add to My Manuals
Save this manual to your list of manuals |
Page 20 highlights
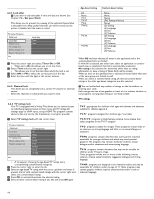
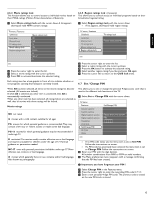
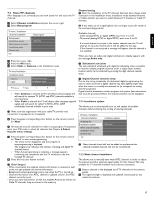
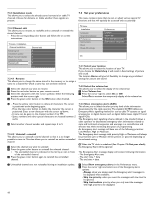
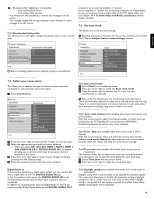
7.3.3 Installation mode This allows you to select the already stored terrestrial or cable TV channels. Choose for Antenna or Cable whether these signals are present 7.3.4 Channel edit This allows you to rename, to reshuffle and to uninstall or reinstall the stored channels. < Press the corresponding color button and follow the on screen instructions. TV menu / Installation Channel installation Autoprogram Installation update Weak channel installat.. Installation mode Channel edit Channel edit 0 1 2 3 4 ...... Info 7.3.4.1 Rename This allows you to change the name stored in the memory or to assign a name to a channel for which a name has not yet been entered. ‡ Select the channel you want to rename. ® Press the red color button on your remote control. Ò Select the characters with the cursor up/down. Select the following position with the cursor right. † Press the green color button or the OK button when finished. 7.4 Set your preferences This menu contains items that can set or adjust various special TV functions and that will typically be accessed only occasionally. TV menu Installation Language Channel installation Preferences Connections Clock Reset AV settings Preferences Location Volume bar Show emergency alerts Downloaded rating table Info 7.4.1 Select your location This allows you to select the location of your TV. If you choose for Retail shop it will result in fixed settings of picture and sound. The location Home will give full flexibility to change any predefined settings for picture and sound 7.4.2 Select the volume bar This allows you to select the display of the volume bar. ‡ Select Volume bar. ® Press the cursor right to select On or Off. Select On to activate the temporarily display of the volume bar à - Press the yellow color button to delete all characters.The cursor is positioned at the beginning again; - Press the blue color button to delete the character the cursor is positioned. Enter a new character with the cursor up/down; - A name can be given to the channel numbers 0 to 999; - Space, numbers and other special characters are located between Z and A. º Select another channel number and repeat steps 2 to 5. 7.3.4.2 Uninstall - reinstall This allows you to uninstall a stored channel so that it is no longer possible to tune to.This also allows you to reinstall an earlier uninstalled channel. ‡ Select the channel you want to uninstall. ® Press the green color button to uninstall the selected channel. > The uninstalled channel is indicated in the list by an icon in front of the uninstalled channel. Ò Press the green color button again to reinstall the uninstalled channel. 7.4.3 Show emergency alerts (EAS) This allows you to select the alert priority level of the information disseminated by the cable operator.The standard SCTE18 defines an Emergency Alert signalling method for use by cable TV systems to signal emergencies to digital devices such as digital Cable boxes, digital TVs and digital VCRs. The Emergency alert signalling scheme defined in the standard allows a cable operator to disseminate emergency alert information related to state and local-level emergencies and warnings in a cost-effective and efficient way, while minimizing disruption of programming. An Emergency alert message will have one of the following priorities: Low, Medium, High or Maximum. The Emergency alert message with priority High or Maximum will always be presented. Low or Medium will be present or ignored depending on the selected setting. ) When the TV clock is undefined (See Chapter 7.6 Set your clock), the Emergency Alert will be ignored. The Emergency Alert message display will contain following information: - The Emergency Alert text - The start time + date - The end time + date. ç Uninstalled channels are not reinstalled during an installation update. ‡ Select Show emergency alerts in the Preferences menu. ® Press the cursor right and select one of the Emergency alerts options: - Always, when you always want the Emergency alert messages to be displayed when available; - Skip low priority, when you want the messages with low level to be ignored; - Skip low/medium priority, when you only want the messages with high priority to be displayed. 18
-
 1
1 -
2
-
3
-
4
-
5
-
6
-
7
-
8
-
9
-
10
-
11
-
12
-
13
-
14
-
 15
15 -
 16
16 -
 17
17 -
 18
18 -
 19
19 -
 20
20 -
 21
21 -
 22
22 -
 23
23 -
 24
24 -
 25
25 -
26
-
27
-
28
-
29
-
30
-
31
-
32
-
33
-
34
-
35
-
36
-
37
-
38
-
39
-
40
 |
 |