Philips B5 User manual - Page 15
Step 1: calibrate the listening zone, Step 2: calibrate the surround speaker position, SURROUND
 |
View all Philips B5 manuals
Add to My Manuals
Save this manual to your list of manuals |
Page 15 highlights
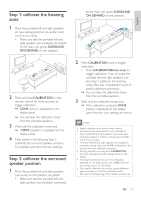
Step 1: calibrate the listening zone 1 Place the portable left and right speakers on two seating positions you prefer most (such as on a sofa). • Make sure that the portable left and right speakers are wirelessly connected to the main unit (press SURROUND ON DEMAND on the speaker). 2 Press and hold CALIBRATION on the remote control for three seconds to trigger calibration. »» ZONE (zone) is displayed on the display panel. »» You can hear the calibration tones from the portable speakers. 3 Wait until the calibration tones end. »» ->SPKR (speaker) is displayed on the display panel. 4 Then perform the following Step 2 (calibrate the surround speaker position) to complete and store the new settings. Step 2: calibrate the surround speaker position 1 Place the portable left and right speakers (surround) on the position you prefer. • Make sure that the portable left and right speakers are wirelessly connected to the main unit (press SURROUND ON DEMAND on the speaker). 2 Press CALIBRATION once to trigger calibration. • Press CALIBRATIONthree times to trigger calibration if you re-locate the portable left and right speakers and skip Step 1 (calibrate the listening zone) after you completed a round of spatial calibration previously. »» You can hear the calibration tones from the portable speakers. 3 Wait until the calibration tones end. »» If the calibration succeeds, DONE (done) is displayed on the display panel. And the new settings are stored. Note •• Spatial calibration takes around three minutes. •• Surround sound improvement is only noticeable if the portable left and right speakers (surround) were improperly placed, or if there is strong surround effect in the music you play. •• If the portable left and right speakers are swapped in placement, during calibration LR is displayed for few seconds, then the calibration completes. •• During calibration, you may press CALIBRATION to cancel calibration, and the settings returns to the default. •• If the spatial calibration fails, an error message is displayed on the display panel, such as FAIL (fail), and the settings returns to the default. •• If the spatial calibration fails, try the spatial calibration again, and make sure that the calibration points described at the beginning of this chapter are fully met. EN 13 English
-
 1
1 -
2
-
3
-
4
-
5
-
6
-
7
-
8
-
9
-
 10
10 -
 11
11 -
 12
12 -
 13
13 -
 14
14 -
 15
15 -
 16
16 -
 17
17 -
 18
18 -
 19
19 -
 20
20 -
21
-
22
-
23
-
24
-
25
-
26
-
27
-
28
 |
 |
