Philips FWM3500 User manual - Page 12
Auto install radio stations, Set clock, Turn
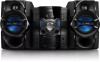 |
View all Philips FWM3500 manuals
Add to My Manuals
Save this manual to your list of manuals |
Page 12 highlights
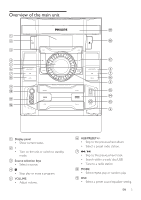
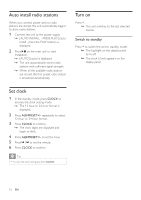
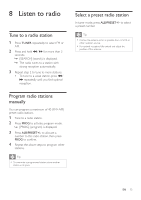
Auto install radio stations When you connect power and no radio stations are stored, the unit automatically begins to store radio stations. 1 Connect the unit to the power supply. »» [AUTO INSTALL - PRESS PLAY] (auto install - press the PLAY button) is displayed. 2 Press on the main unit to start installation. »» [AUTO] (auto) is displayed. »» The unit automatically stores radio stations with sufficient signal strength. »» When all the available radio stations are stored, the first preset radio station is broadcast automatically. Turn on Press . »» The unit switches to the last selected source. Switch to standby Press to switch the unit to standby mode. »» The backlight on the display panel turns off. »» The clock (if set) appears on the display panel. Set clock 1 In the standby mode, press CLOCK to activate the clock setting mode. »» The 12 hour or 24 hour format is displayed. 2 Press ALB/PRESET+/- repeatedly to select 12 hour or 24 hour format. 3 Press CLOCK to confirm. »» The clock digits are displayed and begin to blink. 4 Press ALB/PRESET+/- to set the hour. 5 Press / to set the minute. 6 Press CLOCK to confirm. Tip •• To view the clock during play, press CLOCK. 10 EN
-
 1
1 -
2
-
3
-
4
-
5
-
6
-
 7
7 -
 8
8 -
 9
9 -
 10
10 -
 11
11 -
 12
12 -
 13
13 -
 14
14 -
 15
15 -
 16
16 -
 17
17 -
18
-
19
-
20
-
21
-
22
-
23
-
24
-
25
-
26
 |
 |
