Philips LC5341 User Guide - Page 14
Connecting to a computer
 |
UPC - 037849940570
View all Philips LC5341 manuals
Add to My Manuals
Save this manual to your list of manuals |
Page 14 highlights
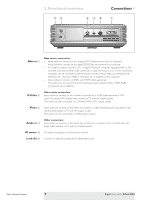
4. Installation Connecting to a computer > VViiddeeoo AAuuddiioo iinn SS--VViiddeeoo DDaattaa iinn Projector 1 43 Audio out USB 2 COMPUTER Mac/PC Data out PC/Macintosh 1 Connect connector 1 of the VESA M1-A to VGA/USB cable supplied, to the Data in socket of your projector. 2 Connect connector 2, to the Data (out) socket of the computer. 3 Connect the USB connector (3) to the USB (downstream) socket of the computer. - You can now manipulate the mouse cursor on the computer and on the screen, using Cursor Control on the remote control. When using the USB connection, make sure Windows 98, Windows ME, Windows 2000 or Windows XP is installed on the computer. - The display settings of the computer will be changed to fit the capability of the projector. • If required you can connect the Audio out socket of the computer to the Audio in socket of the projector. For this, use the Audio minijack to minijack cable (4) supplied. - Audio information from the Computer will then be played via the projector speaker. • When switching on, first switch on the projector and then the PC. Philips Multimedia Projector 14 English User guide bCool XG1
-
 1
1 -
2
-
3
-
4
-
5
-
6
-
7
-
8
-
 9
9 -
 10
10 -
 11
11 -
 12
12 -
 13
13 -
 14
14 -
 15
15 -
 16
16 -
 17
17 -
 18
18 -
 19
19 -
20
-
21
-
22
-
23
-
24
-
25
-
26
-
27
-
28
-
29
 |
 |
