Philips SE7452B User manual - Page 14
Getting started - wall mount
 |
UPC - 609585129269
View all Philips SE7452B manuals
Add to My Manuals
Save this manual to your list of manuals |
Page 14 highlights
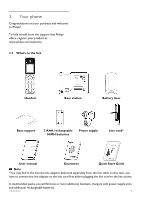
4 Getting started 3 Push into place until a click sound is heard. 4.1 Connect the base station 1 Place the base station in a central location near the telephone line socket and electricity socket. 4.1.1 Wall Mounting Wall mount installation is allowable in SE745. The wall mount holes are located on the back of the base unit and no extra wall mount pedestal is needed. If you want to mount the phone on a wall, simply slip the mounting holes on the back of the base unit over the wall plate posts (not included), and slide the unit down into place. Warning 1 Please use ONLY UL approved wall plate. 2 Please use wall plate that can sustain at least 5.1kg. 3 Please ensure the wall plate has appropriate and rigid mounting. Bottom of the base support 4 To remove, simply pull the base support away from the base unit. 4.1.3 Connect the line cord and power cable 1 Connect the line cord and the power cable to their corresponding connectors at the bottom of the base station as shown. 4.1.2 Install the base support Note The base station is wall mountable. Remove the base support before mounting it to the wall. 1 Place the base station face down so that you can see the bottom of the base station. 2 Attach the base support to your base station by fitting the tabs of the base support into the corresponding slots on the base unit. 2 Connect the other end of the line cord to the telephone line socket and the other end of the power cable to the electricity socket. Note The line adaptor may not be attached to the line cord. In this case, you have to connect the line adaptor to the line cord first before plugging the line cord to the line socket. Warning Avoid placing the base station too close to large metal objects such as filing cabinets, radiators or electrical appliances. This can impair the range 12 Getting started
-
 1
1 -
2
-
3
-
4
-
5
-
6
-
7
-
8
-
 9
9 -
 10
10 -
 11
11 -
 12
12 -
 13
13 -
 14
14 -
 15
15 -
 16
16 -
 17
17 -
 18
18 -
 19
19 -
20
-
21
-
22
-
23
-
24
-
25
-
26
-
27
-
28
-
29
-
30
-
31
-
32
-
33
-
34
-
35
-
36
-
37
-
38
-
39
-
40
-
41
-
42
-
43
-
44
-
45
-
46
-
47
-
48
 |
 |
