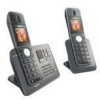
Philips SE7452B User manual - Page 15
Warning, Install your phone, Install battery, Charge battery, Welcome mode, SELECT
 |
UPC - 609585129269
View all Philips SE7452B manuals
Add to My Manuals
Save this manual to your list of manuals |
Page 15 highlights
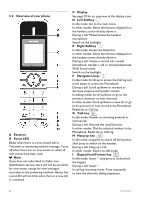
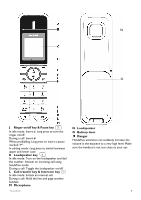
and sound quality. Buildings with thick internal and external walls may impair transmission of signals to and from the base. Warning The base station does not have an ON/OFF switch. Power is applied when the power adaptor is plugged into the unit and connected to the electricity socket. The only way to power down the unit is to unplug the power adaptor from the electricity socket. Therefore, ensure that the electricity socket is easily accessible. The power adaptor and telephone line cord have to be connected correctly, as incorrect connection could damage the unit. Always use the telephone line cord supplied with the unit. Otherwise, you may not get a dial tone. 4.2 Install your phone Before using the handset, the batteries have to be installed and fully charged. 4.2.2 Charge battery Warning The handset must be charged for at least 24 hours before using it for the first time. When the battery level becomes low, an empty battery icon is displayed on the screen. If the battery level becomes exceedingly low, the phone automatically switches off and any function in progress will not be saved. 1 Place the handset on the charging cradle of the base station. A melody is emitted if the handset is placed correctly. 2 The battery icon on the display blinks during charge. 3 The battery icon becomes steady when the handset is fully charged. Note Optimal battery life is reached after 3 cycles of complete charging (over 15 hours) and discharging, allowing approximately 12 hours of talk-time and 150 hours of stand-by time. 4.2.1 Install battery Warning Always use AAA rechargeable batteries supplied with your unit. There could be risk of battery leakage if you use alkaline batteries or other battery types. 1 Slide out the battery cover. 2 Place the batteries in the correct polarity as indicated and replace the cover. Getting started 4.3 Welcome mode Note Depending on your country, the WELCOME screen may not appear. In this case, you are not required to select your country/operator/ language settings. Warning You cannot make outgoing calls or receive incoming calls without first defining your country selection. Before you first use your handset, you need to configure it according to the country of use. After charging it for a few minutes, the word WELCOME appears in various languages. Follow these steps to configure your phone: 1 Scroll : to the word WELCOME in your preferred language and press mSELECT to confirm your selection. 2 3 4 5 Scroll Press Press m :: tStooELyyoEouCurrToctpooeurcnaottrnoyfr.ir(mif your selection. necessary). Press mSELECT again to confirm your selection. • The default line settings and menu language for the selected country will be automatically configured. • To set date/time, see "Set Date and Time" on page 25. Your phone is now ready for use. 13
-
 1
1 -
2
-
3
-
4
-
5
-
6
-
7
-
8
-
9
-
 10
10 -
 11
11 -
 12
12 -
 13
13 -
 14
14 -
 15
15 -
 16
16 -
 17
17 -
 18
18 -
 19
19 -
 20
20 -
21
-
22
-
23
-
24
-
25
-
26
-
27
-
28
-
29
-
30
-
31
-
32
-
33
-
34
-
35
-
36
-
37
-
38
-
39
-
40
-
41
-
42
-
43
-
44
-
45
-
46
-
47
-
48
 |
 |
