Pioneer AVH-170DVD Owners Manual - Page 23
System settings
 |
View all Pioneer AVH-170DVD manuals
Add to My Manuals
Save this manual to your list of manuals |
Page 23 highlights
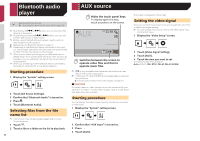
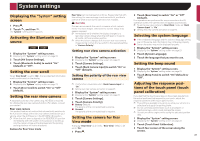
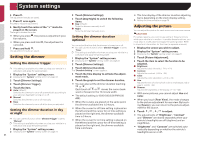
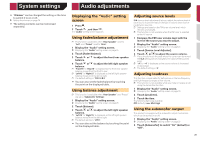
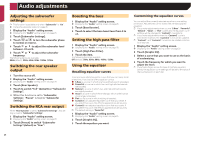
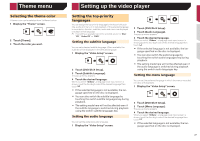
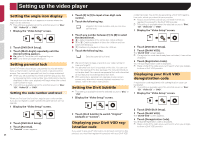
System settings Displaying the "System" setting screen 1 Press . 2 Touch , and then . The "System" setting screen appears. Activating the Bluetooth audio source 270BT 271BT 1 Display the "System" setting screen. Displaying the "System" setting screen on page 23 2 Touch [AV Source Settings]. 3 Touch [Bluetooth Audio] to switch "On" (default) or "Off". Setting the ever scroll When "Ever Scroll" is set to "On", the recorded text information scrolls continuously in the display. 1 Display the "System" setting screen. Displaying the "System" setting screen on page 23 2 Touch [Ever Scroll] to switch "On" or "Off" (default). Setting the rear view camera A separately sold rear view camera (e.g. ND-BC6) is required for utilizing the rear view camera function. (For details, consult your dealer.) Rear view camera This product features a function that automatically switches to the full-screen image of the rear view camera installed on your vehicle, when the shift lever is in the REVERSE (R) position. p When the shift lever is aligned to the REVERSE (R) position immediately after the system of this product is started up, only the camera image will be displayed and the parking assist guidelines will not be displayed. Camera for Rear View mode Rear View can be displayed at all times. Please note that with this setting, the camera image is not resized to fit, and that a portion of what is seen by the camera is not viewable. CAUTION Pioneer recommends the use of a camera which outputs mirror reversed images, otherwise the screen image may appear reversed. p Immediately verify whether the display changes to a rear view camera image when the shift lever is moved to REVERSE (R) from another position. p When the screen changes to full-screen rear view camera image during normal driving, switch to the opposite setting in "Camera Polarity". Setting rear view camera activation 1 Display the "System" setting screen. Displaying the "System" setting screen on page 23 2 Touch [Camera Settings]. 3 Touch [Back Camera Input] to switch "On" or "Off" (default). Setting the polarity of the rear view camera p This function is available when "Back Camera Input" is "On". Setting rear view camera activation on page 23 1 Display the "System" setting screen. Displaying the "System" setting screen on page 23 2 Touch [Camera Settings]. 3 Touch [Camera Polarity]. ● Battery (default): The polarity of the connected lead is positive. ● Ground: The polarity of the connected lead is negative. Setting the camera for Rear View mode To display "Rear View" at all times, "Rear View" needs to be set to "On". 1 Press . 2 Touch [Rear View] to switch "On" or "Off" (default). If no operations are performed for seven seconds on the AV operation screen, the camera view will appear automatically. p To set the rear view camera for Rear View mode, set "Back Camera Input" to "On". Setting rear view camera activation on page 23 Selecting the system language ● If the embedded language and the selected language setting are not the same, text information may not display properly. ● Some characters may not be displayed properly. 1 Display the "System" setting screen. Displaying the "System" setting screen on page 23 2 Touch [System Language]. 3 Touch the language that you want to use. Setting the beep sound 1 Display the "System" setting screen. Displaying the "System" setting screen on page 23 2 Touch [Beep Tone] to switch "On"(default) or "Off". Adjusting the response positions of the touch panel (touch panel calibration) If you feel that the touch panel keys on the screen deviate from the actual positions that respond to your touch, adjust the response positions of the touch panel screen. p This setting is available only when you stop your vehicle in a safe place and apply the parking brake. p Do not use sharp pointed tools such as a ballpoint or mechanical pen, which could damage the screen. p Do not turn off the engine while saving the adjusted position data. 1 Display the "System" setting screen. Displaying the "System" setting screen on page 23 2 Touch [Touch Panel Calibration]. 3 Touch four corners of the screen along the arrows. 23
-
 1
1 -
2
-
3
-
4
-
5
-
6
-
7
-
8
-
9
-
10
-
11
-
12
-
13
-
14
-
15
-
16
-
17
-
 18
18 -
 19
19 -
 20
20 -
 21
21 -
 22
22 -
 23
23 -
 24
24 -
 25
25 -
 26
26 -
 27
27 -
 28
28 -
29
-
30
-
31
-
32
-
33
-
34
-
35
-
36
-
37
-
38
-
39
-
40
-
41
-
42
-
43
-
44
-
45
-
46
-
47
-
48
-
49
-
50
-
51
-
52
-
53
-
54
-
55
-
56
-
57
-
58
-
59
-
60
-
61
-
62
-
63
-
64
-
65
-
66
-
67
-
68
-
69
-
70
-
71
-
72
-
73
-
74
-
75
-
76
-
77
-
78
-
79
-
80
-
81
-
82
-
83
-
84
-
85
-
86
-
87
-
88
-
89
-
90
-
91
-
92
-
93
-
94
-
95
-
96
-
97
-
98
-
99
-
100
-
101
-
102
-
103
-
104
-
105
-
106
-
107
-
108
-
109
-
110
-
111
-
112
-
113
-
114
-
115
-
116
-
117
-
118
-
119
-
120
-
121
-
122
-
123
-
124
-
125
-
126
-
127
-
128
-
129
-
130
-
131
-
132
-
133
-
134
-
135
-
136
-
137
-
138
-
139
-
140
 |
 |
