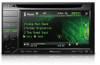
Pioneer AVH-P2300DVD Owner's Manual - Page 8
Touch Panel Calibration - installation
 |
UPC - 884938124508
View all Pioneer AVH-P2300DVD manuals
Add to My Manuals
Save this manual to your list of manuals |
Page 8 highlights
Section 02 Before you start http://www.pioneerelectronics.com 1 Register your product. We will keep the details of your purchase on file to help you refer to this information in the event of an insurance claim such as loss or theft. 2 Receive updates on the latest products and technologies. 3 Download owner's manuals, order product catalogues, research new products, and much more. 4 Your feedback is important in our continual effort to design and build the most advanced, consumer-focused product in the industry. Serial number Resetting the microprocessor By pressing RESET, you can reset the microprocessor to its initial settings without changing the bookmark information. The microprocessor must be reset in the following situations: ! Before using this unit for the first time after installation ! If the unit fails to operate properly ! When strange or incorrect messages ap- pear on the display 1 Turn the ignition switch OFF. 2 Press RESET with a pen tip or other pointed instrument. Note Switch your engine ON or set the ignition switch to ACC ON before pressing RESET in the following situations: ! After completing connections ! When erasing all stored settings ! When resetting the unit to its initial (factory) settings Demo mode The feature demo automatically starts when you select Off for the source and continues while the ignition switch is set to ACC or ON. To cancel the feature demo, press and hold MUTE. Press and hold MUTE again to restart. Operating the feature demo while the car engine is turned off it may drain the battery power. Important Failure to connect the red lead (ACC) of this unit to a terminal coupled with ignition switch on/off operations may lead to battery drain. Adjusting the response positions of the touch panels (Touch Panel Calibration) If you feel that the touch panel keys on the screen deviate from the actual positions that respond to your touch, adjust the response positions of the touch panel. Refer to Adjusting the response positions of the touch panels (Touch Panel Calibration) on page 57. RESET button 8 En Use and care of the remote control Installing the battery Slide the tray on the back of the remote control out and insert the battery with the plus (+) and minus (-) poles aligned properly.
-
 1
1 -
2
-
 3
3 -
 4
4 -
 5
5 -
 6
6 -
 7
7 -
 8
8 -
 9
9 -
 10
10 -
 11
11 -
 12
12 -
 13
13 -
14
-
15
-
16
-
17
-
18
-
19
-
20
-
21
-
22
-
23
-
24
-
25
-
26
-
27
-
28
-
29
-
30
-
31
-
32
-
33
-
34
-
35
-
36
-
37
-
38
-
39
-
40
-
41
-
42
-
43
-
44
-
45
-
46
-
47
-
48
-
49
-
50
-
51
-
52
-
53
-
54
-
55
-
56
-
57
-
58
-
59
-
60
-
61
-
62
-
63
-
64
-
65
-
66
-
67
-
68
-
69
-
70
-
71
-
72
-
73
-
74
-
75
-
76
-
77
-
78
-
79
-
80
-
81
-
82
-
83
-
84
-
85
-
86
-
87
-
88
 |
 |
