Pioneer AVR-W6100 Owner's Manual - Page 36
Replace the reflector and cover
 |
UPC - 012562594538
View all Pioneer AVR-W6100 manuals
Add to My Manuals
Save this manual to your list of manuals |
Page 36 highlights
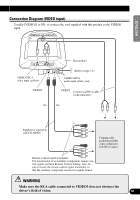
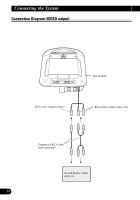
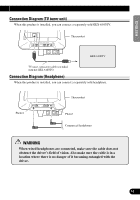
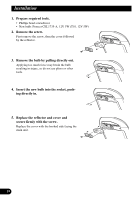
Installation 1. Prepare required tools. • Phillips head screwdriver • New bulb: Pioneer CEL1735-A, 12V 5W (T10, 12V 5W) 2. Remove the screw. First remove the screw, then the cover followed by the reflector. 3. Remove the bulb by pulling directly out. Applying too much force may break the bulb resulting in injury, so do not use pliers or other tools. 4. Insert the new bulb into the socket, pushing directly in. 5. Replace the reflector and cover and secure firmly with the screw. Replace the cover with the hooked side facing the main unit. 35
-
 1
1 -
2
-
3
-
4
-
5
-
6
-
7
-
8
-
9
-
10
-
11
-
12
-
13
-
14
-
15
-
16
-
17
-
18
-
19
-
20
-
21
-
22
-
23
-
24
-
25
-
26
-
27
-
28
-
29
-
30
-
 31
31 -
 32
32 -
 33
33 -
 34
34 -
 35
35 -
 36
36 -
 37
37 -
 38
38 -
 39
39 -
 40
40 -
 41
41 -
42
-
43
-
44
-
45
-
46
-
47
-
48
-
49
-
50
-
51
-
52
-
53
-
54
-
55
-
56
-
57
-
58
-
59
-
60
-
61
-
62
-
63
-
64
-
65
-
66
-
67
-
68
-
69
-
70
-
71
-
72
-
73
-
74
-
75
-
76
-
77
-
78
-
79
-
80
-
81
-
82
-
83
-
84
-
85
-
86
-
87
-
88
-
89
-
90
-
91
-
92
-
93
-
94
-
95
-
96
-
97
-
98
-
99
-
100
-
101
-
102
-
103
-
104
-
105
-
106
-
107
-
108
-
109
-
110
-
111
-
112
 |
 |

35
1.
Prepare required tools.
•
Phillips head screwdriver
•
New bulb: Pioneer CEL1735-A, 12V 5W (T10, 12V 5W)
2.
Remove the screw.
First remove the screw, then the cover followed
by the reflector.
3.
Remove the bulb by pulling directly out.
Applying too much force may break the bulb
resulting in injury, so do not use pliers or other
tools.
4.
Insert the new bulb into the socket, push-
ing directly in.
5.
Replace the reflector and cover and
secure firmly with the screw.
Replace the cover with the hooked side facing the
main unit.
Installation