Pioneer CDJ-900 Owner's Manual - Page 10
Rear Panel, Front Panel - link
 |
UPC - 012562966311
View all Pioneer CDJ-900 manuals
Add to My Manuals
Save this manual to your list of manuals |
Page 10 highlights
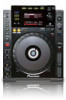
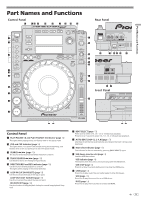
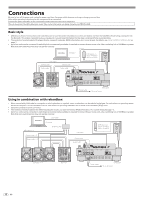
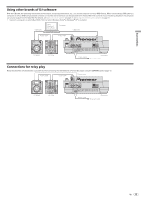
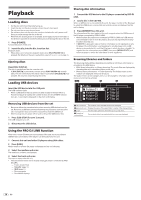
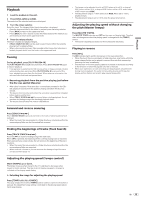
c TIME MODE/AUTO CUE (page 16) When pressed once, the main unit display's time display mode (remaining time display or elapsed time display) switches. When pressed for over 1 second, auto cue turns on and off. d Main unit display (page 11) e BROWSE (page 19) Press this to display the [BROWSE] screen. f TAG LIST (page 19) Press this to display the [TAG LIST] screen. g INFO (page 20) Press this to display the [INFO] screen. h MENU/UTILITY (page 21) When pressed once, the menu screen is displayed. The [UTILITY] screen is displayed when this is pressed for over 1 second. i BACK (page 19) Press this once to return to the previous screen. Press for over 1 second to move to the top layer. j TAG TRACK/REMOVE (page 19) Use these to add and remove tracks from the tag list. k Rotary selector When selecting tracks or setting items, the cursor moves when the rotary selector is turned. Press the rotary selector to enter. l STANDBY indicator (page 21) This lights when in the standby mode. m DISC EJECTh and DISC EJECT indicator (page 14) Use this to eject discs. n VINYL SPEED ADJUST (page 18) Use this to adjust the speed at which playback slows down and stops when the top of the jog dial is pressed and the speed at which normal playback resumes when the top of the jog dial is released. o CUE/LOOP CALLc/d (page 17) Use these to call out cue and loop points stored on the USB device. DELETE (page 17) Use this to delete cue and loop points stored on the USB device. MEMORY (page 17) Use this to store cue and loop points on the USB device. p JOG MODE and VINYL mode indicators (page 18) The mode switches between VINYL and CDJ each time this is pressed. The indicator lights when the VINYL mode is selected. q SLIP (page 18) When turned on, normal playback continues in the background with the original rhythm during scratch play, loop playback and reverse playback. r TEMPO ±6/±10/±16/WIDE (page 15) Use this to switch the playing speed adjustment range. s MASTER TEMPO (page 15) Use this to turn the master tempo function on and off. t TEMPO (page 15) Use this to adjust the track playing speed. u Jog dial (- REV/+ FWD) (page 17) This can be used for such operations as scratching, pitch bending, etc. v Jog dial display section (page 11) Rear Panel w POWER wON vOFF Press to turn the power on and off. x AUDIO OUT L/R (page 12) Connect the audio cables (included) here. y AC IN (page 12) Connect this to a power outlet. Connect the power cord after all the connections between devices have been completed. Be sure to use the included power cord. z CONTROL (page 18) Connect the control cord (included) here. A Kensington security slot B DIGITAL OUT Connect a digital coaxial cable here. C LINK (page 12) Connect the LAN cable (included) here. D USB (page 12) Connect to a computer. Front Panel E Disc insertion slot F Disc force eject pin insertion hole About ejecting discs by force ! If the disc cannot be ejected by pressing [DISC EJECTh], the disc can be ejected forcibly by inserting the disc force eject pin all the way into the disc force eject pin insertion hole on the main unit's front panel. ! When forcibly ejecting a disc, be sure to do so following the procedure below. 1 Press [POWER] and wait at least 1 minute after the set's power has turned off. Never forcibly eject a disc directly after turning off the set's power. Doing so is dangerous for the reasons described below. The disc will still be spinning when ejected and could hit your fingers, etc., causing injury. Also, the disc clamp will rotate in an unstable way, and the disc could get scratched. 2 Use the included disc force eject pin. (Do not use anything else.) The included disc force eject pin is mounted on the CDJ-900's bottom panel. When the pin is inserted all the way into the insertion hole, the disc is ejected 5 mm to 10 mm out of the disc insertion slot. Grasp the disc with your fingers and pull it out. 10 En
-
 1
1 -
2
-
3
-
4
-
 5
5 -
 6
6 -
 7
7 -
 8
8 -
 9
9 -
 10
10 -
 11
11 -
 12
12 -
 13
13 -
 14
14 -
 15
15 -
16
-
17
-
18
-
19
-
20
-
21
-
22
-
23
-
24
-
25
-
26
-
27
-
28
-
29
-
30
-
31
-
32
 |
 |