Pioneer CDJ-900 Owner's Manual - Page 21
Changing the, settings - case
 |
UPC - 012562966311
View all Pioneer CDJ-900 manuals
Add to My Manuals
Save this manual to your list of manuals |
Page 21 highlights
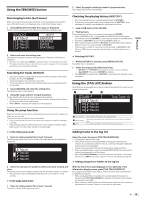
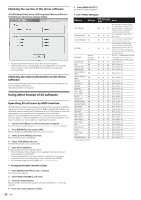
Changing the settings Changing the settings Using the [MENU/UTILITY] button Various settings on the CDJ-900 can be changed by pressing [MENU/UTILITY]. 1 2 UTILITY QUANTIZE SLIP FLASHING AUTO CUE LEVEL MIDI CHANNEL ON OFF -60dB 1 1Setting item 2Setting The CDJ-900's settings items are displayed here. The settings for the various items are displayed here. Changing the settings 1 Press [MENU/UTILITY] for over 1 second. The [UTILITY] screen is displayed. 2 Select and enter the setting item. The cursor moves to the setting. 3 Change the setting and enter. The cursor returns to the setting. ! Press [BACK] before changing the setting to return to step 2. 4 Press [MENU/UTILITY]. Press [MENU/UTILITY] to return to the menu screen. Setting the auto standby mode 1 Select [AUTO STANDBY] and enter the setting item. 2 Select [ON] or [OFF] and enter. When [AUTO STANDBY] is set to [ON], the power management function is activated in the following cases and the standby mode is set. ! When no operation whatsoever is performed for over 4 hours with no disc loaded or USB device connected, no PRO DJ LINK connection, and no computer connected to the USB port (on the CDJ-900's rear panel) ! When the CDJ-900 is operated, the standby mode is canceled. ! The CDJ-900 is shipped with the power management function turned on. If you do not want to use the power management function, set [AUTO STANDBY] to [OFF]. Setting [HISTORY NAME] The name of the [HISTORY] recorded on the USB device can be preset. 1 Select [HISTORY NAME] and enter the setting item. 2 Using the rotary selector to input characters. 3 Press the rotary selector to enter. The [HISTORY NAME] setting is changed. ! If [HISTORY NAME] is not set, numbers are added sequentially after [HISTORY]. ! The maximum number of characters that can be set for the [HISTORY] name is 32, including both letters, numbers and symbols. List of settings The factory default settings are indicated in bold. Options settings Setting ranges Descriptions QUANTIZE ON/ OFF For details, see QUANTIZE on page 11. SLIP FLASHING ON/OFF Sets whether or not the SLIP indicator flashes during DJ play using the [SLIP] button. -36dB/ -42dB/ -48dB/ -54dB/ AUTO CUE LEVEL -60dB/-66dB/-72dB/-78dB For details, see Changing the auto cue level on page 16. MIDI CHANNEL 1 - 16 - LIBRARY CREATOR LIBRARY/ FOLDER Sets the browsing method for media on which Pioneer MEP-7000 libraries are recorded. HISTORY NAME - For details, refer to Setting [HISTORY NAME] on the right. DIGITAL OUT 16 bit/24 bit This switches the number of bits of the audio signals output from the [DIGITAL OUT] terminal. PLAYER No. AUTO, 1 - 4 Sets this unit's player number. The player number cannot be changed when a medium is loaded in this unit. LINK STATUS - When PRO DJ LINK connections are made, the connection status is displayed here. AUTO STANDBY ON/OFF For details, refer to Setting the auto standby mode on the right. VERSION No. - Displays the CDJ-900's software version. En 21
-
 1
1 -
2
-
3
-
4
-
5
-
6
-
7
-
8
-
9
-
10
-
11
-
12
-
13
-
14
-
15
-
 16
16 -
 17
17 -
 18
18 -
 19
19 -
 20
20 -
 21
21 -
 22
22 -
 23
23 -
 24
24 -
 25
25 -
 26
26 -
27
-
28
-
29
-
30
-
31
-
32
 |
 |
