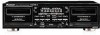
Pioneer CT-W208R Operating Instructions - Page 9
Reverse Mode Switch Rev Mode, Operation Of Deck I With A Remote, Control Unit Not Designed For, - remote control
 |
UPC - 012562489056
View all Pioneer CT-W208R manuals
Add to My Manuals
Save this manual to your list of manuals |
Page 9 highlights
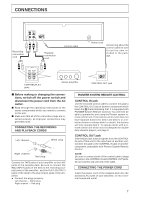
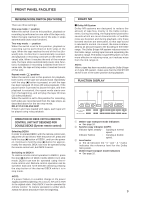
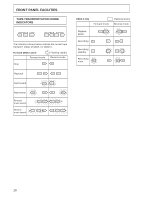
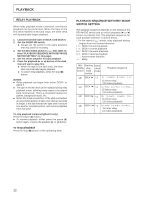
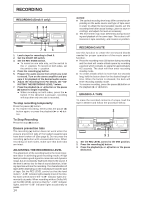
FRONT PANEL FACILITIES REVERSE MODE SWITCH (REV MODE) There are three settings: One way mode O position When the switch is set to this position, playback or recording is performed on one side of the tape only. When the tape reaches the end of the side, it stops automatically (auto stop function). Two way mode [ position When the switch is set to this position, playback or recording can be performed on both sides of the tape. When the tape reaches the end of the first (forward) side, its direction is automatically reversed, and playback or recording continues on the other (reverse) side. When it reaches the end of the reverse side, the tape stops automatically (auto stop function). If playback or recording is started from the reverse side, the tape will stop when it reaches the end of that side. Repeat mode position When the switch is set to this position for playback, both sides of the tape are played back repeatedly until the stop (7) button is pressed, or until the tape has been replayed 15 times (32 sides playback). If the pause button is pressed to pause the tape, and then playback is restarted, the repeat mode starts over from the beginning, and will play the tape 15 times (32 sides playback). When the switch is set to this position for recording, both sides are recorded and then the tape stops, as described above for the two way mode. RELAY PLAY/BLANK SKIP If Deck I and II are loaded with tapes, each tape will be played using relay palyback. OPERATION OF DECK I WITH A REMOTE CONTROL UNIT NOT DESIGNED FOR DOUBLE DECKS (System remote control) Selecting DECK I In order to operate DECK I with the remote control unit, adjust the unit as follows: With the power off, press and hold the stop (7) button of DECK I, and turn the power on. Continue to hold the stop (7) button for approximately five seconds. DECK I can now be operated using the remote control unit, but DECK II cannot. Switching to DECK II To restore remote control operation to DECK II, press the stop (7) button of DECK II while DECK II is in stop mode. DECK II can now be operated using the remote control unit. Remote control operation can be switched back and forth between decks by pressing the stop button of the desired DECK while it is in stop mode. NOTE: If a power failure or a sudden change in the power supply (caused by lightning, etc.) occurs, the unit is reset to its original state. Only DECK II can be operated by remote control. To restore operation to either deck, repeat the above procedure from the beginning. DOLBY NR 7 Dolby NR System Dolby NR systems are designed to reduce the amount of tape hiss, mainly in the treble components. During recording, the highpitched pianissimo sounds which are most characteristic of audible noise are boosted, and during playback, only these boosted sections are attenuated, so that tape sound is returned to normal. As a result, the noise is attenuated by an amount equal to the boosting in the treble range. The Dolby B-type NR system reduces noise in the treble range, cutting tape hiss and expanding the dynamic range. The Dolby C-type NR system is even more effective in reducing noise, as it reduces noise from the mid-range on. NOTE: When a tape has been recorded using the Dolby B-type or C-type NR system, make sure that the DOLBY NR switch is set to the same position during playback. FUNCTION DISPLAY 1 23 4 DECK I REV PLAY FWD COPY DECK @II REC REV PLAY FWD LEFT LEVEL -0 0 RIGHT -15 -9 -3 Ÿ0 -3 dB 1 DECK I tape transport mode indicators ÷ See page 10. 2 Synchro copy indicator (COPY) Indicator lights steadily : Copying at normal speed. Indicator flashes : Copying at double speed. 3 Level meter ÷ The Ÿ between the " 0 " and " -3 " marks indicates the reference level for the Dolby NR system. 4 DECK II tape transport mode indicators ÷ See page 10. 9
-
 1
1 -
2
-
3
-
 4
4 -
 5
5 -
 6
6 -
 7
7 -
 8
8 -
 9
9 -
 10
10 -
 11
11 -
 12
12 -
 13
13 -
 14
14 -
15
-
16
-
17
-
18
-
19
-
20
 |
 |
