Pioneer DEH-12E Owner's Manual - Page 4
Head unit, Display indication, Basic Operations, Operating this unit
 |
UPC - 012562968261
View all Pioneer DEH-12E manuals
Add to My Manuals
Save this manual to your list of manuals |
Page 4 highlights
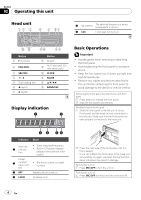
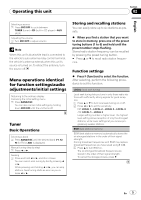
Section 02 Operating this unit Head unit 5 5 (stereo) The selected frequency is being broadcasted in stereo. 6 LOC Local seek tuning is on. Button 1 F (function) 2 EQ/LOUD 3 SRC/OFF 4 1 to 6 5 Disc loading slot 6 h (eject) 7 A (audio) Button 8 Detach 9 AUX input jack (3.5 mm stereo jack) a CLOCK b PAUSE c a/b/c/d d BAND/ESC Display indication Basic Operations Important ! Handle gently when removing or attaching the front panel. ! Avoid subjecting the front panel to excessive shock. ! Keep the front panel out of direct sunlight and high temperatures. ! Remove any cables and devices attached to this unit before detaching the front panel to avoid damage to the device or vehicle interior. Removing the front panel to protect your unit from theft 1 Press detach to release the front panel. 2 Grab the front panel and remove. Re-attaching the front panel 1 Slide the front panel to the left until it clicks. Front panel and the head unit are connected on the left side. Make sure that the front panel has been properly connected to the head unit. Indicator State Main dis1 play sec- tion ! Tuner: band and frequency ! Built-in CD player: elapsed playback time and text information Preset 2 number/ track num- ! The track number or preset number. ber 3 RPT Repeat play is turned on. 4 LOUD Loudness is on. 2 Press the right side of the front panel until it is firmly seated. If you can't attach the front panel to the head unit successfully, try again. However, forcing the front panel into place may result in damage. Turning the unit on 1 Press SRC/OFF to turn the unit on. Turning the unit off 1 Press SRC/OFF and hold until the unit turns off. 4 En
-
 1
1 -
 2
2 -
 3
3 -
 4
4 -
 5
5 -
 6
6 -
 7
7 -
 8
8 -
 9
9 -
 10
10 -
11
-
12
-
13
-
14
-
15
-
16
-
17
-
18
-
19
-
20
-
21
-
22
-
23
-
24
-
25
-
26
-
27
-
28
-
29
-
30
-
31
-
32
-
33
-
34
-
35
-
36
-
37
-
38
-
39
-
40
-
41
-
42
 |
 |
