Pioneer DEH-12E Owner's Manual - Page 6
Audio Adjustments, Operating this unit - cd player
 |
UPC - 012562968261
View all Pioneer DEH-12E manuals
Add to My Manuals
Save this manual to your list of manuals |
Page 6 highlights
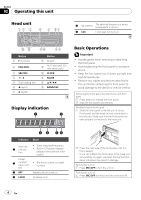
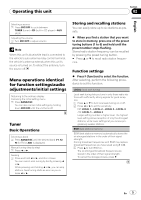
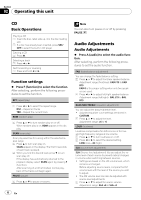
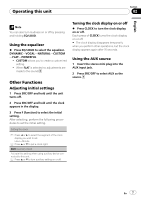
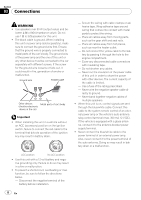
Section 02 Operating this unit CD Basic Operations Playing a CD 1 Insert the disc, label side up, into the disc loading slot. 1 If a disc has already been inserted, press SRC/ OFF to select the built-in CD player. Ejecting a CD 1 Press h. Selecting a track 1 Press c or d. Fast forwarding or reversing 1 Press and hold c or d. Function settings % Press F (function) to select the function. After selecting, perform the following procedures to set the function. RPT (repeat play) 1 Press c or d to select the repeat range. DSC - Repeat all tracks TRK - Repeat the current track RDM (random play) 1 Press a or b to turn random play on or off. When random play is on, RDM appears in the display. SCAN (scan play) Scan play searches for a song within the selected repeat range. 1 Press a to turn scan play on. SCAN appears in the display. The first 10 seconds of each track is played. 2 When you find the desired track press b to turn scan play off. If the display has automatically returned to the playback display, select SCAN again by pressing F (function). After scanning of a CD is finished, normal playback of the tracks will begin again. PAUSE (pause) 1 Press a or b to pause or resume. 6 En Note You can also turn pause on or off by pressing PAUSE. Audio Adjustments Audio Adjustments % Press A (audio) to select the audio function. After selecting, perform the following procedures to set the audio function. FAD (fader/balance adjustment) You can change the fader/balance setting. 1 Press a or b to adjust front/rear speaker balance. Adjustment range (front/rear): FAD F15 to FAD R15 FAD 0 is the proper setting when only two speakers are used. 2 Press c or d to adjust left/right speaker balance. Adjustment range (left/right): BAL L15 to BAL R15 BASS/MID/TREBLE (equalizer adjustment) You can adjust the bass/mid/treble level. ! Adjusted equalizer curve settings are stored in CUSTOM. 1 Press a or b to adjust the level. Adjustment range: +6 to -6 LOUD (loudness) Loudness compensates for deficiencies in the lowand high-frequency ranges at low volume. 1 Press a or b to turn loudness on or off. 2 Press c or d to select the desired setting. LOW (low)-HI (high) SLA (source level adjustment) SLA (Source level adjustment) lets you adjust the volume level of each source to prevent radical changes in volume when switching between sources. ! Settings are based on the FM volume level, which remains unchanged. Before adjusting source levels, compare the FM volume level with the level of the source you wish to adjust. ! The AM volume level can also be adjusted with source level adjustments. 1 Press a or b to adjust the source volume. Adjustment range: SLA +4 to SLA -4
-
 1
1 -
 2
2 -
 3
3 -
 4
4 -
 5
5 -
 6
6 -
 7
7 -
 8
8 -
 9
9 -
 10
10 -
 11
11 -
 12
12 -
13
-
14
-
15
-
16
-
17
-
18
-
19
-
20
-
21
-
22
-
23
-
24
-
25
-
26
-
27
-
28
-
29
-
30
-
31
-
32
-
33
-
34
-
35
-
36
-
37
-
38
-
39
-
40
-
41
-
42
 |
 |