Pioneer DEH-P4300 Owner's Manual
Pioneer DEH-P4300 Manual
 |
View all Pioneer DEH-P4300 manuals
Add to My Manuals
Save this manual to your list of manuals |
Pioneer DEH-P4300 manual content summary:
- Pioneer DEH-P4300 | Owner's Manual - Page 1
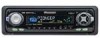
ENGLISH FRANÇAIS Multi-CD control High power CD player with FM/AM tuner Syntoniseur FM/AM et lecteur de CD, "Puissance élevée", avec contrôleur pour lecteur de CD à chargeur Operation Manual DEH-P4300 DEH-P43 Mode d'emploi DEUTSCH FRANÇAIS ITALIANO NEDERLANDS - Pioneer DEH-P4300 | Owner's Manual - Page 2
5 About This Product 5 About This Manual 5 Important 5 Precaution 5 After-sales Service for Pioneer Products .......... 6 When using the 50-Disc Type Multi-CD Player 6 About the XM READY Mark 6 Remote Controller and Care 7 Using the Remote Controller 7 Battery 7 Basic Operation 8 To - Pioneer DEH-P4300 | Owner's Manual - Page 3
- Switching the AUX Mode (AUX) - Setting the Dimmer (DIMMER) - Setting the Rear Output (FRT+REAR) Other Functions 41 Displaying the Time 41 Using the AUX Source 41 - Selecting the AUX Source - AUX Title Input (TITLE IN) CD Player and Care 42 Precaution 42 Built-in CD Player's Error Message 43 - Pioneer DEH-P4300 | Owner's Manual - Page 4
this by setting your equipment at a safe level BEFORE your hearing adapts. To establish a safe level: • Start your volume control at a low setting. • dryer, noisy restaurant 80 Average city traffic, garbage disposals, alarm clock at two feet. THE FOLLOWING NOISES CAN BE DANGEROUS UNDER CONSTANT - Pioneer DEH-P4300 | Owner's Manual - Page 5
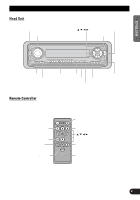
OPEN button ESPAÑOL DEUTSCH FRANÇAIS SOURCE button Buttons 1-6 DISPLAY button PGM button CLOCK button AUDIO button FUNCTION button BAND button Remote Controller A remote controller that enables remote operation of the head unit is supplied. Operation is the same as when using buttons - Pioneer DEH-P4300 | Owner's Manual - Page 6
especially important that you read and observe the "Precaution" on this page and in other sections. This manual explains head unit operation. You can perform the same operations with the remote controller. Important The serial number of this device is located on the bottom of this product. For your - Pioneer DEH-P4300 | Owner's Manual - Page 7
service station regarding the XM tuner that can be connected to this product. For operation of the XM tuner, refer to the XM tuner owner's manual. Note: • XM Satellite Radio is developing a new band of radio in the U.S.A. The system will use direct satellite-to-receiver broadcasting technology - Pioneer DEH-P4300 | Owner's Manual - Page 8
controller is not used for a month or longer. • If the event of battery leakage, wipe the remote controller completely clean and install a new bat- tery. WARNING: • Keep the Lithium Battery out of reach of children. Should the Battery be swallowed, immediately consult a doctor. CAUTION: • Do not - Pioneer DEH-P4300 | Owner's Manual - Page 9
In the following cases, the sound source will not change: * When a product corresponding to each source is not connected to this product. * When no disc is set in this product. * When no magazine is set in the Multi-CD player. * When the AUX (external input) is set to OFF. (Refer to page 39.) • When - Pioneer DEH-P4300 | Owner's Manual - Page 10
Basic Operation 2. Raise or lower the volume. Rolling the VOLUME changes the volume level. Note: • Roll clockwise to raise the volume level. • Roll counterclockwise to lower the volume level. 3. Turn the source OFF. Hold for 1 second 9 - Pioneer DEH-P4300 | Owner's Manual - Page 11
and Seek Tuning • You can select the tuning method by changing the length of time you press the 2/3 button. Manual Tuning (step by step) Seek Tuning 0.5 seconds or less 0.5 seconds or more Note: • If you continue pressing the button for longer than 0.5 seconds, you can - Pioneer DEH-P4300 | Owner's Manual - Page 12
CD Player Note: • Be sure to close the front panel after loading or ejecting a disc. Switching the Display Each press of the DISPLAY button changes the display in the following order: Playback mode (Play time) = Disc Title Note: • If you switch displays when disc titles have not been input 11 - Pioneer DEH-P4300 | Owner's Manual - Page 13
. • If the Built-in CD player cannot operate properly, an error message (such as "ERROR-14") appears on the display. Refer to "Built-in CD Player's Error Message" on page 43. • The Built-in CD player is not equipped with CD TEXT function. • A CD TEXT disc is a CD featuring recorded text information - Pioneer DEH-P4300 | Owner's Manual - Page 14
ON or a new disc is selected for playback. "READY" is displayed. • If the Multi-CD player cannot operate properly, an error message such as "ERROR-14" is displayed. Refer to the Multi-CD player owner's manual. • If there are no discs in the Multi-CD player magazine, "NO DISC" is displayed. 13 - Pioneer DEH-P4300 | Owner's Manual - Page 15
Function Menu, Detailed Setting Menu or Initial Setting Menu. You can switch between each of these menus and between different modes in the menus using button x on the head unit or remote con- troller. next section, "Function Menu Functions".) Each press changes the Mode ... Continued overleaf. 14 - Pioneer DEH-P4300 | Owner's Manual - Page 16
Memory (BSM) Local Seek Tuning (LOCAL) Button: Operation 5: ON ∞: OFF 1 5: ON 3 ∞: OFF 2 2 or 3: Select (Sensitivity) Page 18 18 7 Built-in CD Player Function name (Display) Repeat Play (REPEAT) Random Play (RANDOM) Scan Play (T-SCAN) Pause (PAUSE) Button: Operation 5: ON ∞: OFF 5: ON ∞: OFF - Pioneer DEH-P4300 | Owner's Manual - Page 17
ENGLISH ESPAÑOL 7 Multi-CD Player Function name (Display) Repeat Play (REPEAT) Selecting Discs by Disc Detailed Setting Menu. DEUTSCH FRANÇAIS Hold for 2 seconds 2. Select the desired mode. (Refer to next section, "Detailed Setting Menu Functions".) ITALIANO NEDERLANDS Each press changes - Pioneer DEH-P4300 | Owner's Manual - Page 18
has no Detailed Setting Menu. 7 Built-in CD Player Function name (Display) Disc Title Input (TITLE IN) 3 3: Memory Page 20 7 Multi-CD Player Function name (Display) Disc Title Input (TITLE IN) ITS Programming (ITS) seconds) 18 Built-in CD player Pause 20 Multi-CD player Pause 22 TV Best - Pioneer DEH-P4300 | Owner's Manual - Page 19
DEUTSCH FRANÇAIS FM : LOCAL 1 Ô LOCAL 2 Ô LOCAL 3 Ô LOCAL 4 AM : LOCAL 1 Ô LOCAL 2 Note: • The LOCAL 4 setting allows reception of only the strongest stations, while lower settings let you receive progressively weaker stations. Best Stations Memory (BSM) The BSM function stores stations in memory - Pioneer DEH-P4300 | Owner's Manual - Page 20
Using the Built-in CD Player Repeat Play (REPEAT) Repeat Play plays the same track repeatedly. /Reverse, Repeat Play is automatically canceled. Random Play (RANDOM) Random Play plays the tracks on a CD in random order for variety. 1. Press the FUNCTION button and select the Random mode (RANDOM) in - Pioneer DEH-P4300 | Owner's Manual - Page 21
(Perform the same operation as (described) on page 25 under "Using Multi-CD Players".) Note: • After the title for 48 discs have been entered, data for a new disc will overwrite the oldest one. • If you connect a Multi-CD player, you can input disc titles for up to 100 discs. 20 FRANÇAIS ITALIANO - Pioneer DEH-P4300 | Owner's Manual - Page 22
-track Repeat Disc Repeat Display MCD TRK DSC Indicator -RPT DISC Note: • If you select other discs during the repeat play, the repeat play range changes to Multi-CD player Repeat. • If you perform Track Search or Fast Forward/Reverse during One-track Repeat, the repeat play range - Pioneer DEH-P4300 | Owner's Manual - Page 23
Scan mode in the Function Menu again. Display DSCN SCAN Play range Disc Repeat Multi-CD player Repeat Note: • Scan Play is canceled automatically after all the tracks or discs have been scanned. • One-track Repeat changes to the Disc Repeat when you switch the Scan Play ON. Pause (PAUSE) Pause - Pioneer DEH-P4300 | Owner's Manual - Page 24
search for the track you wish to play when a Multi-CD player is installed. You can use ITS to program automatic playback of up track you wish to program. 2. Select the ITS Programming mode (ITS) in the Detailed Setting Menu. (Refer to page 16.) 3. Program the desired track with the 5 button. Note: - Pioneer DEH-P4300 | Owner's Manual - Page 25
OL DEUTSCH Erase a Track Program 1. Select the track you wish to erase, during ITS Play. 2. Select the ITS Programming mode (ITS) in the Detailed Setting Menu. (Refer to page 16.) 3. Erase the track program with the ∞ button. ITS is canceled and playback of the next ITS-programmed track begins. If - Pioneer DEH-P4300 | Owner's Manual - Page 26
the disc title. 2. Select the Disc Title Input mode (TITLE IN) in the Detailed Setting Menu. (Refer to page 16.) Note: • When playing a CD TEXT disc on a CD TEXT compatible Multi-CD player, you cannot switch to this mode. • A CD TEXT disc is a CD featuring recorded text information such as Disc - Pioneer DEH-P4300 | Owner's Manual - Page 27
compatible Multi-CD player. (Refer to page 28.) • Switch the Disc Title Display with the DISPLAY button. Each press of the DISPLAY button changes the display in the following order: Playback mode (Play Time) = Disc Title Note: • If you switch displays when disc titles have not been input, "NO TITLE - Pioneer DEH-P4300 | Owner's Manual - Page 28
Function Menu. 2. Select the desired mode with the 5/∞ buttons. COMP OFF = COMP 1 = COMP 2 = COMP OFF = DBE 1 = DBE 2 Note: • You can use these functions with a Multi-CD player that has them. If the player does not feature the COMP/DBE functions, "NO COMP" is displayed if you try to use them. 27 - Pioneer DEH-P4300 | Owner's Manual - Page 29
compatible type) You can use these functions when playing a CD TEXT disc on a CD TEXT compatible Multi-CD player. Title Display Switching • Select the desired title display with the DISPLAY button. Each press of the DISPLAY button changes the display in the following order: Playback mode (Play Time - Pioneer DEH-P4300 | Owner's Manual - Page 30
on the rear output. (The bass boost is the same for both front and rear.) For both "FRT1" and "FRT2" the "HI" setting provides a more pronounced effect than the "LOW" setting. 1. Select the desired SFEQ mode. "F1" FRT1-HI (front 1-high) = FRT1-LOW (front 1-low) = FRT2-HI (front 2-high) = FRT2-LOW - Pioneer DEH-P4300 | Owner's Manual - Page 31
" on page 33.) 7 CUSTOM 1 A separate "CUSTOM 1" curve can be created for each source. (The Built-in CD player and Multi-CD player are set to the same Equalizer Curve Adjustment setting automatically.) If you make adjustments when a curve other than "CUSTOM 2" is selected, the equalizer curve - Pioneer DEH-P4300 | Owner's Manual - Page 32
you do not perform an operation within about 30 seconds, the Audio Menu is automatically canceled. • Audio Menu functions change depending on the Rear Output setting in the Initial Setting Menu. (Refer to "Setting the Rear Output" on page 40.) 1. Select the desired mode in the Audio Menu. Each press - Pioneer DEH-P4300 | Owner's Manual - Page 33
2 speakers are in use. Equalizer Curve Adjustment (EQ-LOW/EQ-MID/EQ-HIGH) You can adjust the currently selected equalizer curve settings as desired. 1. Press the AUDIO button and select the Equalizer mode (EQ-LOW/EQ-MID/EQ-HIGH) in the Audio Menu. 2. Select the band you - Pioneer DEH-P4300 | Owner's Manual - Page 34
Audio Adjustment Equalizer Curve Fine Adjustment You can adjust the center frequency and the Q factor (curve characteristics) of each currently selected curve band (EQ-LOW/EQ-MID/EQ-HIGH). Level (dB) Center frequency Q=2N Q=2W Frequency (Hz) 1. Press the AUDIO button for 2 seconds to select - Pioneer DEH-P4300 | Owner's Manual - Page 35
ENGLISH ESPAÑOL DEUTSCH Bass Adjustment (BASS) You can adjust the cut-off frequency and the Bass level. In "FRT1" mode, bass adjustment affects only the rear output: front output cannot be adjusted. 1. Press the AUDIO button and select the Bass mode (BASS) in the Audio Menu. 2. Select the desired - Pioneer DEH-P4300 | Owner's Manual - Page 36
MID (mid) += HI (high) "LOUD" Subwoofer Output (SUB.W) When a Subwoofer is connected, switch Subwoofer output ON. Initially, Subwoofer output is ON. 1. Press the AUDIO button and " Note: • When the Rear Output setting is "FRT+REAR", you cannot switch the Subwoofer ON/OFF mode. (Refer to page 40.) - Pioneer DEH-P4300 | Owner's Manual - Page 37
in the FM modes. • The AM volume level, which is different from the FM base setting volume level, can also be adjusted similar to sources other than tuner. • The Built-in CD player and Multi-CD player are set to the same volume adjustment setting auto- matically. 36 FRANÇAIS ITALIANO NEDERLANDS - Pioneer DEH-P4300 | Owner's Manual - Page 38
outward. Take care not to grip it tightly or drop it. 3. Use the protective case (provided for DEH-P4300) to store/carry the detached front panel. Note: • The protective case is not provided for DEH-P43. Replacing the Front Panel • Replace the front panel by holding it upright to this product and - Pioneer DEH-P4300 | Owner's Manual - Page 39
With this menu, you can perform initial settings for this product. 1. Turn the source OFF. 2. Enter the Initial Setting Menu. Hold for 2 seconds 3. Select a desired mode. Each press changes the Mode ... 4. Operate a mode. 5. Cancel the Initial Setting Menu. Note: • Holding down the FUNCTION button - Pioneer DEH-P4300 | Owner's Manual - Page 40
. Switching the AUX Mode (AUX) It is possible to use auxiliary (AUX) equipment with this product. Activate the AUX mode when using external equipment with this product. 1. Press the FUNCTION button and select the AUX Setting mode (AUX) in the Initial Setting Menu. 2. Switch the AUX Setting ON/OFF - Pioneer DEH-P4300 | Owner's Manual - Page 41
a rear speaker lead directly to a Subwoofer without using an auxiliary amp. Initially, the unit is set for rear full-range speaker connection ("FRT+REAR"). Note: • Even if you change this setting, there is no output unless you switch the Subwoofer Output (refer to page 35) in the Audio Menu ON - Pioneer DEH-P4300 | Owner's Manual - Page 42
RB20 or CD-RB10 (sold separately) enables you to connect this product to auxiliary equipment featuring an RCA output. For more details, refer to the IP-BUS-RCA Interconnector's Owner's Manual. Selecting the AUX Source • Select AUX. (Refer to page 8.) Each press changes the Source ... AUX Title Input - Pioneer DEH-P4300 | Owner's Manual - Page 43
Titles and other text information recorded on a CD-R disc may not be displayed by this product. • This product conforms to Do not affix labels or apply chemicals to discs. • Condensation may collect inside the player when using the heater in cold weather, inter- fering with playback. Turn it off - Pioneer DEH-P4300 | Owner's Manual - Page 44
your nearest PIONEER Service Center. Message ERROR- 11, 12, 17, 30 ERROR- 11, 12, 17, 30 ERROR- 14 ERROR- 10, 11, 12, 14, 17, 30, A0 ERROR- 44 HEAT Possible cause Dirty disc. Scratched disc. Unrecorded CD. Electrical or mechanical problem. All tracks are setting track skip. CD player overheating - Pioneer DEH-P4300 | Owner's Manual - Page 45
kHz) (High 11 dB (100 Hz), +11 dB (10 kHz) (volume: -30 dB) Tone controls (Bass Frequency: 40/63/100/160 Hz Level: ±12 dB (Treble Frequency: 2.5k/4k/6.3k/10k Hz Level: ±12 dB Subwoofer output Frequency 50/80/125 Hz Slope 12 dB/oct Gain 12 dB CD player System Compact disc - Pioneer DEH-P4300 | Owner's Manual - Page 46
caution 5 Service après-vente des produits PIONEER .... 6 Lors de l'utilisation du lecteur de CD à changeur 50 disques 6 À propos de la marque XM READY équences - Gamme Opérations de base sur le lecteur de CD intégr 11 - Choix des indications affichées - Ouverture - Recherche d'une plage musicale et - Pioneer DEH-P4300 | Owner's Manual - Page 47
- Réglage des graves (BASS) - Réglage des aigus (TRE) - Mise en service de la correction physiologique (LOUD) - Sortie vers le haut-parleur d'extrêmes graves Utilisation de l'entrée AUX 41 - Choix de l'entrée AUX - Frappe du nom de l'entrée AUX (TITLE IN) Lecteur de CD et entretien 42 Précaution - Pioneer DEH-P4300 | Owner's Manual - Page 48
qui est plus important, sans affecter votre ouïe sensible. Le son peut être décevant. Avec le temps, le "niveau de confort" de votre ouïe s'adapte aux volumes sonores plus élevés. Ainsi, les sons "normaux" peuvent en fait être forts et affecter votre ouïe. Protégez-vous contre cela en réglant votre - Pioneer DEH-P4300 | Owner's Manual - Page 49
Touche SOURCE Touches 1-6 Touche PGM Touche AUDIO Touche DISPLAY Touche CLOCK Touche FUNCTION Touche BAND Télécommande Un boîtier de télécommande ment central. Touche FUNCTION Touche BAND Touche CD Appuyez une fois sur cette touche pour choisir un CD. Touche PAUSE Appuyez une fois sur cette - Pioneer DEH-P4300 | Owner's Manual - Page 50
Avant d'utiliser cet appareil Quelques mots concernant cet appareil Les fréquences d'accord de cet appareil sont attribuées pour une utilisation en Amérique du Nord. Il s'ensuit que l'utilisation de l'appareil dans d'autres régions peut donner lieu à des anomalies de réception. Quelques mots - Pioneer DEH-P4300 | Owner's Manual - Page 51
revendeur ou du centre de service autorisé Pioneer le plus proche en ce qui concerne le tuner XM pouvant être connecté à cet appareil. Pour le fonctionnement du tuner XM, reportez-vous à son mode d'emploi. Remarque: • La radio satellite XM utilise une nouvelle bande radio aux États-Unis. Le système - Pioneer DEH-P4300 | Owner's Manual - Page 52
Remarques concernant le boîtier de télécommande Utilisation du boîtier de télécommande Cet appareil est livré avec un boîtier de télécommande qui en facilite l'emploi. • Pointez la télécommande vers le panneau avant pour l'utiliser. Précaution: • Ne rangez pas la télécommande dans un endroit tès - Pioneer DEH-P4300 | Owner's Manual - Page 53
vous à la page 11.) 1. Choisissez la source (par exemple, choisissez le syntoniseur). Chaque pression change la source ... connecté à cet appareil. * L'appareil ne contient aucun disque. * Le lecteur de CD à chargeur ne contient aucun chargeur. * L'entrée AUX (entrée extérieure) n'est pas en service - Pioneer DEH-P4300 | Owner's Manual - Page 54
Opérations de base 2. Augmentez ou diminuez le niveau d'écoute. Rouler la commande VOLUME, change le niveau d'écoute. Remarque: • Roulez la commande dans le sens des aiguilles d'une montre pour augmenter le niveau d'écoute. • Roulez la commande dans le sens - Pioneer DEH-P4300 | Owner's Manual - Page 55
Fréquence Indicateur de gamme Numéro de présélection DEUTSCH FRANÇAIS ITALIANO NEDERLANDS Mise en mémoire des fréquences • Les mémoires associées aux touches 1 à 6 permettent de conserver les fréquences des stations. Rappel d'une présélection Mise en mémoire d'une fréquence 2 secondes ou moins - Pioneer DEH-P4300 | Owner's Manual - Page 56
de CD intégré Remarque: • Après la mise en place ou d'ejecter un disque, n'oubliez pas de refermer le panneau avant. Choix des indications affichées Chaque pression sur la touche DISPLAY change les indications musicale Déplacement rapide du capteur 0,5 seconde ou moins Pression continue 11 - Pioneer DEH-P4300 | Owner's Manual - Page 57
n'est pas nécessaire de retirer le disque pour mettre le lecteur de CD en service, ou hors service. (Reportez-vous à la page 8.) • Ne conservez pas le disque partiellement introduit dans le lecteur (après son éjection) car il pourrait être endommagé. Remarque: • Si vous ne parvenez pas à introduire - Pioneer DEH-P4300 | Owner's Manual - Page 58
) Recherche d'un disque • Vous pouvez choisir un disque directement grâce aux touches 1 à 6. Il vous suffit pour cela d'appuyer sur la touche de CD à chargeur ne fonctionne pas normalement, un message d'erreur tel que "ERROR-14" s'affiche. Reportez-vous alors au mode d'emploi du lecteur de CD - Pioneer DEH-P4300 | Owner's Manual - Page 59
également de savoir aisément quelles touches 5/∞/2/3 vous pouvez utiliser pour mettre en service, ou hors service, une source, répéter une plage musicale et effectuer d'autres opérations. Les la section suivante, "Fonctions du menu des fonctions".) Chaque pression change le mode ... (à suivre) 14 - Pioneer DEH-P4300 | Owner's Manual - Page 60
Opérations de base 2. Procédez aux réglages requis. (par exemple, la répétition de la lecture) La Hors 1 5: En 3 ∞: Hors 2 2 ou 3: Choisissez (Sensibilité) Page 18 18 7 Lecteur de CD intégré Fonction (Indication affichée) Répétition de la lecture (REPEAT) Lecture au hasard (RANDOM) Examen rapide - Pioneer DEH-P4300 | Owner's Manual - Page 61
ENGLISH FRANÇAIS DEUTSCH 7 Lecteur de CD à chargeur Fonction (Indication affichée) Répétition de la lecture ( à la section suivante, "Fonctions du menu des réglages détaillés".) Chaque pression change le mode ... 3. Procédez aux réglages requis. (à suivre) FRANÇAIS ITALIANO NEDERLANDS 16 - Pioneer DEH-P4300 | Owner's Manual - Page 62
glages détaillés Le tableau qui suit indique les fonctions correspondant aux diverses sources du menu des réglages détaillés. Ce tableau fournit Le syntoniseur ne possède pas de menu des réglages détaillés. 7 Lecteur de CD intégré Fonction (Indication affichée) Frappe du titre d'un disque (TITLE IN) - Pioneer DEH-P4300 | Owner's Manual - Page 63
. 1. Appuyez sur la touche FUNCTION puis choisissez le mode de BSM (BSM) grâce au menu des fonctions. 2. Mettez la mémoire des meilleures stations en service au moyen de la touche 5. Les fréquences des stations dont le signal reçu par le syntoniseur est puissant sont sauvegardées par les mémoires - Pioneer DEH-P4300 | Owner's Manual - Page 64
de CD intégré Répétition de la lecture (REPEAT) Dans le cas présent, la répétition de la lecture concerne une seule plage musicale. 1. Appuyez sur la touche FUNCTION puis choisissez le mode de répétition (REPEAT) grâce au menu des fonctions. 2. Mettez la répétition de la lecture en service, ou - Pioneer DEH-P4300 | Owner's Manual - Page 65
. 2. Mettez la lecture d'examen rapide des disques en service au moyen de la touche 5. 3. Lorsque se présente CD à chargeur".) Remarque: • Après avoir entré les titres de 48 titres, les données d'un nouveau disque écraseront le plus ancien titre. • Si l'installation comporte un lecteur de CD - Pioneer DEH-P4300 | Owner's Manual - Page 66
disque pendant la lecture répétée, le champ de la lecture répétée change sur le lecteur de CD à chargeur. • Si vous réalisez une recherche de plage âce au menu des fonctions. 2. Mettez la lecture au hasard, en service, ou hors service, au moyen des touches 5/∞. Après avoir choisi le champ de la - Pioneer DEH-P4300 | Owner's Manual - Page 67
chargeur, le lecteur s'intéresse aux 10 premières secondes de la la lecture d'examen rapide des disques en service au moyen de la touche 5. Après avoir des disques que contient le lecteur de CD à chargeur. 3. Lorsque se pré • La répétition d'une plage musicale change à la répétition d'un disque quand - Pioneer DEH-P4300 | Owner's Manual - Page 68
ITS (Programmation en temps réel) Lorsque l'installation comporte un lecteur de CD à chargeur, la fonction ITS vous permet de ITS (ITS-P) grâce au menu des fonctions. 2. Mettez la lecture ITS en service, ou hors service, au moyen des touches 5/∞. Après avoir choisi le champ de la lecture répétée - Pioneer DEH-P4300 | Owner's Manual - Page 69
ENGLISH FRANÇAIS DEUTSCH Pour effacer un numéro de plage musicale 1. Pendant la lecture ITS, choisissez la plage musicale qui ne doit plus faire partie du programme. 2. Grâce au menu des réglages détaillés, choisissez le mode de programmation en temps réel (ITS). (Reportez-vous à la page 16.) 3. - Pioneer DEH-P4300 | Owner's Manual - Page 70
Utilisation des lecteurs de CD à chargeur Titre d'un disque Frappe du titre d'un disque (TITLE la page 16.) Remarque: • Si vous écoutez un CD TEXT sur un lecteur de CD à chargeur compatible CD TEXT, vous ne pouvez pas faire usage de ce mode. • Un CD TEXT est un disque compact qui porte en outre des - Pioneer DEH-P4300 | Owner's Manual - Page 71
TEXT sur un lecteur de CD à chargeur compatible CD TEXT. (Reportez-vous à la page 28.) • Commutation de l'affichage du titre du disque avec la touche DISPLAY. Chaque pression sur la touche DISPLAY change les indications affichées, dans l'ordre suivant: Mode de lecture (Durée de lecture) = Titre du - Pioneer DEH-P4300 | Owner's Manual - Page 72
niveaux des graves pour donner un son plus étoffé. Mise en/hors service de la fonction (COMP/DBE) 1. Appuyez sur la touche FUNCTION puis DBE 1 =DBE 2 Remarque: • Vous pouvez utiliser ces fonctions pour les lecteurs de CD à chargeur qui en sont pourvus. Si le lecteur ne possède pas les fonctions - Pioneer DEH-P4300 | Owner's Manual - Page 73
ces fonctions lorsque vous écoutez un disque CD TEXT à l'aide d'un lecteur de CD à chargeur compatible CD TEXT. Affichage, ou non, du titre • Choisissez l'affichage convenable avec la touche DISPLAY. Chaque pression sur la touche DISPLAY change les indications affichées, dans l'ordre suivant - Pioneer DEH-P4300 | Owner's Manual - Page 74
-HI (avant 1-fort) = FRT1-LOW (avant 1-faible) = FRT2-HI (avant 2-fort) = FRT2-LOW (avant 2-faible) = CUSTOM (personnalisé) = SFEQ OFF (hors service) 2. Choisissez la position désirée. L (gauche) Ô C (centre) Ô R (droite) Remarque: • Si vous ajustez les graves ou les aigus, "CUSTOM" mémorise un mode - Pioneer DEH-P4300 | Owner's Manual - Page 75
courbe d'égalisation" à la page 33.) 7 CUSTOM 1 Une courbe "CUSTOM 1" séparée peut être créée pour chaque source. (Le lecteur de CD intégré et le lecteur de CD à changeur sont réglés automatiquement sur le même réglage d'ajustement de courbe d'égalisation.) Si vous réalisez un ajustement quand une - Pioneer DEH-P4300 | Owner's Manual - Page 76
de la sortie arrière" à la page 40.) 1. Grâce au menu des réglages sonores, choisissez le paramètre à régler. Chaque pression change le mode ... 2. Procédez aux réglages requis. 3. Abandonnez le menu des réglages sonores. Paramètres du menu des réglages sonores Le menu des réglages sonores permet - Pioneer DEH-P4300 | Owner's Manual - Page 77
. (Reportez-vous à la page 40.) • "FADER :0" est la réglage convenable si l'installation ne comportant que 2 haut-parleurs. Réglage de la courbe d'égalisation (EQ-LOW/EQ-MID/ une courbe d'égalisation autre que "CUSTOM 2", la courbe "CUSTOM 1" set mise à jour. FRANÇAIS ITALIANO NEDERLANDS 32 - Pioneer DEH-P4300 | Owner's Manual - Page 78
le facteur Q qui convient au moyen des touches 5/∞. 2N += 1N += 1W += 2W Remarque: • Si vous modifiez une courbe d'égalisation autre que "CUSTOM 2", la courbe "CUSTOM 1" set mise à jour. 33 - Pioneer DEH-P4300 | Owner's Manual - Page 79
qui convient au moyen des touches 2/3. 40 Ô 63 Ô 100 Ô 160 (Hz) 3. Accentuez ou atténuez le niveau des graves avec les touches 5/∞. L'affichage change de "+6" à "-6". Réglage des aigus (TRE) Vous pouvez ajuster la fréquence de coupure et le niveau des aigus. En mode "FRT1" et "FRT2", l'ajustement - Pioneer DEH-P4300 | Owner's Manual - Page 80
touches 2/3. LOW (graves) += MID (médium) += HI (aigus) Sortie vers le haut-parleur d'extrêmes graves (SUB.W) Si l'enceinte d'extrêmes graves est connectée, mettez en service la sortie de l'enceinte des extrêmes graves. Au moment de quitter l'usine, l'appareil est réglé de manière que la sortie vers - Pioneer DEH-P4300 | Owner's Manual - Page 81
vers le haut-parleur d'extrêmes graves que si cette sortie a été mise en service (ON) grâce au paramètre qui convient. Réglage du niveau de la source du signal en FM à celui d'une autre source (par exemple le lecteur de CD intégré). 2. Appuyez sur la touche AUDIO puis choisissez le mode de réglage - Pioneer DEH-P4300 | Owner's Manual - Page 82
pas la laisser tomber. 3. Rangez la face avant dans le coffret de protection (fourni avec le DEH-P4300) qui vous servira également à la transporter. Remarque: • Le coffret de protection n'est pas fourni avec le DEH-P43. Pose de la face avant • Replacez la face avant en la tenant droite par rapport - Pioneer DEH-P4300 | Owner's Manual - Page 83
de base de ce produit. 1. Mettez la source hors service. 2. Affichez le menu des réglages initiaux. Appuyez pendant 2 secondes 3. Choisissez le mode de fonctionnement désiré. Chaque pression change le mode ... 4. Procédez aux réglages requis. 5. Abandonnez le menu des réglages initiaux. Remarque - Pioneer DEH-P4300 | Owner's Manual - Page 84
, au moyen des touches 5/∞. Utilisation, ou non, de la source auxiliaire (AUX) Vous pouvez décider d'utiliser la source auxiliaire (AUX) reliée à cet appareil. Pour cela, vous devez mettre en service l'entrée AUX. 1. Appuyez sur la touche FUNCTION puis choisissez le mode de fonctionnement de l'entr - Pioneer DEH-P4300 | Owner's Manual - Page 85
, ou hors service, au moyen des touches 5/∞. Réglage de la sortie arrière (FRT+REAR) La sortie arrière (sortie par les câbles d'enceinte arrière et les prises RCA) de cet appareil peut être utilisée pour connecter des enceintes couvrant toute la gamme ("FRT+REAR") ou une enceinte d'extrêmes graves - Pioneer DEH-P4300 | Owner's Manual - Page 86
plus tard. Remarque: • Même quand les sources sont hors service, l'heure apparaît sur l'afficheur. Appuyer sur la touche CLOCK affiche et efface l'heure sur l'afficheur. Utilisation de l'entrée AUX Un connecteur RCA IP-BUS tel que CD-RB20 ou CD-RB10 (vendus séparément) vous permet de relier cet - Pioneer DEH-P4300 | Owner's Manual - Page 87
les précautions relatives aux disques CD-R avant d'utiliser de tels disques. • Essuyez soigneusement tout disque sale ou humide en dépla peut perturber le fonctionnement du lecteur. En ce cas, mettez le lecteur hors service pendant environ une heure et si le disque est humide, essuyez-la à l'aide - Pioneer DEH-P4300 | Owner's Manual - Page 88
qui se pose à vous, prenez contact avec le distributeur PIONEER ou un centre d'entretien agréé. Messages ERROR- 11, 12, 17, 30 ERROR- 11, 12, 17, 30 ERROR- 14 ERROR- 10, 11, 12, 14, 17, 30, A0 ERROR- 44 HEAT Causes possibles Disque sale. Disque rayé. Disque non enregistré. Anomalie électrique ou - Pioneer DEH-P4300 | Owner's Manual - Page 89
+3 dB (10 kHz) (Médium 10 dB (100 Hz), +6,5 dB (10 kHz) (Aigus 11 dB (100 Hz), +11 dB (10 kHz) (Niveau: -30 dB) Commandes de tonalité (Graves Fréquence: 40/ /80/125 Hz Pente 12 dB/octave Gain 12 dB Lecteur de CD Système Système audio disque compact Disques utilisables Disque compact Format du - Pioneer DEH-P4300 | Owner's Manual - Page 90
- Pioneer DEH-P4300 | Owner's Manual - Page 91
- Pioneer DEH-P4300 | Owner's Manual - Page 92
ELECTRONICS (USA) INC. P.O. Box 1760, Long Beach, California 90801, U.S.A. TEL: (800) 421-1404 PIONEER EUROPE NV Haven 1087, Keetberglaan 1, B-9120 Melsele, Belgium TEL: (0) 3/570.05.11 PIONEER ELECTRONICS AUSTRALIA PTY. LTD. 178-184 Boundary Road, Braeside, Victoria 3195, Australia TEL: (03) 9586
-
 1
1 -
 2
2 -
 3
3 -
 4
4 -
 5
5 -
 6
6 -
 7
7 -
8
-
9
-
10
-
11
-
12
-
13
-
14
-
15
-
16
-
17
-
18
-
19
-
20
-
21
-
22
-
23
-
24
-
25
-
26
-
27
-
28
-
29
-
30
-
31
-
32
-
33
-
34
-
35
-
36
-
37
-
38
-
39
-
40
-
41
-
42
-
43
-
44
-
45
-
46
-
47
-
48
-
49
-
50
-
51
-
52
-
53
-
54
-
55
-
56
-
57
-
58
-
59
-
60
-
61
-
62
-
63
-
64
-
65
-
66
-
67
-
68
-
69
-
70
-
71
-
72
-
73
-
74
-
75
-
76
-
77
-
78
-
79
-
80
-
81
-
82
-
83
-
84
-
85
-
86
-
87
-
88
-
89
-
90
-
91
-
92
 |
 |

Multi-CD control High power CD player
with FM/AM tuner
Syntoniseur FM/AM et lecteur de CD,“Puissance élevée”,
avec contrôleur pour lecteur de CD à chargeur
Operation Manual
DEH-P4300
DEH-P43
Mode d’emploi
ENGLISH
FRANÇAIS
DEUTSCH
FRANÇAIS
ITALIANO
NEDERLANDS