Pioneer DEH-P4300 Owner's Manual - Page 15
Corresponding Display Indications and Buttons, Entering the Function Menu
 |
View all Pioneer DEH-P4300 manuals
Add to My Manuals
Save this manual to your list of manuals |
Page 15 highlights
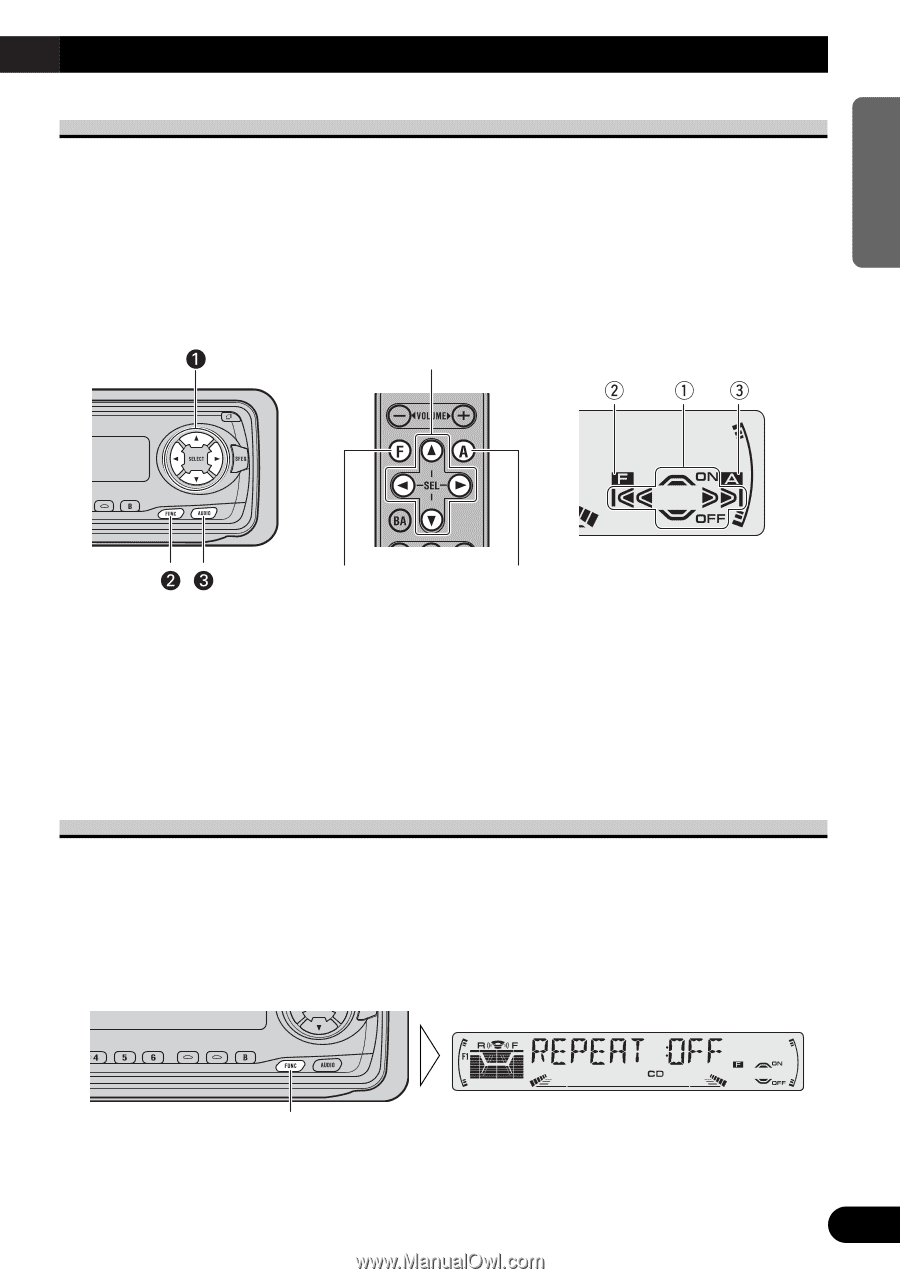
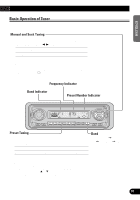
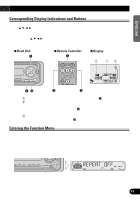
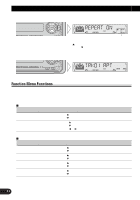
ENGLISH Corresponding Display Indications and Buttons This product's display features Key Guidance Indicators. These light to indicate which of the 5/∞/2/3, FUNCTION and AUDIO buttons you can use. When you're in the Function Menu (refer to next section), Detailed Setting Menu (refer to page 16), Initial Setting Menu (refer to page 38) or Audio Menu (refer to page 31), they also make it easy to see which 5/∞/2/3 buttons you can use to switch functions ON/OFF, switch repeat selections and perform other operations. Indicator and corresponding buttons are shown below. 7 Head Unit 7 Remote Controller z 7 Display ESPAÑOL DEUTSCH FRANÇAIS ITALIANO NEDERLANDS x c When 1 is lit in the display, perform appropriate operations with the z buttons. When 2 is lit in the display, it indicates that you are in the Function Menu, Detailed Setting Menu or Initial Setting Menu. You can switch between each of these menus and between different modes in the menus using button x on the head unit or remote con- troller. When 3 is lit in the display, it indicates you are in the Audio Menu. You can switch between modes in the Audio Menu using button c on the head unit or remote controller. Entering the Function Menu The Function Menu lets you operate simple functions for each source. Note: • After entering the Function Menu, if you do not perform an operation within about 30 seconds, the Function Menu is automatically canceled. 1. Select the desired mode in the Function Menu. (Refer to next section, "Function Menu Functions".) Each press changes the Mode ... Continued overleaf. 14
-
 1
1 -
2
-
3
-
4
-
5
-
6
-
7
-
8
-
9
-
 10
10 -
 11
11 -
 12
12 -
 13
13 -
 14
14 -
 15
15 -
 16
16 -
 17
17 -
 18
18 -
 19
19 -
 20
20 -
21
-
22
-
23
-
24
-
25
-
26
-
27
-
28
-
29
-
30
-
31
-
32
-
33
-
34
-
35
-
36
-
37
-
38
-
39
-
40
-
41
-
42
-
43
-
44
-
45
-
46
-
47
-
48
-
49
-
50
-
51
-
52
-
53
-
54
-
55
-
56
-
57
-
58
-
59
-
60
-
61
-
62
-
63
-
64
-
65
-
66
-
67
-
68
-
69
-
70
-
71
-
72
-
73
-
74
-
75
-
76
-
77
-
78
-
79
-
80
-
81
-
82
-
83
-
84
-
85
-
86
-
87
-
88
-
89
-
90
-
91
-
92
 |
 |