Pioneer DEH-P4900IB Owner's Manual - Page 8
s What, Operating this unit, Head unit, Remote control - cd player
 |
UPC - 012562845791
View all Pioneer DEH-P4900IB manuals
Add to My Manuals
Save this manual to your list of manuals |
Page 8 highlights
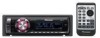
Section 02 Operating this unit What's What Head unit 1 AUDIO button Press to select various sound quality controls. 2 BAND button Press to select among three FM bands and one AM band and to cancel the control mode of functions. 3 a/b/c/d buttons Press to perform manual seek tuning, fast forward, reverse and track search controls. Also used for controlling functions. 4 OPEN button Press to open the front panel. 5 EQ button Press to select various equalizer curves. 6 SW button Press to directly select subwoofer setting menu. See Using subwoofer output on page 19. Press and hold to select bass boost setting menu. See Boosting the bass on page 20. 7 CLOCK button Press to change to the clock display. Press and hold to change the channel select mode when XM tuner or SIRIUS tuner is selected as the source. 8 1 to 6 buttons Press for preset tuning and disc number search when using a multi-CD player. 9 SOURCE button, VOLUME This unit is turned on by selecting a source. Press to cycle through all the available sources. Rotate it to increase or decrease the volume. a DISPLAY button Press to select different displays. b FUNCTION button Press to select functions. Remote control Operation is the same as when using the buttons on the head unit. See the explanation of the head unit about the operation of each button with the exception of ATT and PAUSE, which is explained below. c VOLUME buttons Press to increase or decrease the volume. 8 En
-
 1
1 -
2
-
 3
3 -
 4
4 -
 5
5 -
 6
6 -
 7
7 -
 8
8 -
 9
9 -
 10
10 -
 11
11 -
 12
12 -
 13
13 -
14
-
15
-
16
-
17
-
18
-
19
-
20
-
21
-
22
-
23
-
24
-
25
-
26
-
27
-
28
-
29
-
30
-
31
-
32
-
33
-
34
-
35
-
36
-
37
-
38
-
39
-
40
-
41
-
42
-
43
-
44
-
45
-
46
-
47
-
48
-
49
-
50
-
51
-
52
-
53
-
54
-
55
-
56
-
57
-
58
-
59
-
60
-
61
-
62
-
63
-
64
-
65
-
66
-
67
-
68
-
69
-
70
-
71
-
72
-
73
-
74
-
75
-
76
-
77
-
78
-
79
-
80
-
81
-
82
-
83
-
84
-
85
-
86
-
87
-
88
-
89
-
90
-
91
-
92
-
93
-
94
-
95
-
96
-
97
-
98
-
99
-
100
-
101
-
102
-
103
-
104
-
105
-
106
-
107
-
108
-
109
-
110
-
111
-
112
-
113
-
114
-
115
-
116
-
117
-
118
 |
 |
