Pioneer DEH-X7600S Owner's Manual - Page 6
Use and care of the remote, control, Frequently used menu, operations, HD Radio, Technology, Using - reviews
 |
View all Pioneer DEH-X7600S manuals
Add to My Manuals
Save this manual to your list of manuals |
Page 6 highlights
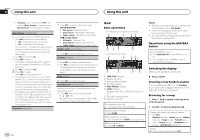
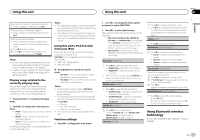
Section 02 Using this unit Using this unit Use and care of the remote control Using the remote control 1 Point the remote control in the direction of the front panel to operate. When using for the first time, pull out the film protruding from the tray. Replacing the battery 1 Slide the tray out on the back of the remote control. 2 Insert the battery with the plus (+) and minus (-) poles aligned properly. ! When disposing of used batteries, comply with governmental regulations or environmental public institutions' rules that apply in your country/area. ! "Perchlorate Material - special handling may apply. See www.dtsc.ca.gov/hazardouswaste/ perchlorate. (Applicable to California, U.S.A.)" Important ! Do not store the remote control in high temperatures or direct sunlight. ! The remote control may not function properly in direct sunlight. ! Do not let the remote control fall onto the floor, where it may become jammed under the brake or accelerator pedal. WARNING ! Keep the battery out of the reach of children. Should the battery be swallowed, consult a doctor immediately. ! Batteries (battery pack or batteries installed) must not be exposed to excessive heat such as sunshine, fire or the like. CAUTION ! Remove the battery if the remote control is not used for a month or longer. ! There is a danger of explosion if the battery is incorrectly replaced. Replace only with the same or equivalent type. ! Do not handle the battery with metallic tools. ! Do not store the battery with metallic objects. ! If the battery leaks, wipe the remote control completely clean and install a new battery. Frequently used menu operations Returning to the previous display Returning to the previous list/category (the folder/ category one level higher) 1 Press /DISP. Returning to the ordinary display 1 Press BAND/ . Returning to the ordinary display from the list/category 1 Press BAND/ . Selecting a function or list 1 Turn M.C. or LEVER. ! In this manual, "Turn M.C." is used to describe the operation used to select a function or list. HD Radioä Technology Only for DEH-X9600BHS, DEH-X8600BH and DEHX7600HD 6 En About HD Radioä stations HD Radioä stations offer high-quality audio and data services. HD Radio stations are brought to you by local FM/AM stations. HD Radio stations feature the following: ! High quality audio ! FM multicasting ! Data services iTunesâ Tagging provides you the opportunity to discover a wide range of content tent for later review and and the means purchase from tthoe"tiaTugn" ethsâat conStore. HD Radioä Technology HD Radio Technology manufactured under license from iBiquity Digital Corporation. U.S. and Foreign Patents. HD Radioä and the HD, HD Radio, and "Arc" logos are proprietary trademarks of iBiquity Digital Corp. Basic operations 1 2 3 4 56 78 9 a b Program Service Data: Contributes to the superior user experience of HD Radio Technology. Presents song name, artist, station IDs, HD2/HD3 Channel Guide, and other relevant data streams. Adjacent to traditional main stations are extra local FM channels. These HD2/HD3 Channels provide new, original music as well as deep cuts into traditional genre. 1 TAG indicator 2 Tags transferring indicator 3 Signal reception status indicator When digital signal is received, is dis- played. Otherwise, is displayed. 4 Band indicator 5 Channel indicator 6 5 (stereo) indicator 7 Preset number indicator 8 LOC indicator Appears when local seek tuning is on. 9 Signal level indicator a Program service name b Frequency indicator Digital, CD-quality sound. HD Radio Technology enables local radio stations to broadcast a clean digital signal. AM sounds like today's FM and FM sounds like a CD.
-
 1
1 -
 2
2 -
 3
3 -
 4
4 -
 5
5 -
 6
6 -
 7
7 -
 8
8 -
 9
9 -
 10
10 -
 11
11 -
 12
12 -
13
-
14
-
15
-
16
-
17
-
18
-
19
-
20
-
21
-
22
-
23
-
24
-
25
-
26
-
27
-
28
-
29
-
30
-
31
-
32
-
33
-
34
-
35
-
36
-
37
-
38
-
39
-
40
-
41
-
42
-
43
-
44
-
45
-
46
-
47
-
48
-
49
-
50
-
51
-
52
-
53
-
54
-
55
-
56
-
57
-
58
-
59
-
60
-
61
-
62
-
63
-
64
-
65
-
66
-
67
-
68
-
69
-
70
-
71
-
72
-
73
-
74
-
75
-
76
-
77
-
78
-
79
-
80
-
81
-
82
-
83
-
84
-
85
-
86
-
87
-
88
-
89
-
90
-
91
-
92
-
93
-
94
-
95
-
96
-
97
-
98
-
99
-
100
-
101
-
102
-
103
-
104
-
105
-
106
-
107
-
108
-
109
-
110
-
111
-
112
 |
 |
